apijam
Lab 3 - Manage tiered API Product subscription through API call quotas
Duration : 15 mins
Persona : API Product Team & API Dev Team
Use Case
API tiering is a new look at API as a Product. With tiering you provide the base level (e.g. bronze) as a free option. This offer is an entry point to leverage your data offering with a potential upsell to premium API Products. The goal is to upsell to additional functional levels. This term is also known as “freemium”. The basic approach is as follows – offer basic functions or call quotas as an entry level and if more data access or more functionality is required, offer these options for a fee. This gives developers the chance to have a working prototype and explore your API in a real life scenario before making an informed purchase decision.
How can Apigee help
Apigee offers the concept of API Products abstracted from the functional logic of API proxies. The proxies can access and enforce the limits defined in API Products. This way the API product team can focus on the business model (e.g. establishing usage quotas and entitled API operations on a per API Product basis) while the API development team works with these values to implement the parametrized behaviour.
Pre-requisites
Pre-reqs are met if you have completed Lab 1 and Lab 2.
The minimum for this lab is to have a deployed API proxy with a “Verify API Key” policy and a Developer for whom we can register an App that subscribes to our API product.
Instructions
In this lab we will create different API products that bundle the same API Proxy but with different quotas attached to it.
Create API Products (Bronze, Silver, Gold)
-
Go to https://apigee.com/edge and log in. This is the Edge management UI
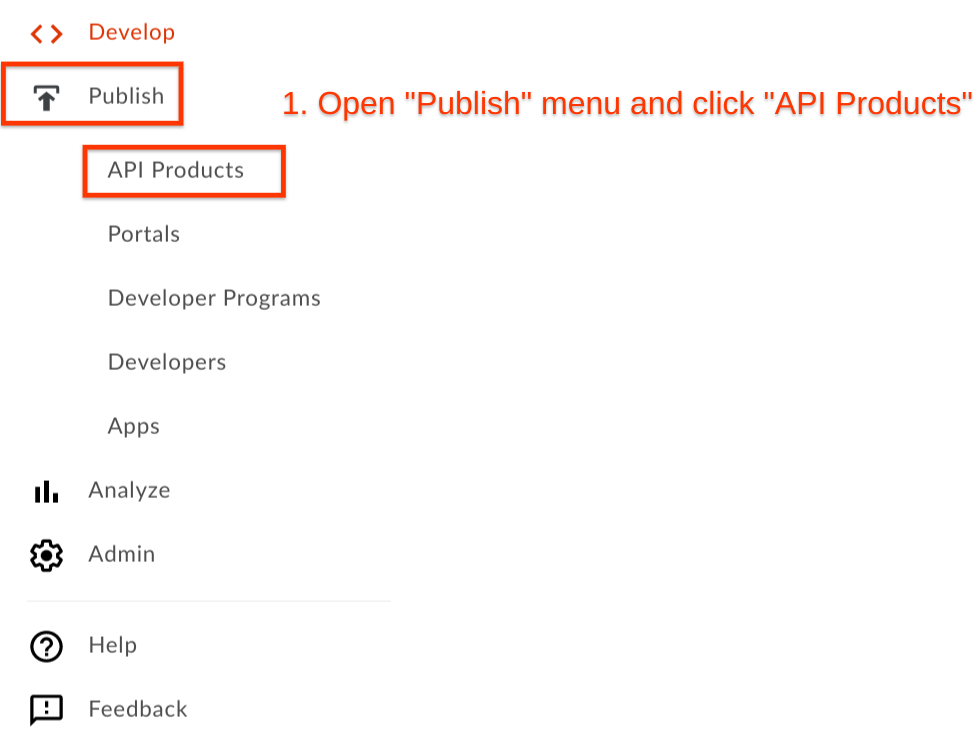
-
Select Publish → API Products
-
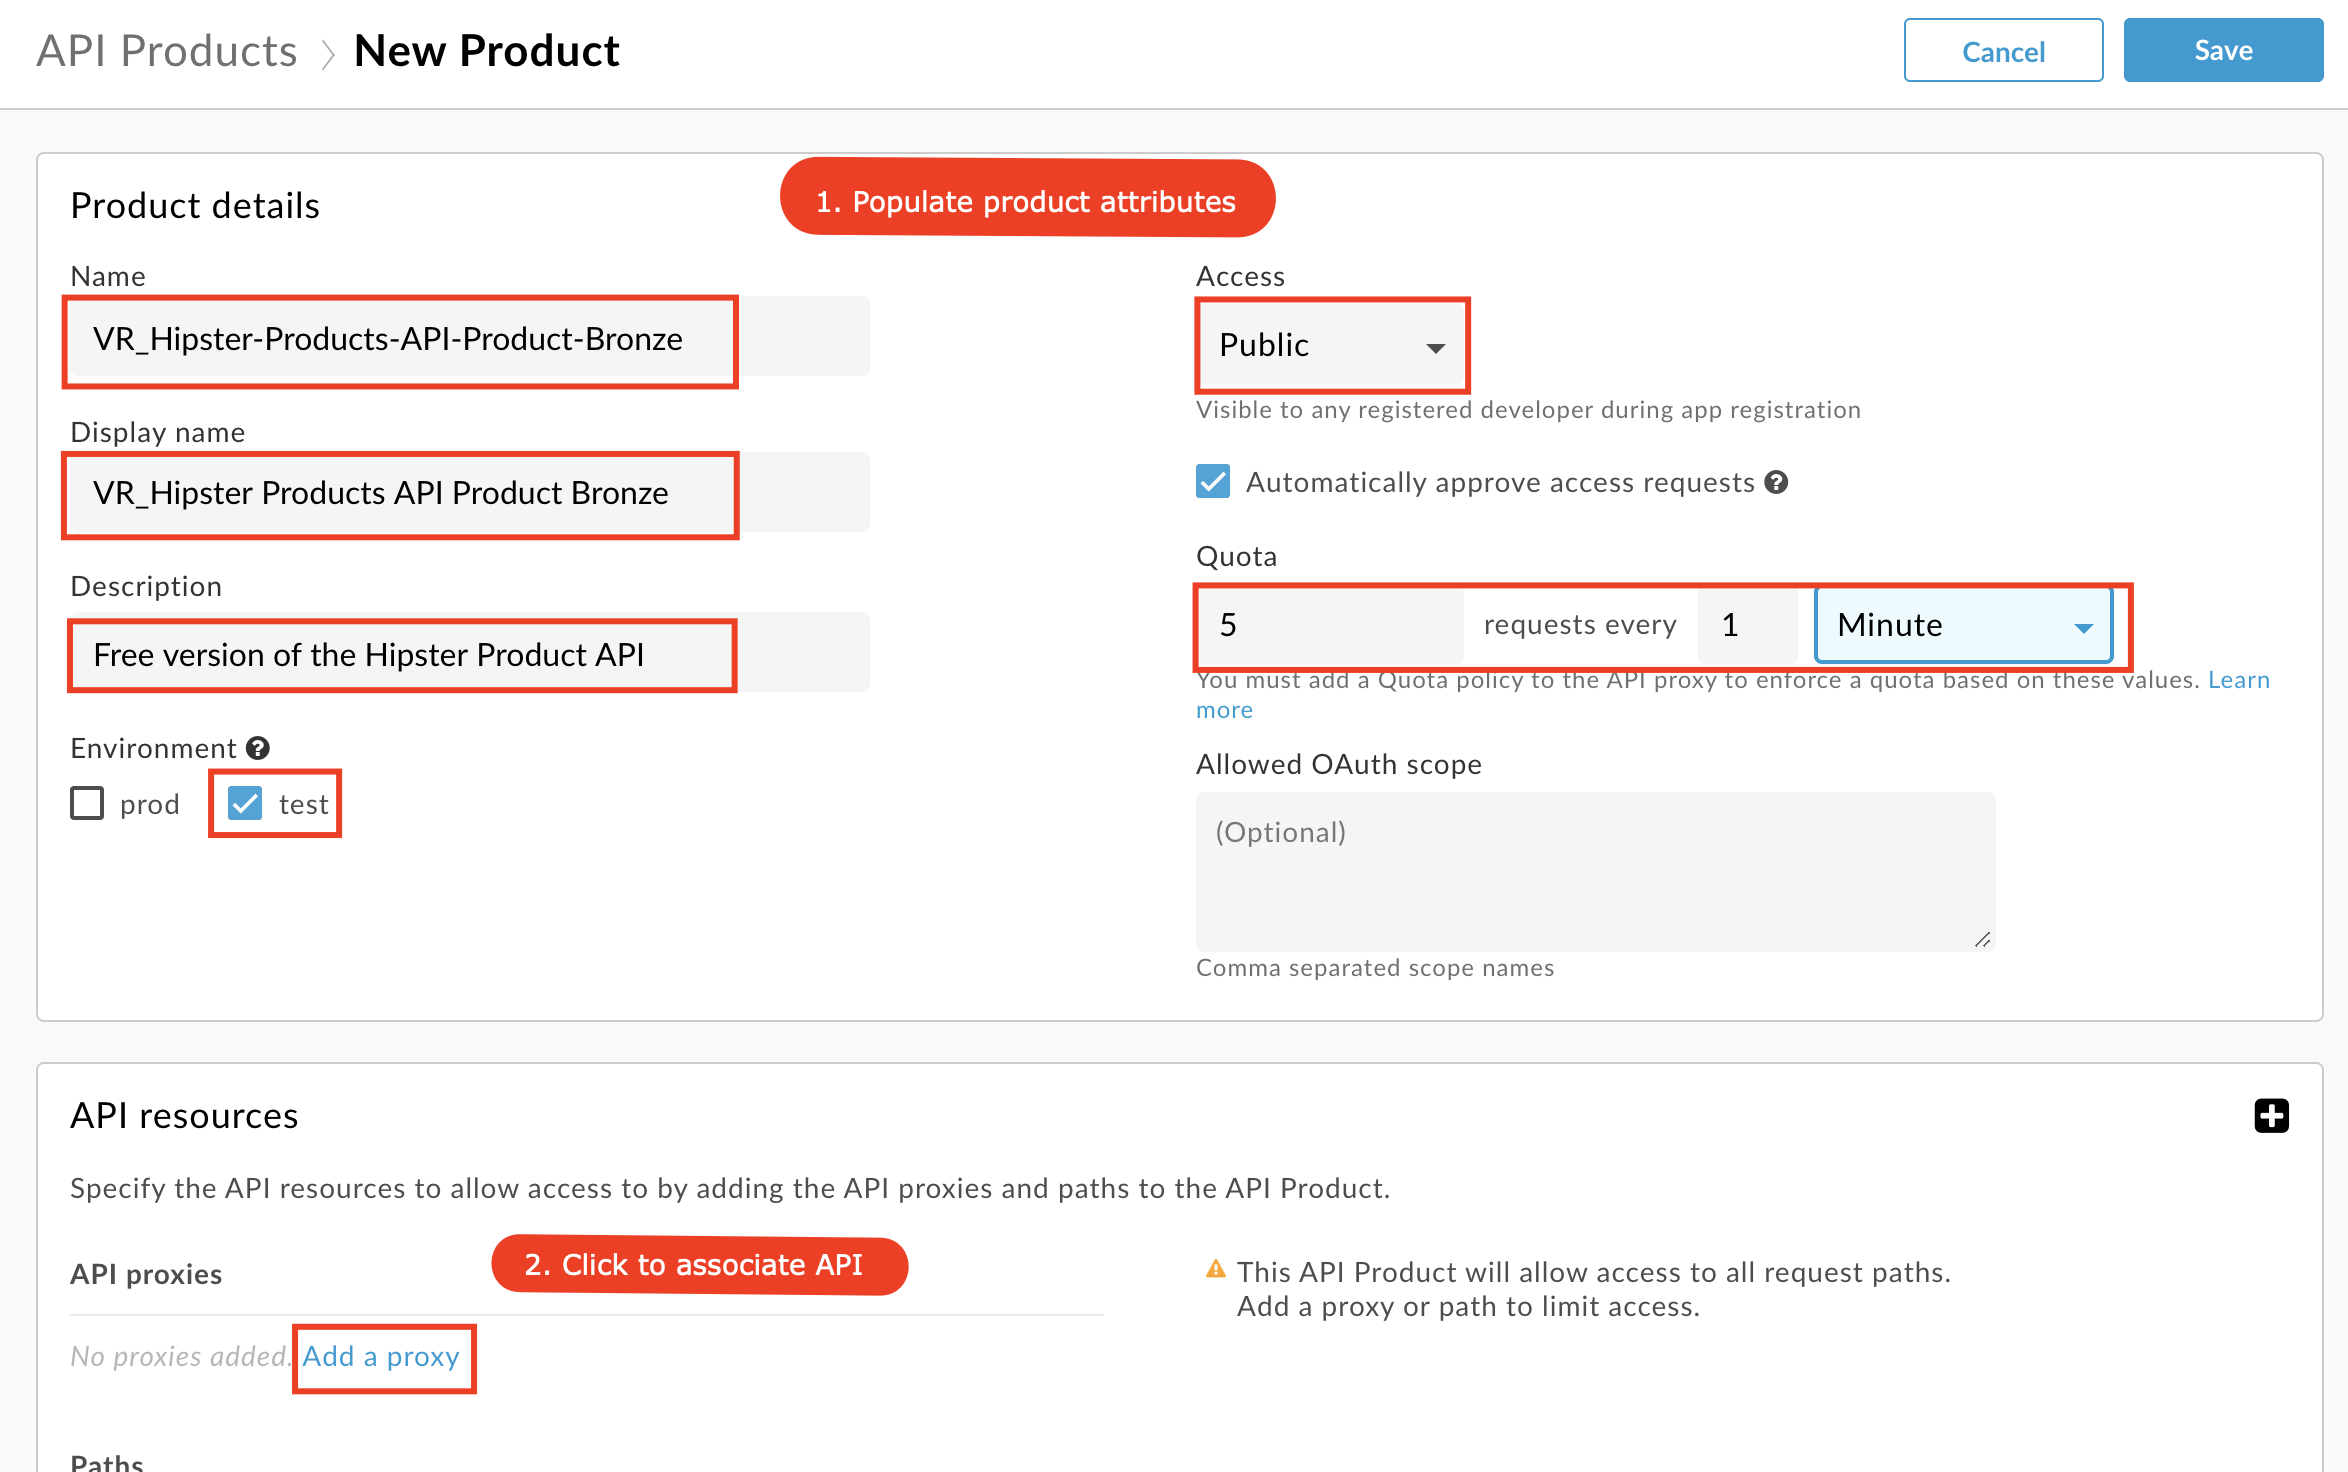
Click +API Product

-
Populate the following fields
-
Section: Product details
-
Name: {yourInitials}_Hipster-Products-API-Product-Bronze
-
Display name: {yourInitials}_Hipster Products API Product Bronze
-
Description: Free version of the Hipster Product API
-
Environment: test
-
Access: Public
-
Quota: 5 requests every 1 Minute
-
-
Section: API resources
- Click the Add a proxy link
-
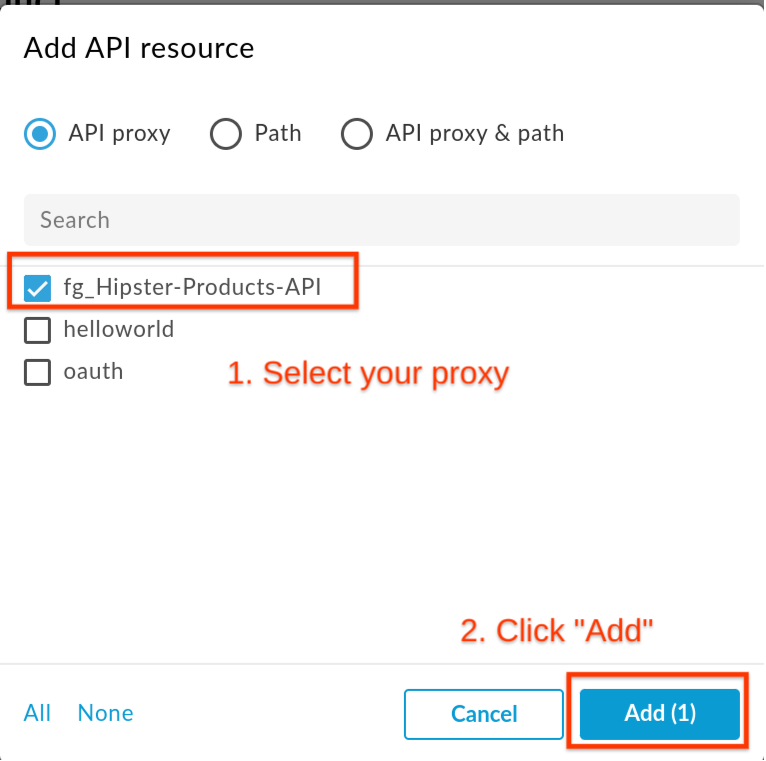
- Select {yourInitials}_Hipster-Products-API Proxy and click Add
API products have a set of fields called “Quota” that allow you to configure how many requests per number of time periods (e.g. 5 requests per 1 [minute/hour/day/month]) you want to allow. Just configuring this does NOT enforce quotas though! Think of these fields as metadata that the Quota Policy (enforcement point) can dynamically reference when enforcing the policy.
- Click Save to create the API Product
We now create 2 similar products that represent our Silver and Gold Products with different Quota settings. To create another API Product just follow these steps:
-
Click Publish → API Products
-
Click +API Product
-
For the Silver Product populate the following fields
-
Section: Product details
-
Name: {yourInitials}_Hipster-Products-API-Product-Silver
-
Display name: {yourInitials}_Hipster Products API Product Silver
-
Description: Basic version of the Hipster Product API
-
Environment: test
-
Access: Public
-
Quota: 20 requests every 1 Minute
-
-
Section: API resources
-
Click the Add a proxy link
-
Select {yourInitials}_Hipster-Products-API Proxy and click Add
-
-
-
For the Gold Product populate the following fields
-
Section: Product details
-
Name: {yourInitials}_Hipster-Products-API-Product-Gold
-
Display name: {yourInitials}_Hipster Products API Product Gold
-
Description: Deluxe version of the Hipster Product API
-
Environment: test
-
Access: Public
-
Quota: 1000 requests every 1 Minute
-
-
Section: API resources
-
Click the Add a proxy link
-
Select {yourInitials}_Hipster-Products-API Proxy and click Add
-
-
Now we should end up with 3 API Products resembling our Product tier strategy.

Create an App for our Products
-
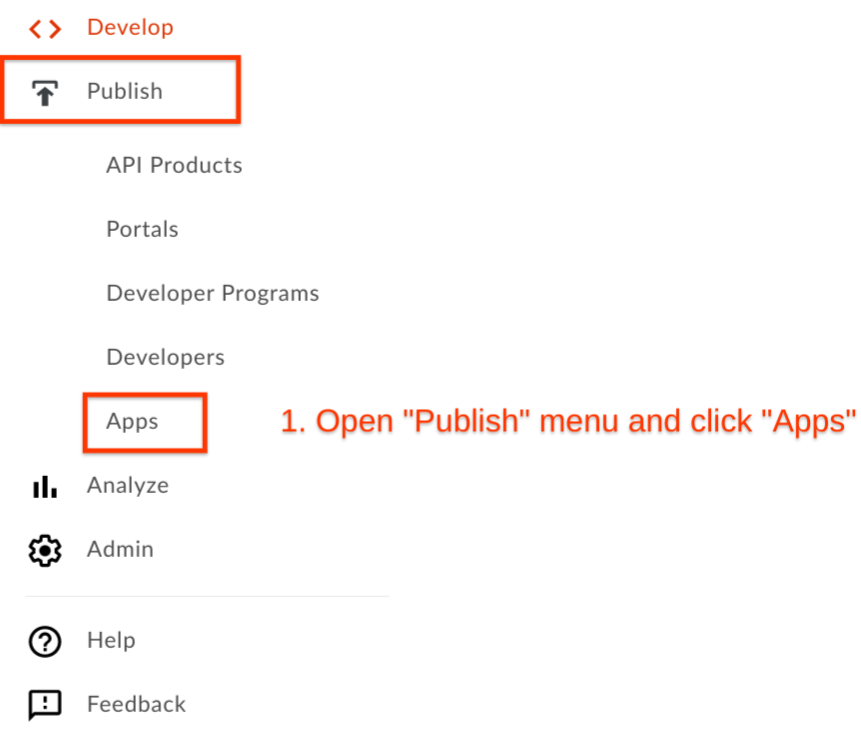
Select Publish → Apps
-
Click +API Product

-
Populate the following fields
-
Section: App Details
-
Name: {yourInitials}_Hipster Android App Free
-
Display name: {yourInitials}_Hipster Android App Free
-
Developer: Chose any existing Developer
-
-
Section: Credentials
- Click Add product
-
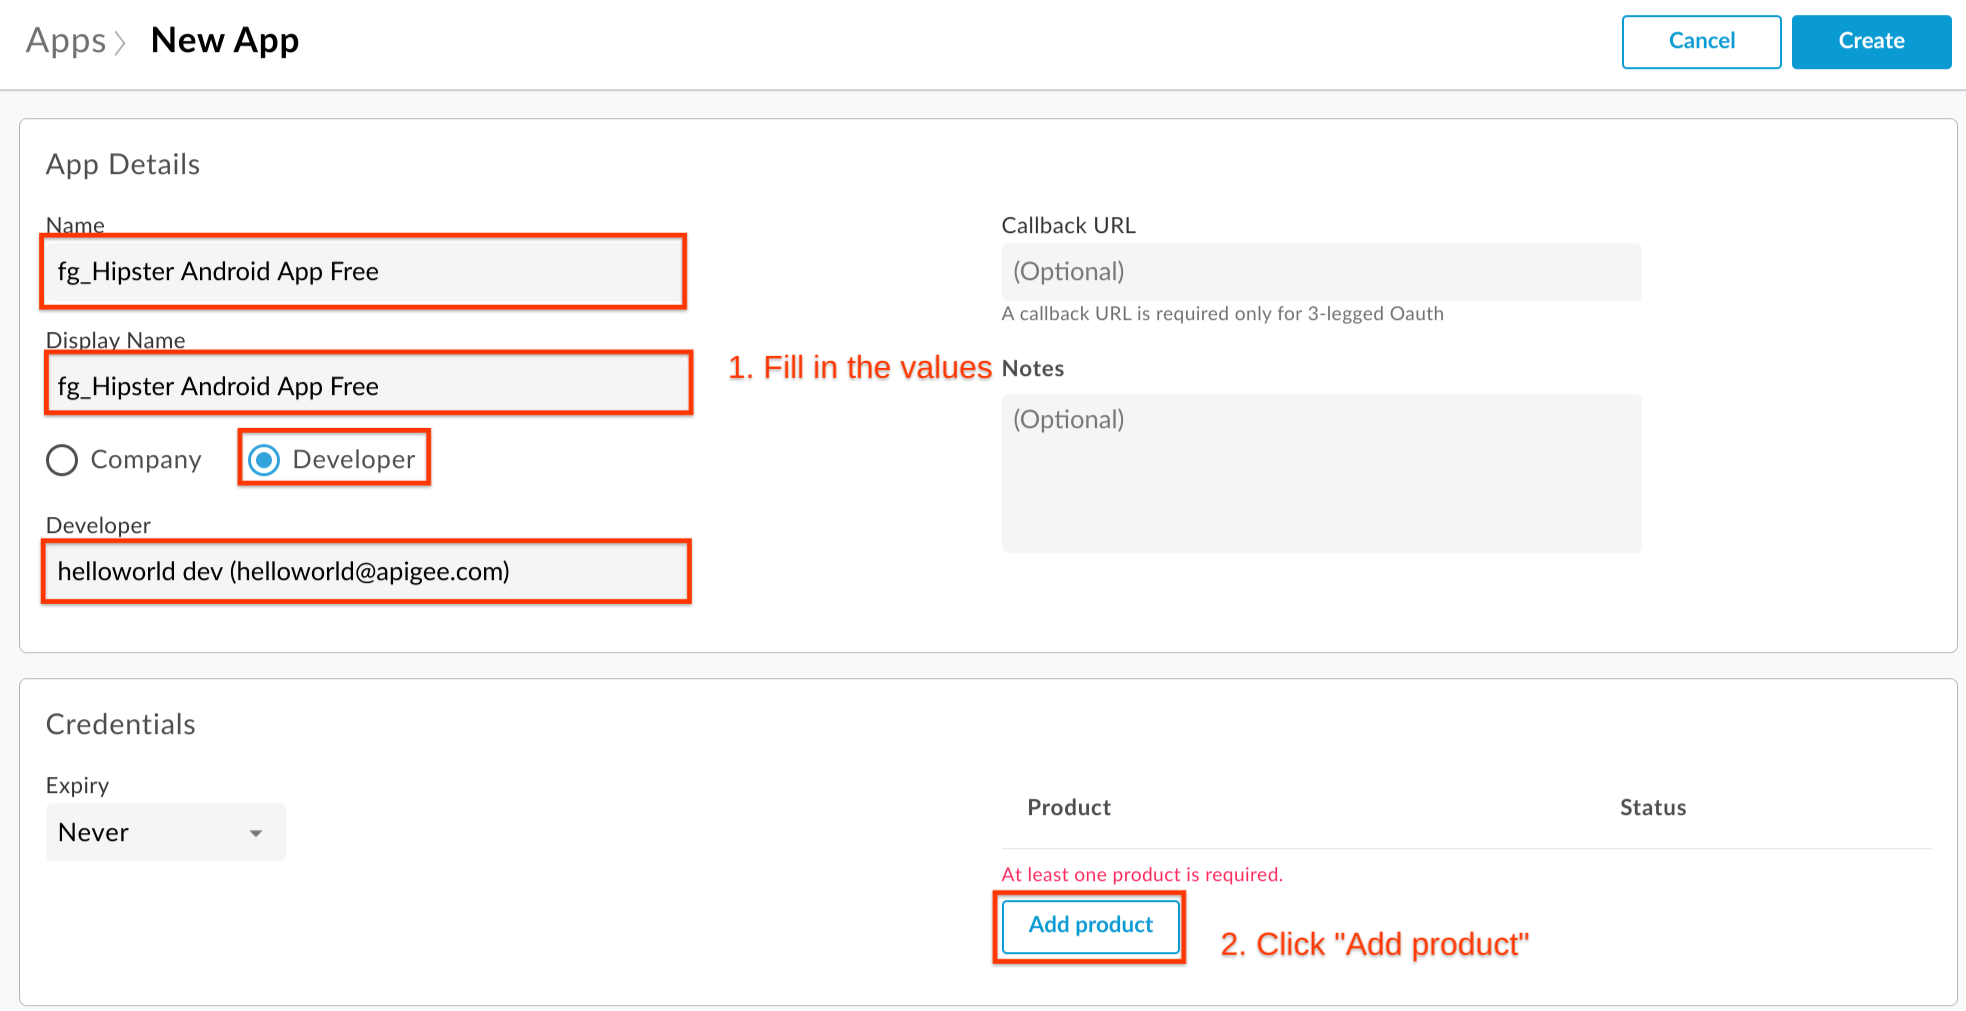
- Select Hipster Product API Product Bronze and click Add
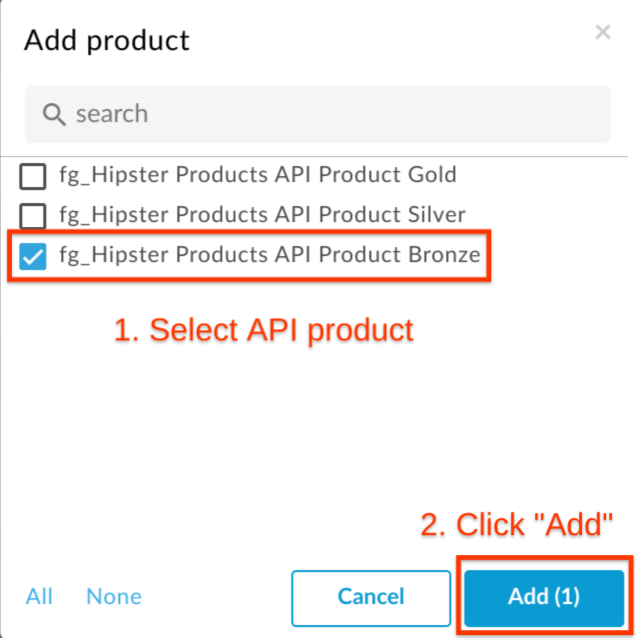
-
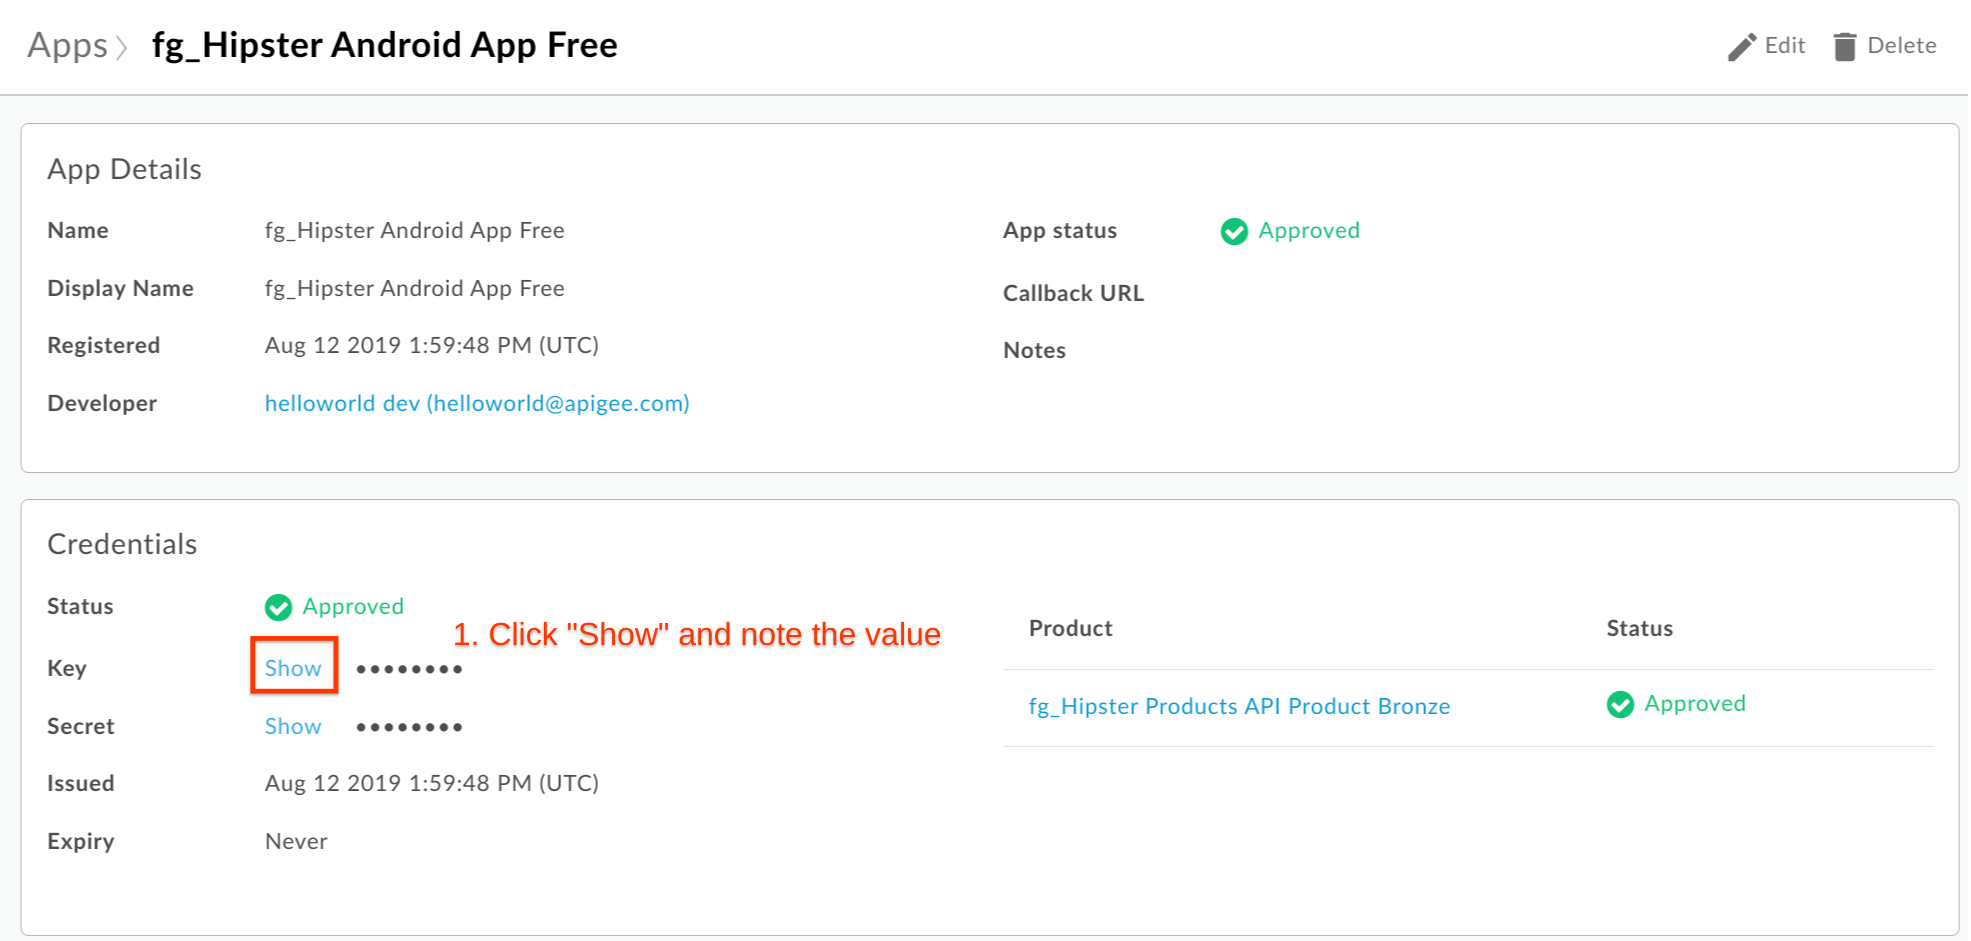
Click Create to create the App
-
Note down the Key for later by clicking on “Show” in the App properties.
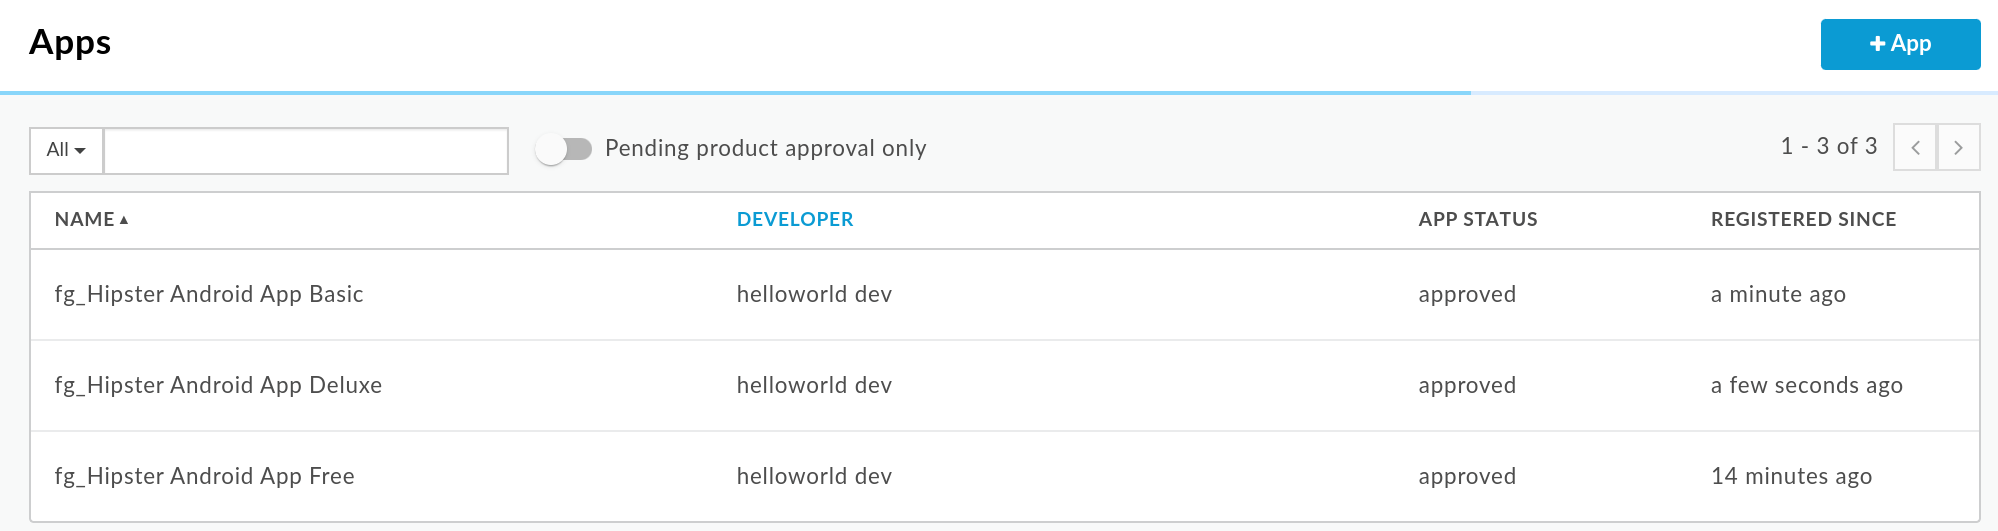
Repeat the process for the Apps that use the Silver and Gold tier as well, with using these values:
-
App using the Silver API Product
-
Section: App Details
-
Name: {yourInitials}_Hipster Android App Basic
-
Display name: {yourInitials}_Hipster Android App Basic
-
Developer: Chose any existing Developer
-
-
Section: Credentials
-
Click Add product
-
Select Hipster Product API Product Silver and click Add
-
-
-
App using the Gold API Product
-
Section: App Details
-
Name: {yourInitials}_Hipster Android App Deluxe
-
Display name: {yourInitials}_Hipster Android App Deluxe
-
Developer: Chose any existing Developer
-
-
Section: Credentials
-
Click Add product
-
Select Hipster Product API Product Gold and click Add
-
-
You should end up with three Apps with three different API keys, that you have noted down. Each App’s API key will have an associated secret that will be used if you are implementing OAuth.
Create and Configure Quota Policy
As stated, quotas are only enforced by adding a Quota Policy into your API Proxy. With the configuration of the Quota fields in the API Product, when an API call is made that presents a valid API key, Apigee will automatically fetch the associated API Product’s metadata (including the Quota fields), which become available to be dynamically referenced by a quota (or any other) policy.
-
Click on Develop → API Proxies from side navigation menu. Open the existing API Proxy from the prerequisites.
-
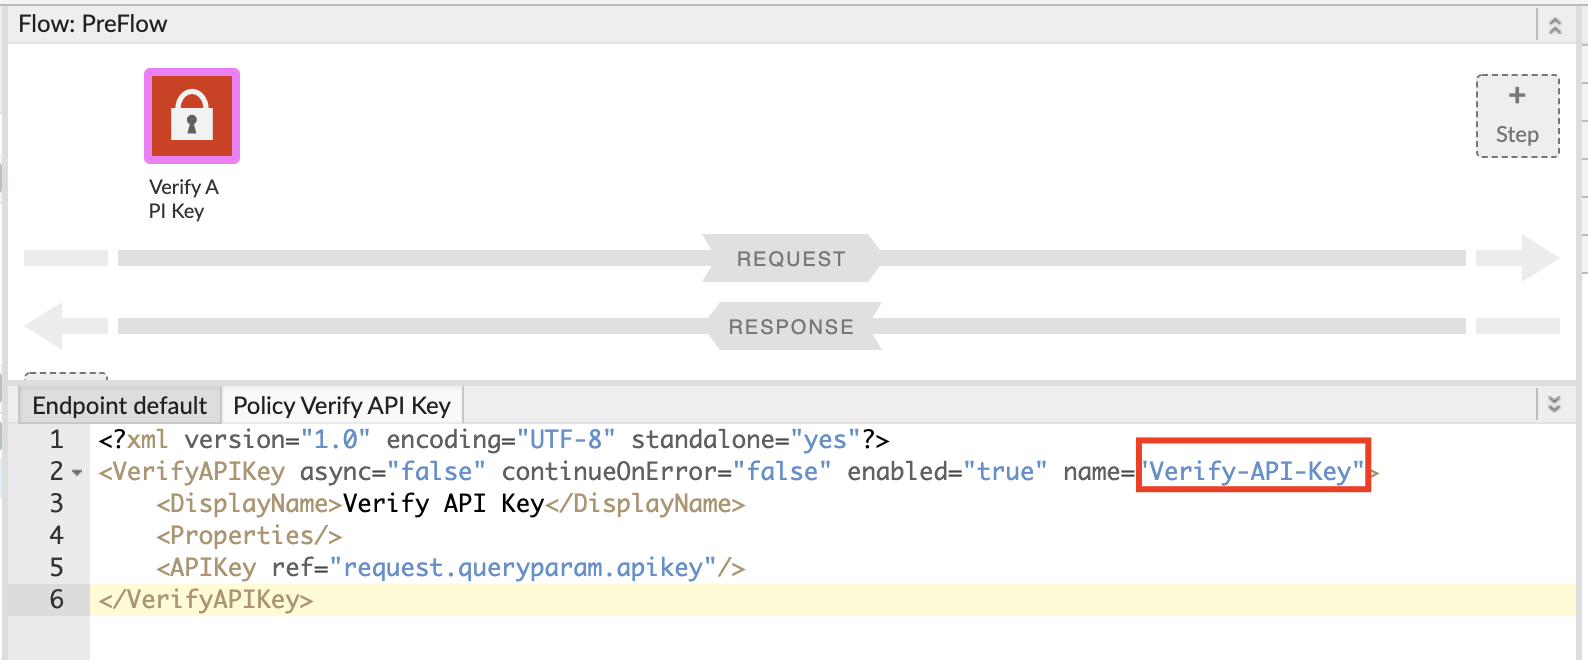
Verify that the policy for Verify API Key exists with the proper name. Click on the Policy Name and look at the XML configuration below.
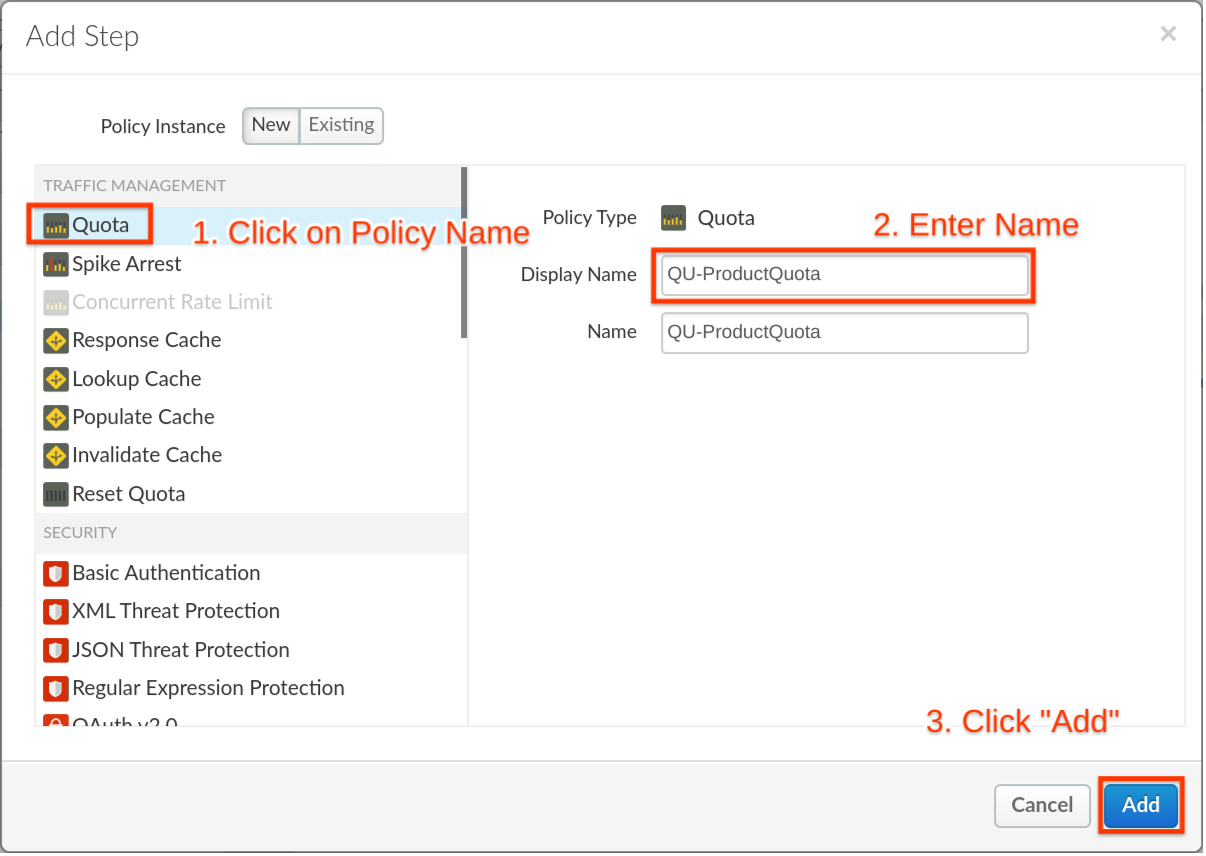
- Click PreFlow and + Step to add a new policy

-
Click Quota Policy and Populate the following fields
- Display Name: QU-ProductQuota
Click Add to add the policy to your flow.
- With the VerifyAPIKey policy that we have configured in our prerequisites Verify-API-Key, the following variables are populated after verification of an API key that has an API product with the quota fields set as 3 requests per 1 second:
- verifyapikey.Verify-API-Key.apiproduct.developer.quota.limit = 3
- verifyapikey.Verify-API-Key.apiproduct.developer.quota.interval = 1
- verifyapikey.Verify-API-Key.apiproduct.developer.quota.timeunit = second
Important note about variable naming : the variables that Apigee creates to hold the metadata include, as part of the variable name, the policy that was used to verify the API Key which in this example is “Verify-API-Key”. If you named your policy “check_the_api_key”, you would find the “limit” in the runtime context variable: verifyapikey.check_the_api_key.apiproduct.developer.quota.limit
The next step then is to set the QU-ProductQuota Quota policy to reference these variables and use this code in the Policy Configuration
<?xml version="1.0" encoding="UTF-8" standalone="yes"?>
<Quota async="false" continueOnError="false" enabled="true" name="QU-ProductQuota" type="calendar">
    <DisplayName>QU-ProductQuota</DisplayName>
    <Allow count="3" countRef="verifyapikey.Verify-API-Key.apiproduct.developer.quota.limit"/>
    <Interval ref="verifyapikey.Verify-API-Key.apiproduct.developer.quota.interval">1</Interval>
    <TimeUnit ref="verifyapikey.Verify-API-Key.apiproduct.developer.quota.timeunit">minute</TimeUnit>
    <Identifier ref='verifyapikey.Verify-API-Key.client_id'/>
    <Distributed>true</Distributed>
    <Synchronous>true</Synchronous>
    <StartTime>2019-01-01 12:00:00</StartTime>
</Quota>
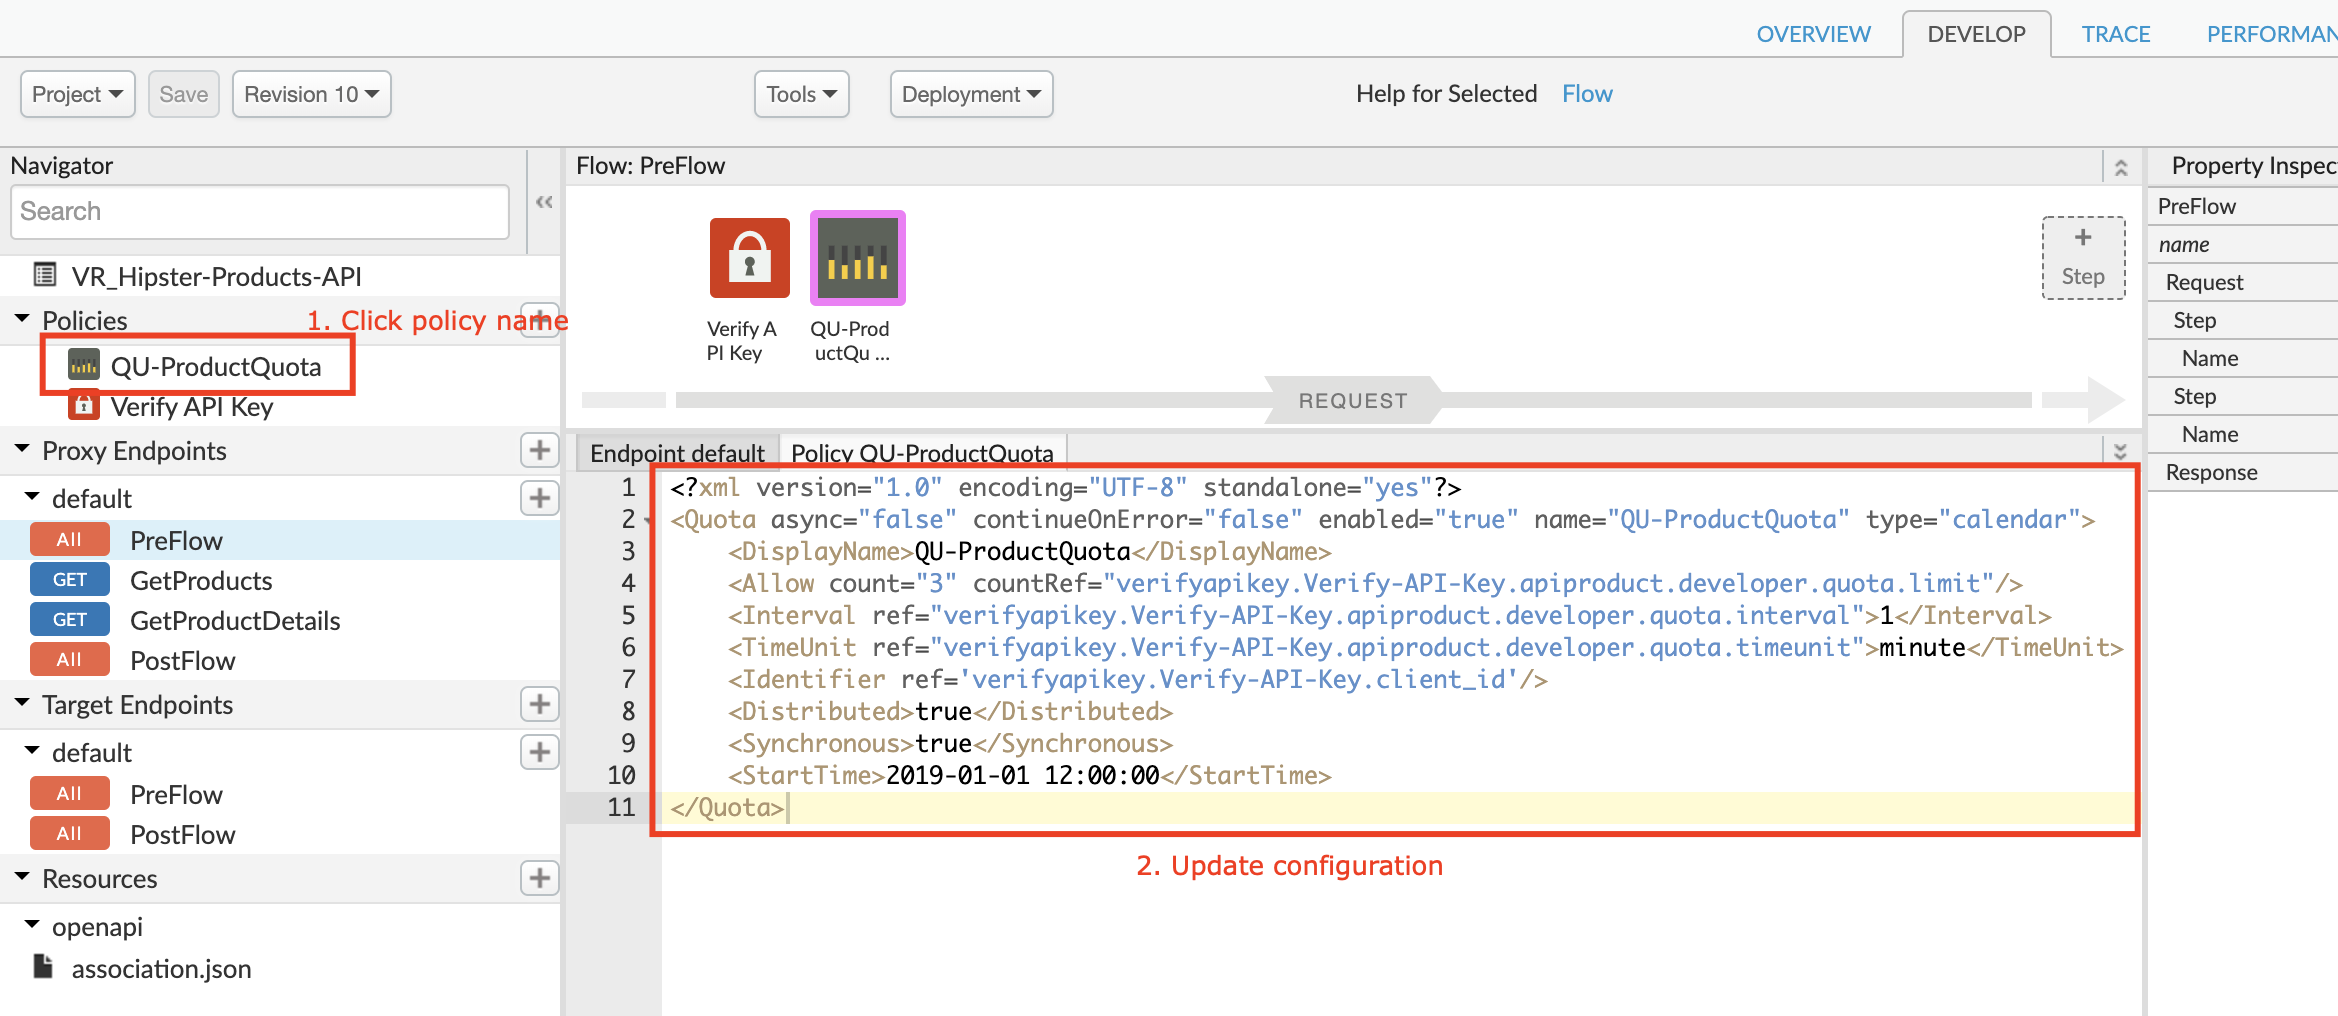
Note: If the field is not set in the API product, this would allow a default of 3 calls per minute
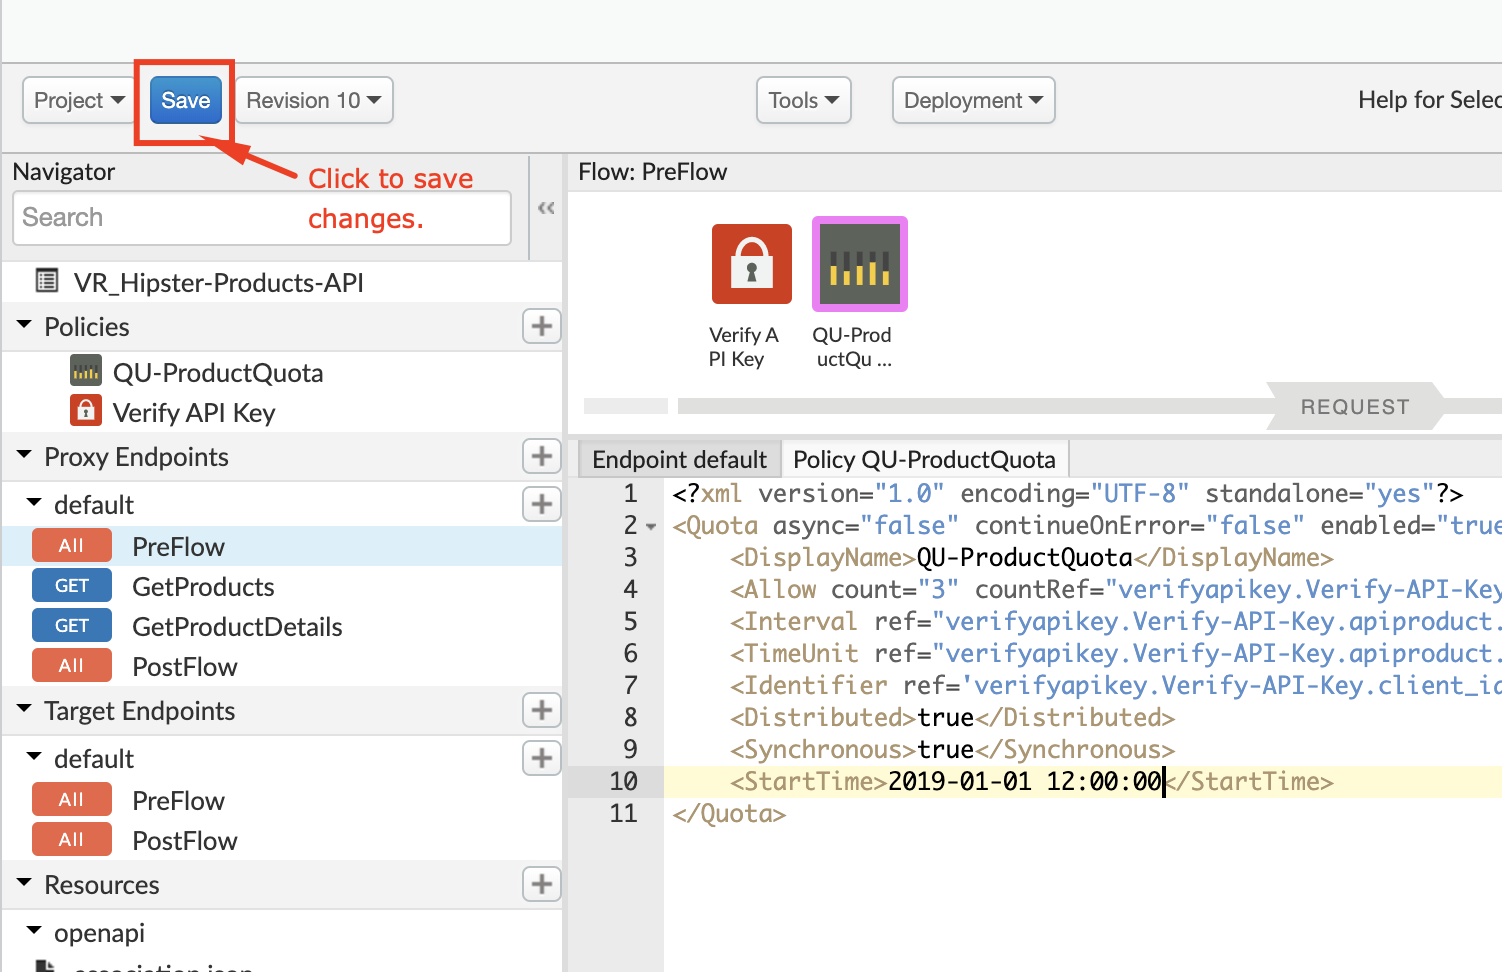
- Click on Save after you have changed the policy in the previous step
Test the results
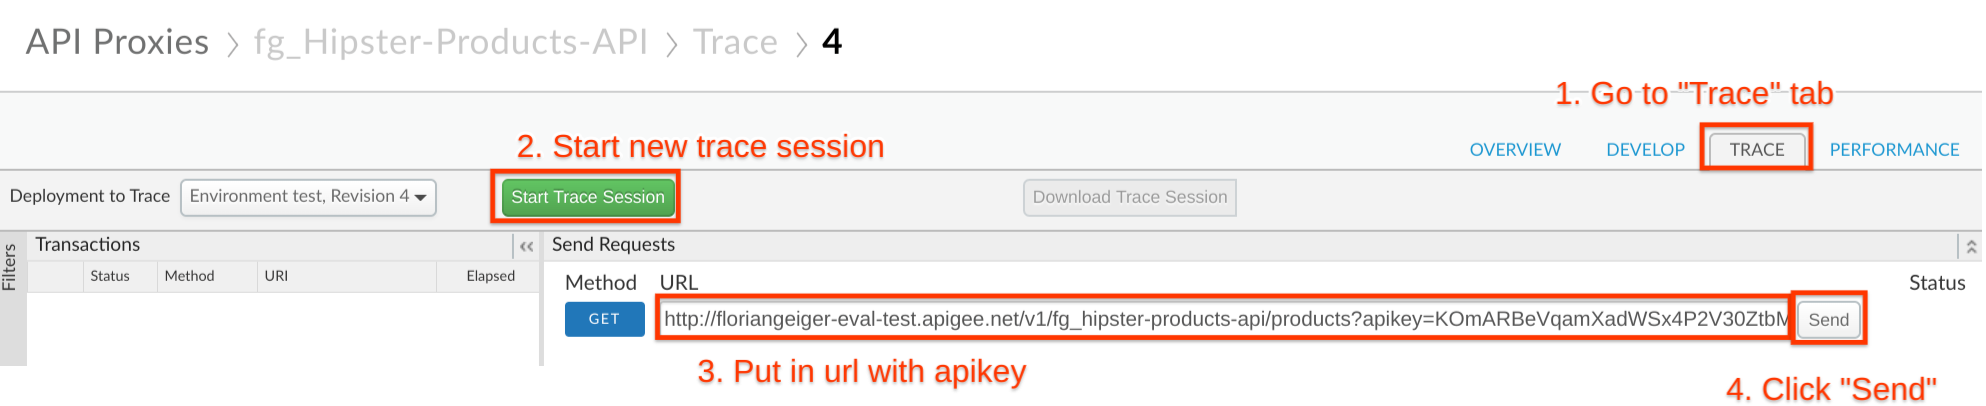
Go to the API proxy and enter the trace tab so we can run some tests:
-
Click Trace
-
Click Start Trace Session
-
Add the Bronze apikey value as a query parameter to the URL (e.g.: http://{yourapigeeorg}-test.apigee.net/v1/{yourInitials}_hipster-products-api/products?apikey=GYuZekimsQ2TLdWWMHkqB1poAquHaGsv
-
Run a test by clicking the Send button multiple times
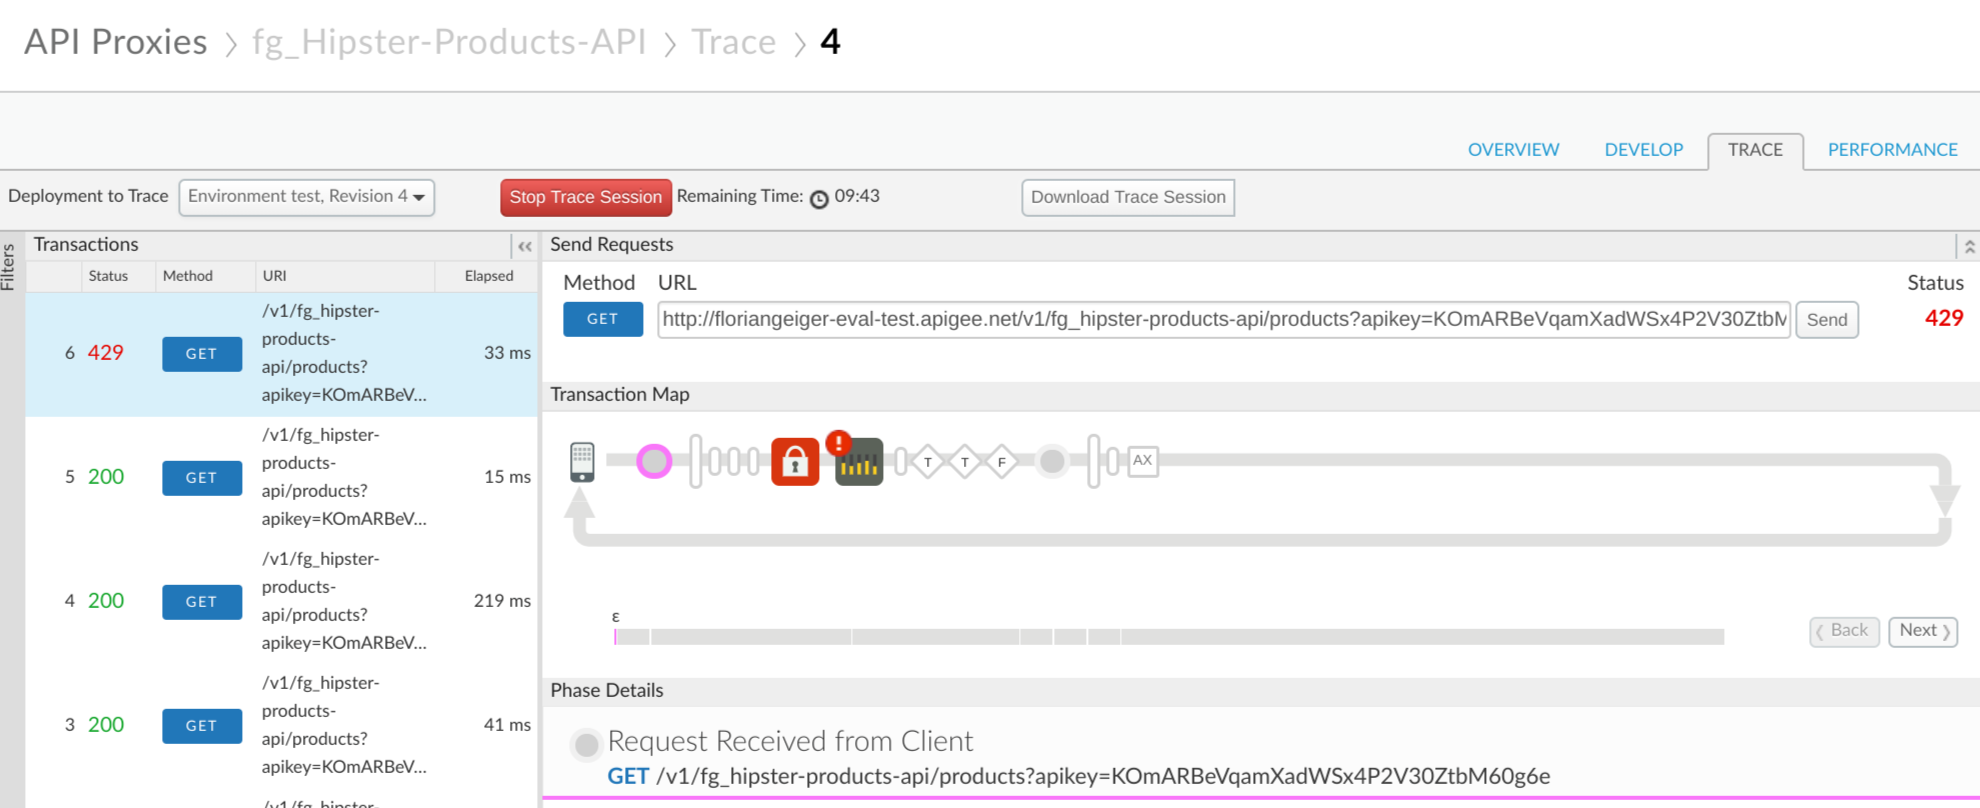
- After 6 calls we see that our free quota of 5 calls is exceeded and the quota policy shows a red exclamation mark sign
Now we switch API products and add the Silver apikey value from our App as a query parameter to the URL (e.g.: http://{yourapigeeorg}-test.apigee.net/v1/{yourInitials}_hipster-products-api/products?apikey=GYuZekimsQ2TLdWWMHkqB1poAquHaGsv
-
Change your apikey parameter to match your Silver App credentials
-
Run a test by clicking the Send button around 15 times before clicking Start Trace Session
-
Start the trace session and click the Send button a couple of times again before reaching your limit.
Let’s check out the trace result:
-
Click on one of the successful trace results on the left (indicated by a green Status with 200)
-
Click the quota policy icon in the Transaction Map
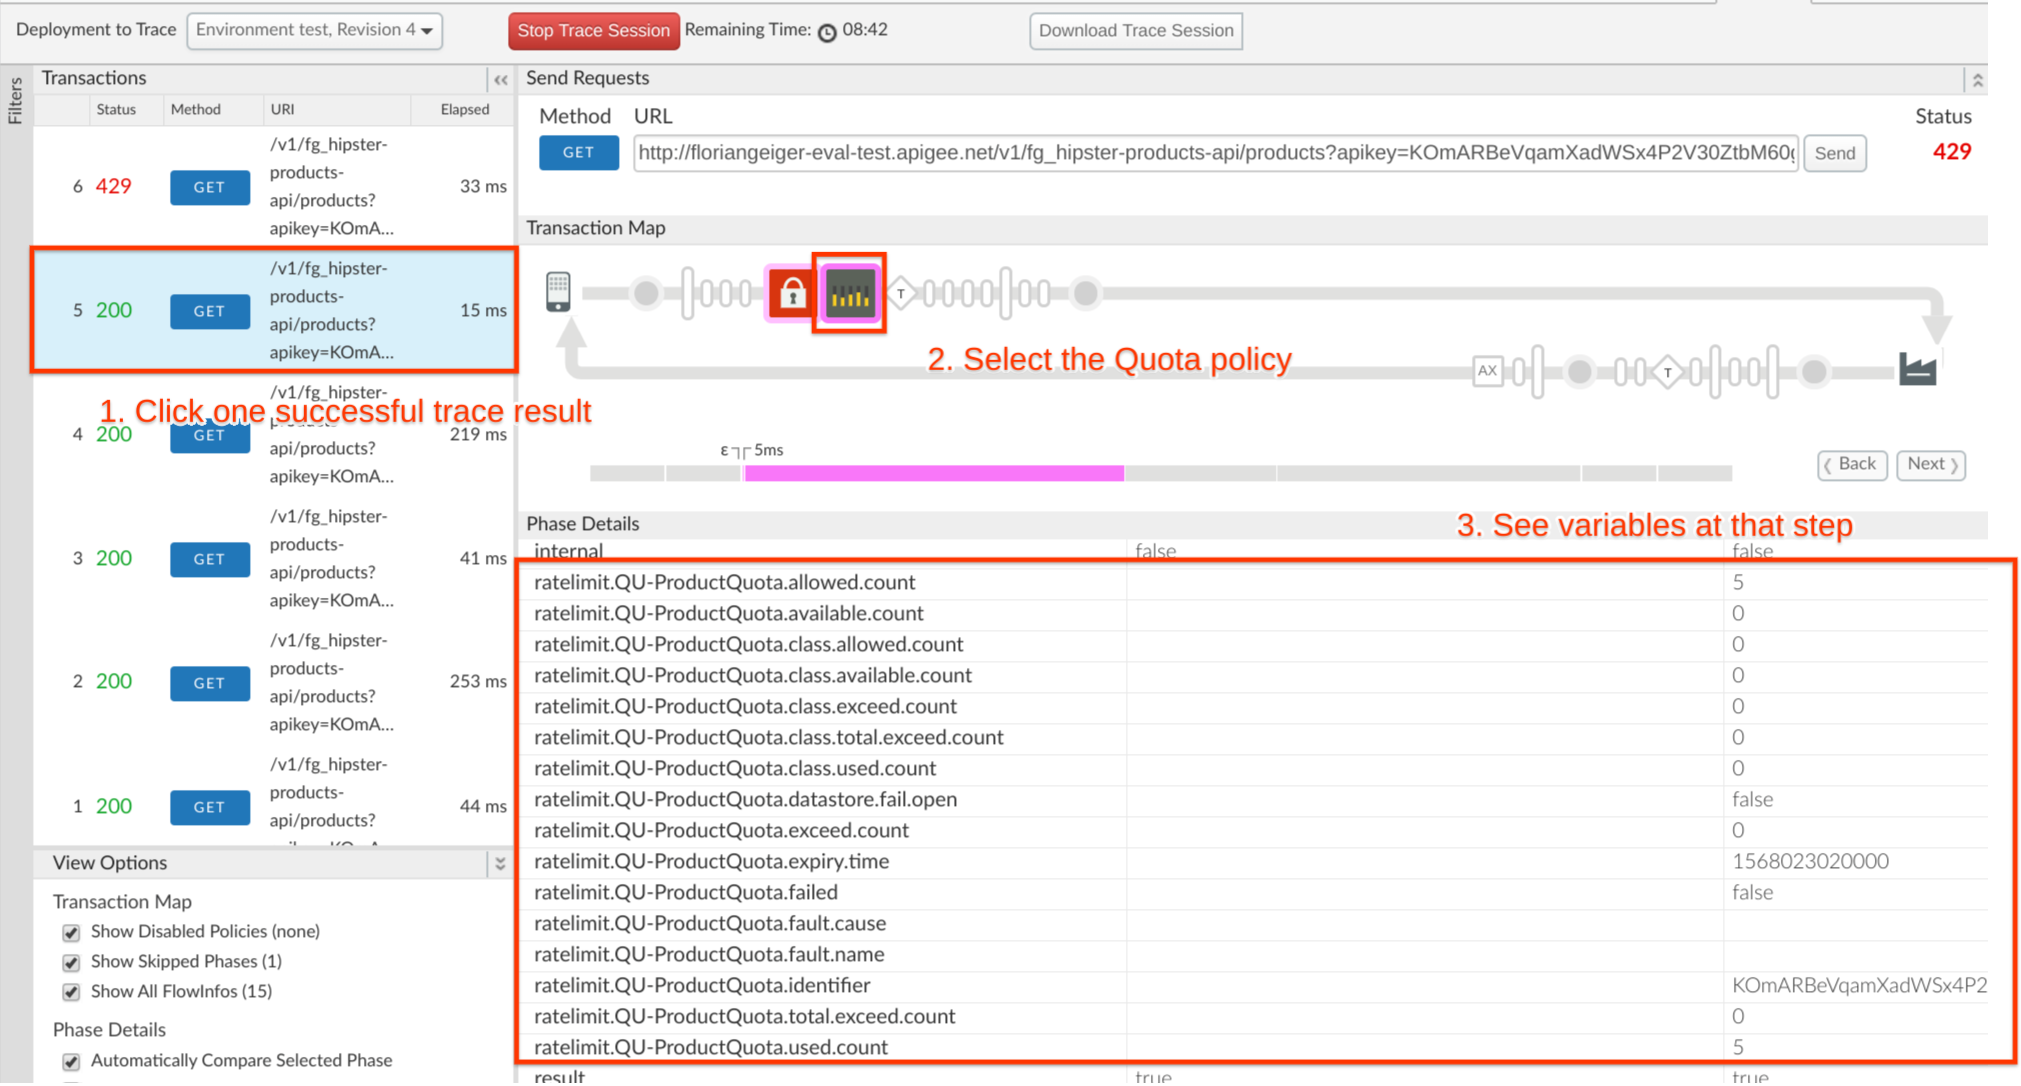
-
Here we see at the end of our calls that we only have one count available (ratelimit.QU-ProductQuota.available.count) out of the original 20 (ratelimit.QU-ProductQuota.allowed.count).
-
Also have a look at the other variables available as part of the proxy flow.
At this point, we will skip the Deluxe/Gold version of our product, but you get the idea, that your developers won’t easily reach the limit with this one.
Quiz
-
What would happen if you leave out the Identifier Tag in the Quota Policy?
-
What would happen if the Quota Policy were placed before the Verify API Key policy?
-
In the configuration we provided, the ‘Distributed’ and ‘Synchronous’ attributes were both set to ‘true’. What is the implication if we set these to ‘false’?
-
How would you configure the quota so that POST calls are counted as 2 calls for the purposes of evaluating the quota?
Summary
In this lab you have created 3 products aligned with your API product strategy to offer a tiered model and have different quotas attached to each product. We have not defined the limits in our API proxies but made the same proxy available in different API products that define the quota amount.
References
Apigee Docs Links
https://docs.apigee.com/api-platform/reference/policies/quota-policy
Videos (4mv4d)
https://www.youtube.com/watch?v=z8Rj_VzSbh4
https://www.youtube.com/watch?v=1RDDpH0wOdc
Next Steps
Now go to Lab-4