apijam
API Security - External IdP Integration using Okta
Duration : 20 mins
Persona : API Team/Security
Use case
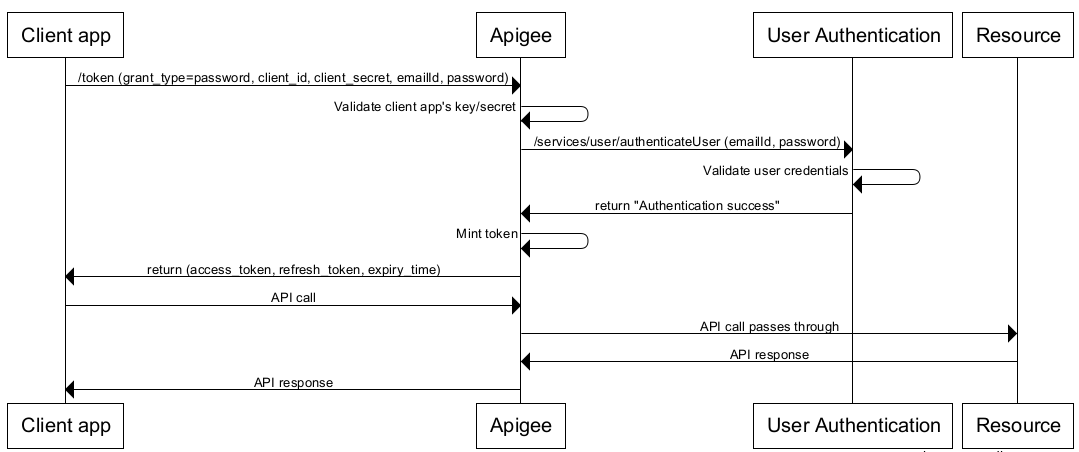
You have an API that is needs to be consumed by a trusted client application. You want to secure that API using OAuth 2.0 and use an external identity provider such as Okta to protect the application end user’s identity. In this lab we will use Apigee as the OAuth provider to protect the API endpoints using OAuth 2.0. Okta will be used to protect the application end user’s identity. We will accomplish this by integrating Okta into the Apigee OAuth proxy, and implement OAuth 2.0 with the resource owner password credentials (or ROPC) grant type.
How can Apigee Edge help?
(optional) See: Apigee + Okta - Using OAuth 2.0 Resource Owner / Password Grant Type
Apigee has built in support to implement OAuth 2.0 with the ROPC grant type. Using the OAuthV2 policy, Apigee Edge can be configured to act as the authorization provider for access to the API, while using the Service Callout policy to invoke Okta’s authentication API to authenticate the identity of the end user.
Prerequisites
- Have completed the API Jam Module-2a labs. If not, please complete those first.
Instructions
For this lab we will use the client application - Hipster Products App - that needs to consume the API - {yourinitials}_Hipster-Products-API - both of which you built in the previous modules.
The ROPC grant type is mostly used in cases where the app is highly trusted. In this configuration, the end user provides their resource server credentials (username/password) to the client app, which sends them in an access token request to the OAuth authorization server (in this case Apigee Edge). An identity provider or IdP (in this case Okta) validates the credentials, and if they are valid, Apigee Edge proceeds to mint an access token and returns it to the app.
In this scenario, we will set up:
- The end user’s identity in Okta
- The API proxy configuration in Apigee Edge to enforce both end user identity authentication, as well as API authorization via OAuth 2.0
End User Configuration in Okta
- In this lab, we will use a pre-configured Okta instance to authenticate end user identity. To add a new app end user, we will use the Okta User API.
Invoke the following API request (either from a terminal or a REST client):
POST /api/v1/users?activate=true HTTP/1.1
Host: dev-271499-admin.okta.com
Content-Type: application/json
Authorization: SSWS 004LHmN3InpVQ9pOMWjsdb6ZDUmi1IP8_DLjaOlb6Z

{"profile": {"firstName": "<Enter First Name>","lastName": "<Enter Last Name>","email": "<Enter Email ID>","login": "<Enter Email ID>"},"credentials": {"password" : { "value": "<Enter Password>"}}}
- For first Name, last name, email, login, and password: provide your own values
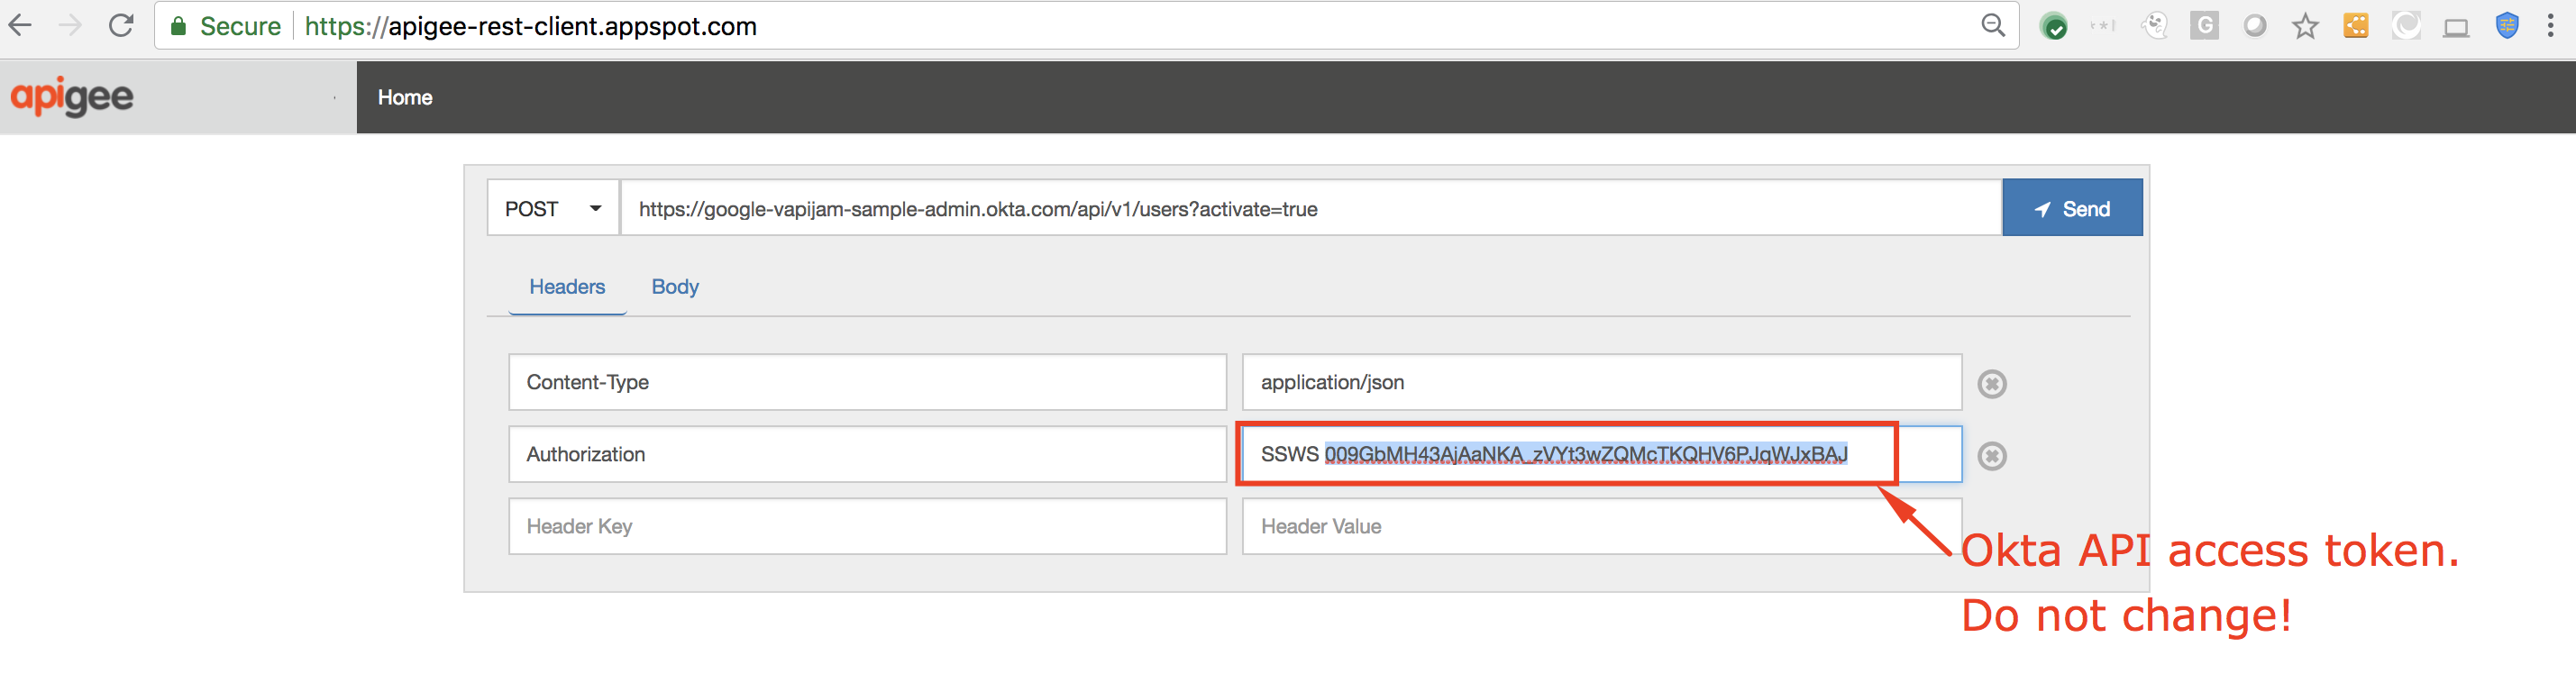
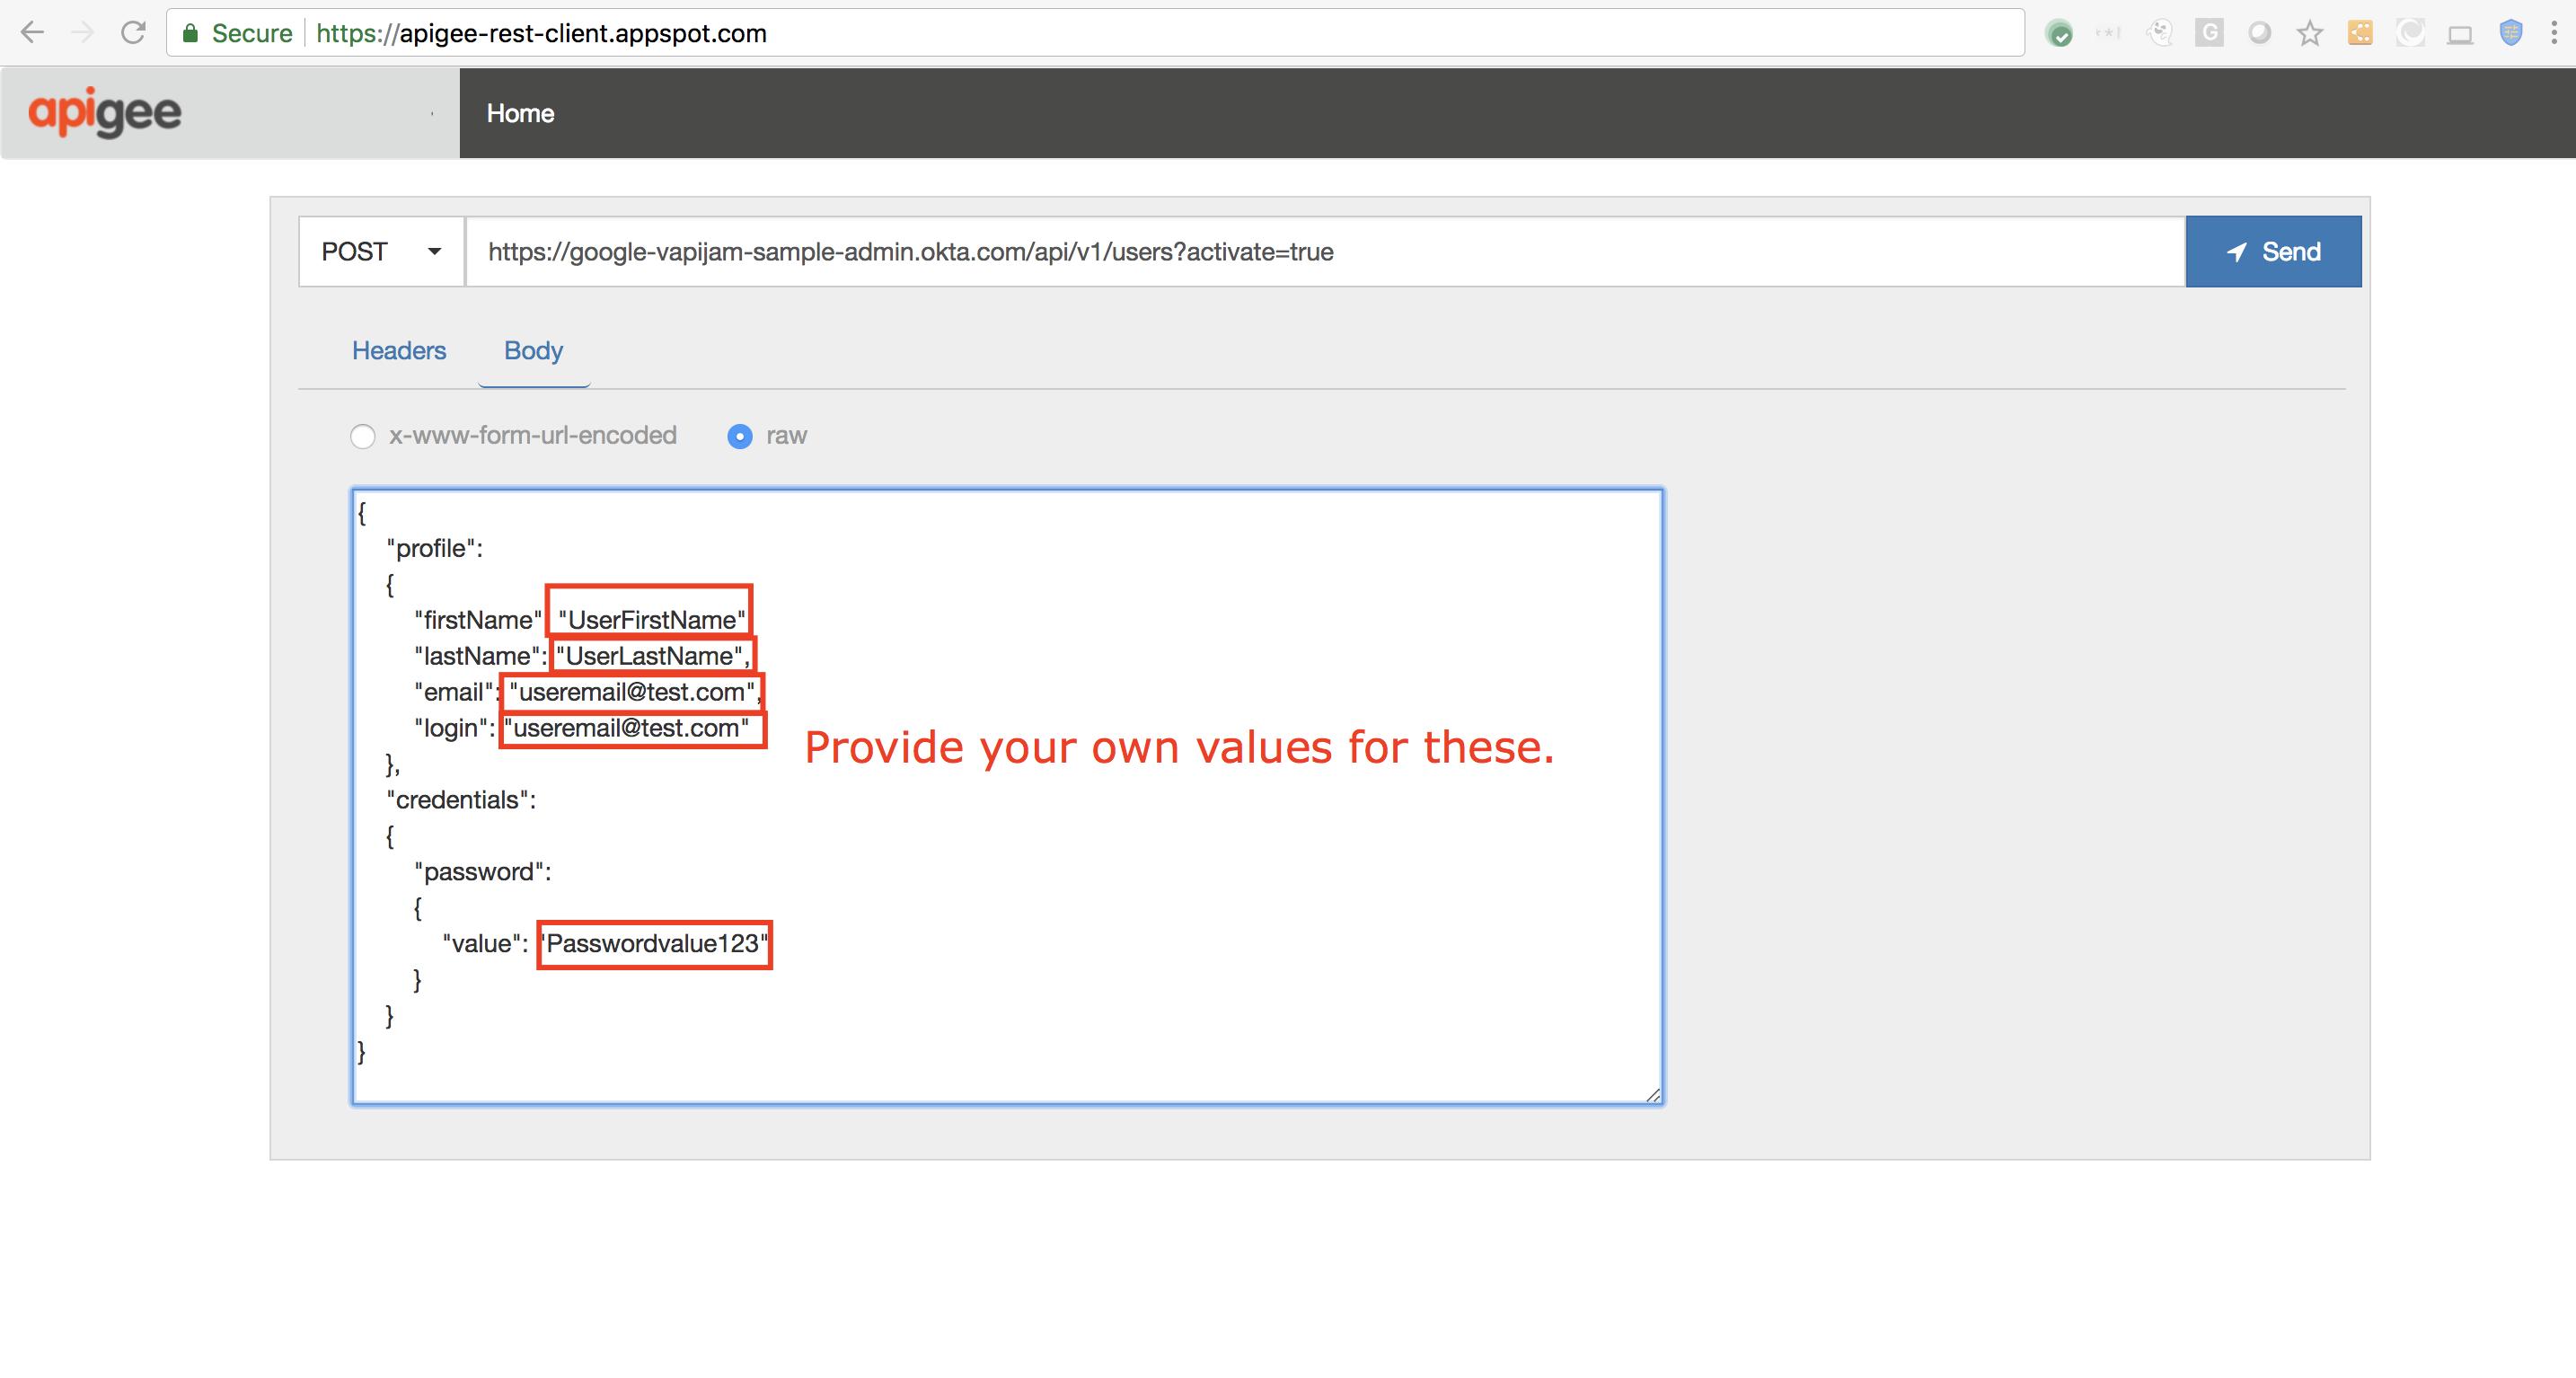
Example curl command (replace user details with your own):
curl -X POST "https://dev-271499-admin.okta.com/api/v1/users?activate=true" -H "Content-Type: application/json" -H "Authorization: SSWS 004LHmN3InpVQ9pOMWjsdb6ZDUmi1IP8_DLjaOlb6Z" -d '{"profile": {"firstName": "<Enter First Name>","lastName": "<Enter Last Name>","email": "<Enter Email ID>","login": "<Enter Email ID>"},"credentials": {"password" : { "value": "<Enter Password>"}}}'
This will create an active end user profile in Okta:
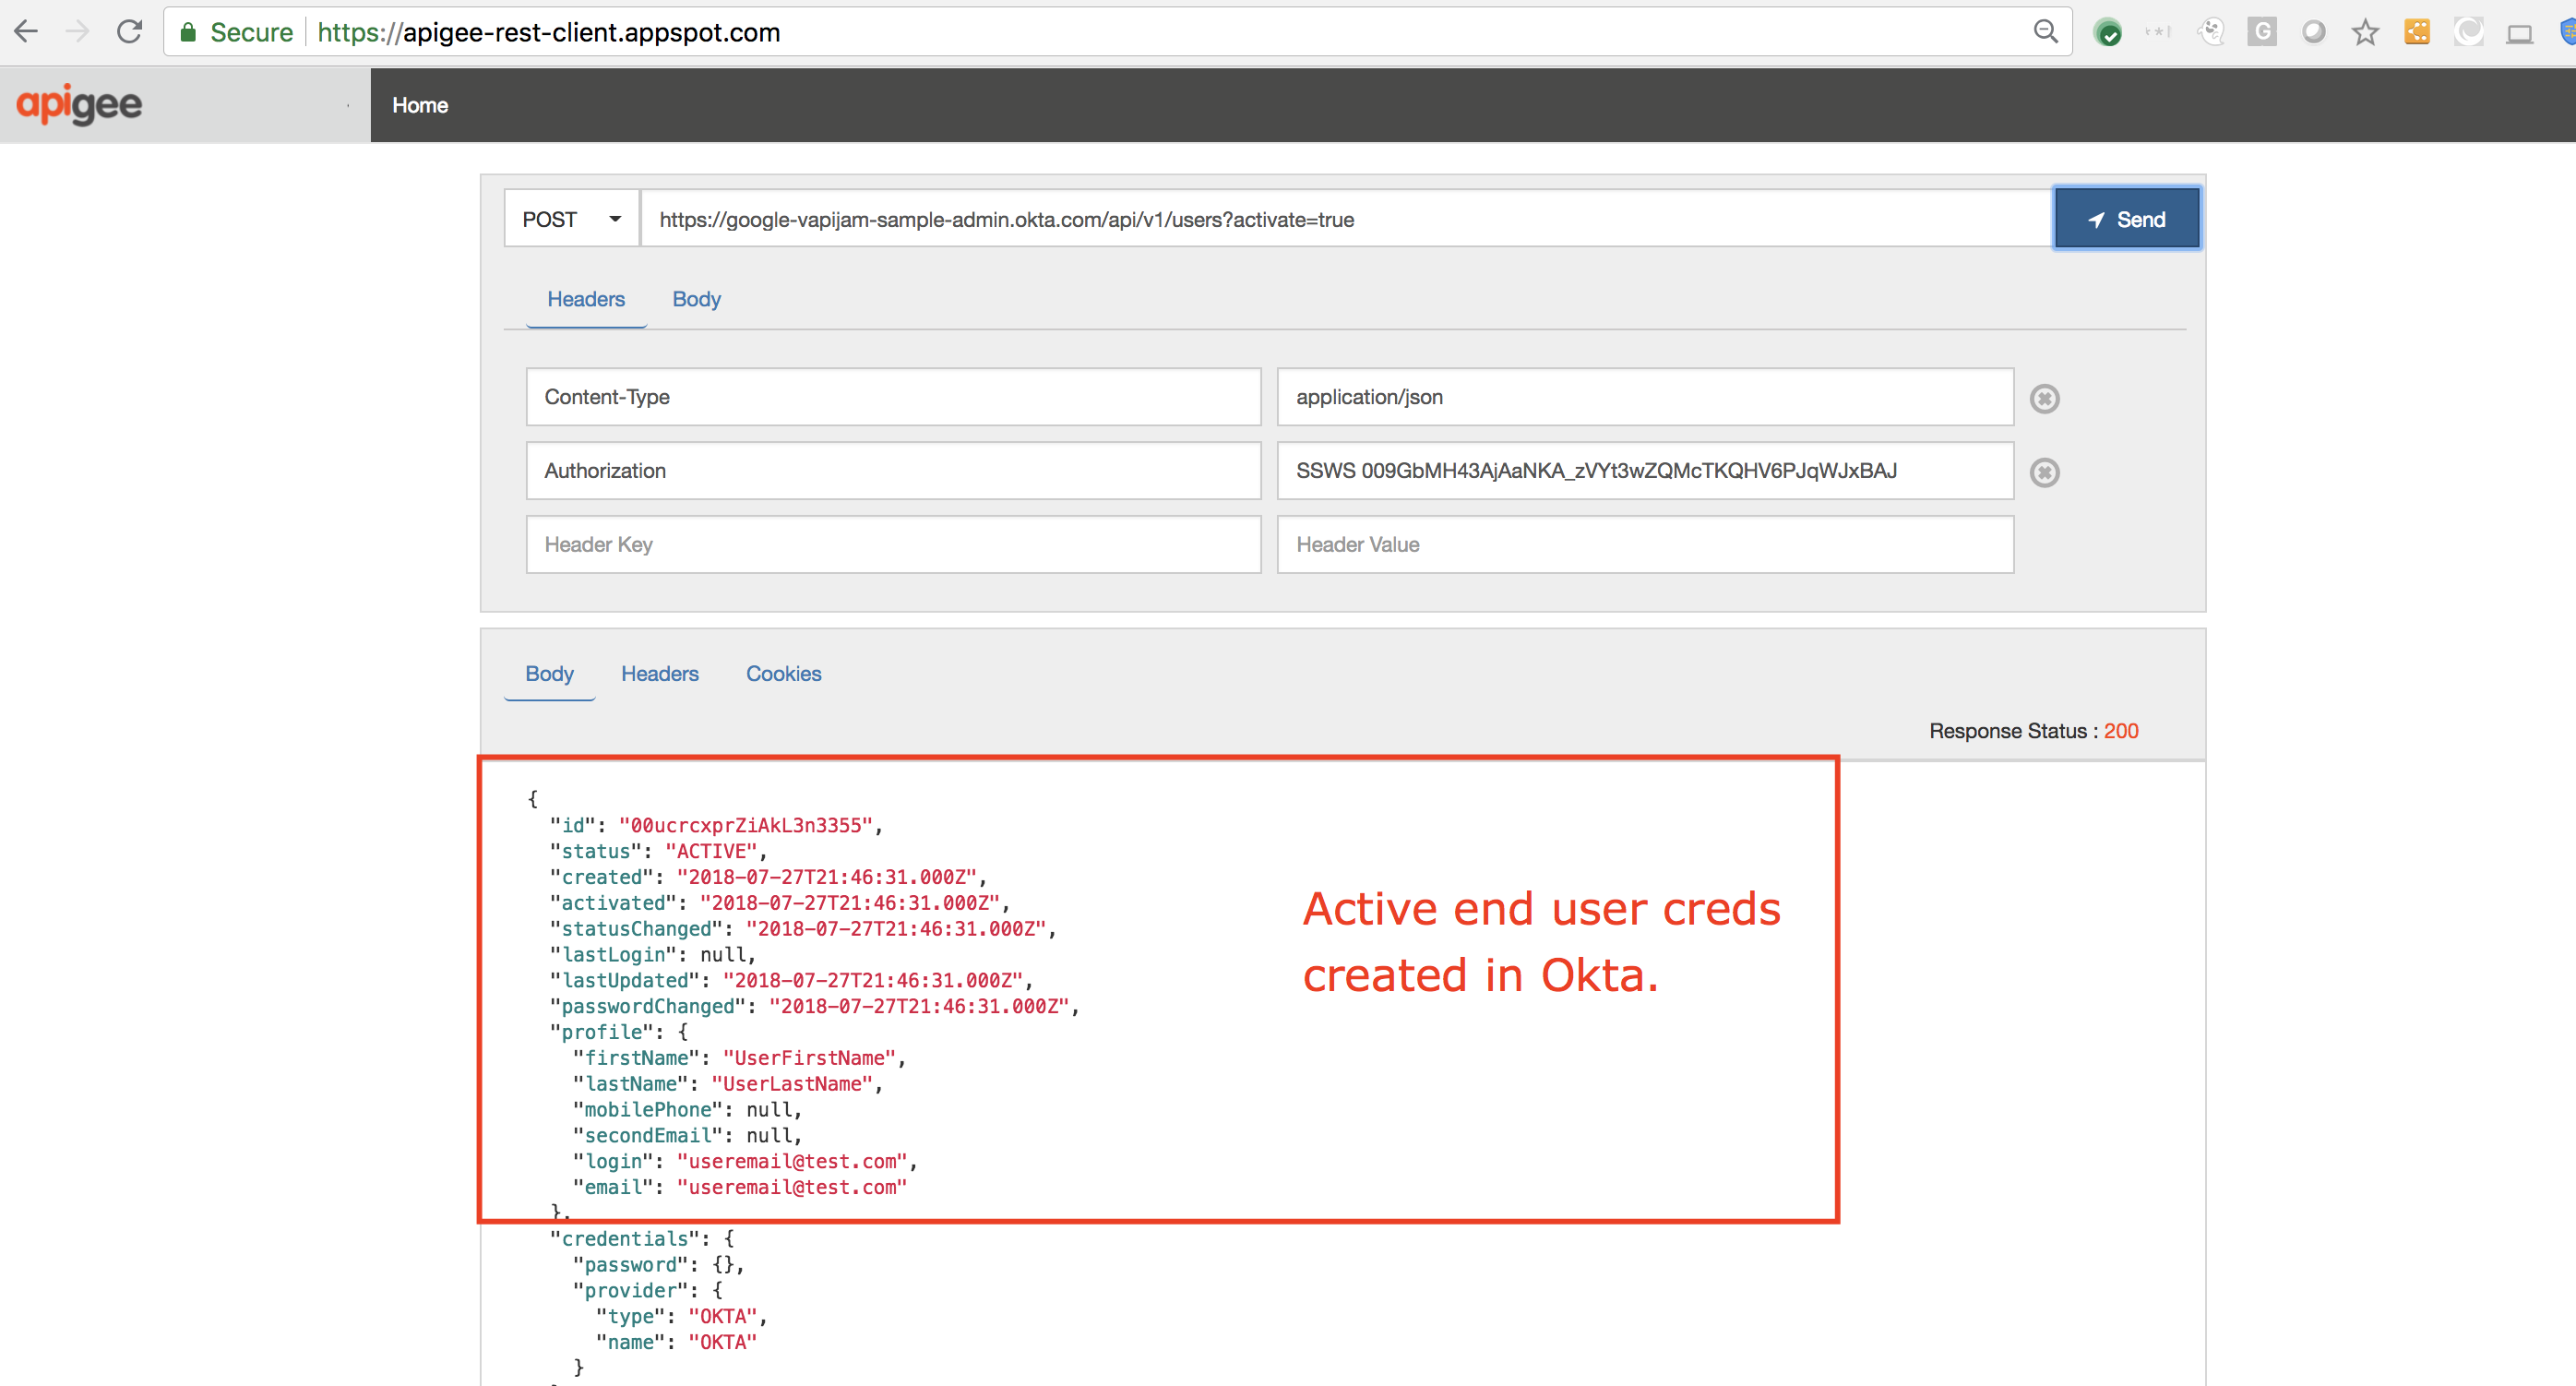
- Make note of the Username and Password you provided in the above API request. We will use this to authenticate the app end user’s identity.
Create OAuth Token Endpoints
-
First, we must set up the OAuth token endpoint. To do this, download the API proxy bundle from here.
-
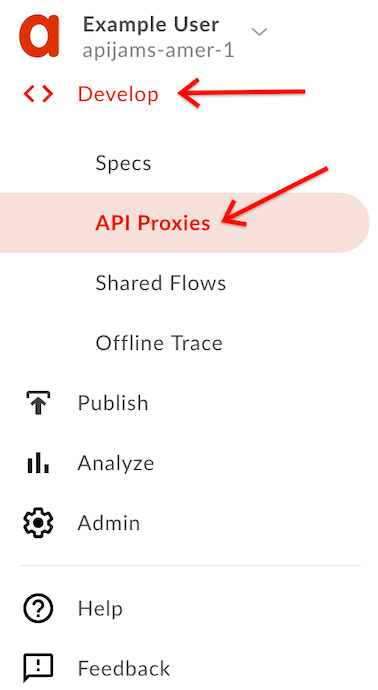
Once downloaded, navigate to Develop → API Proxies from the side navigation menu:
- Click the +Proxy button at the top right of the screen:

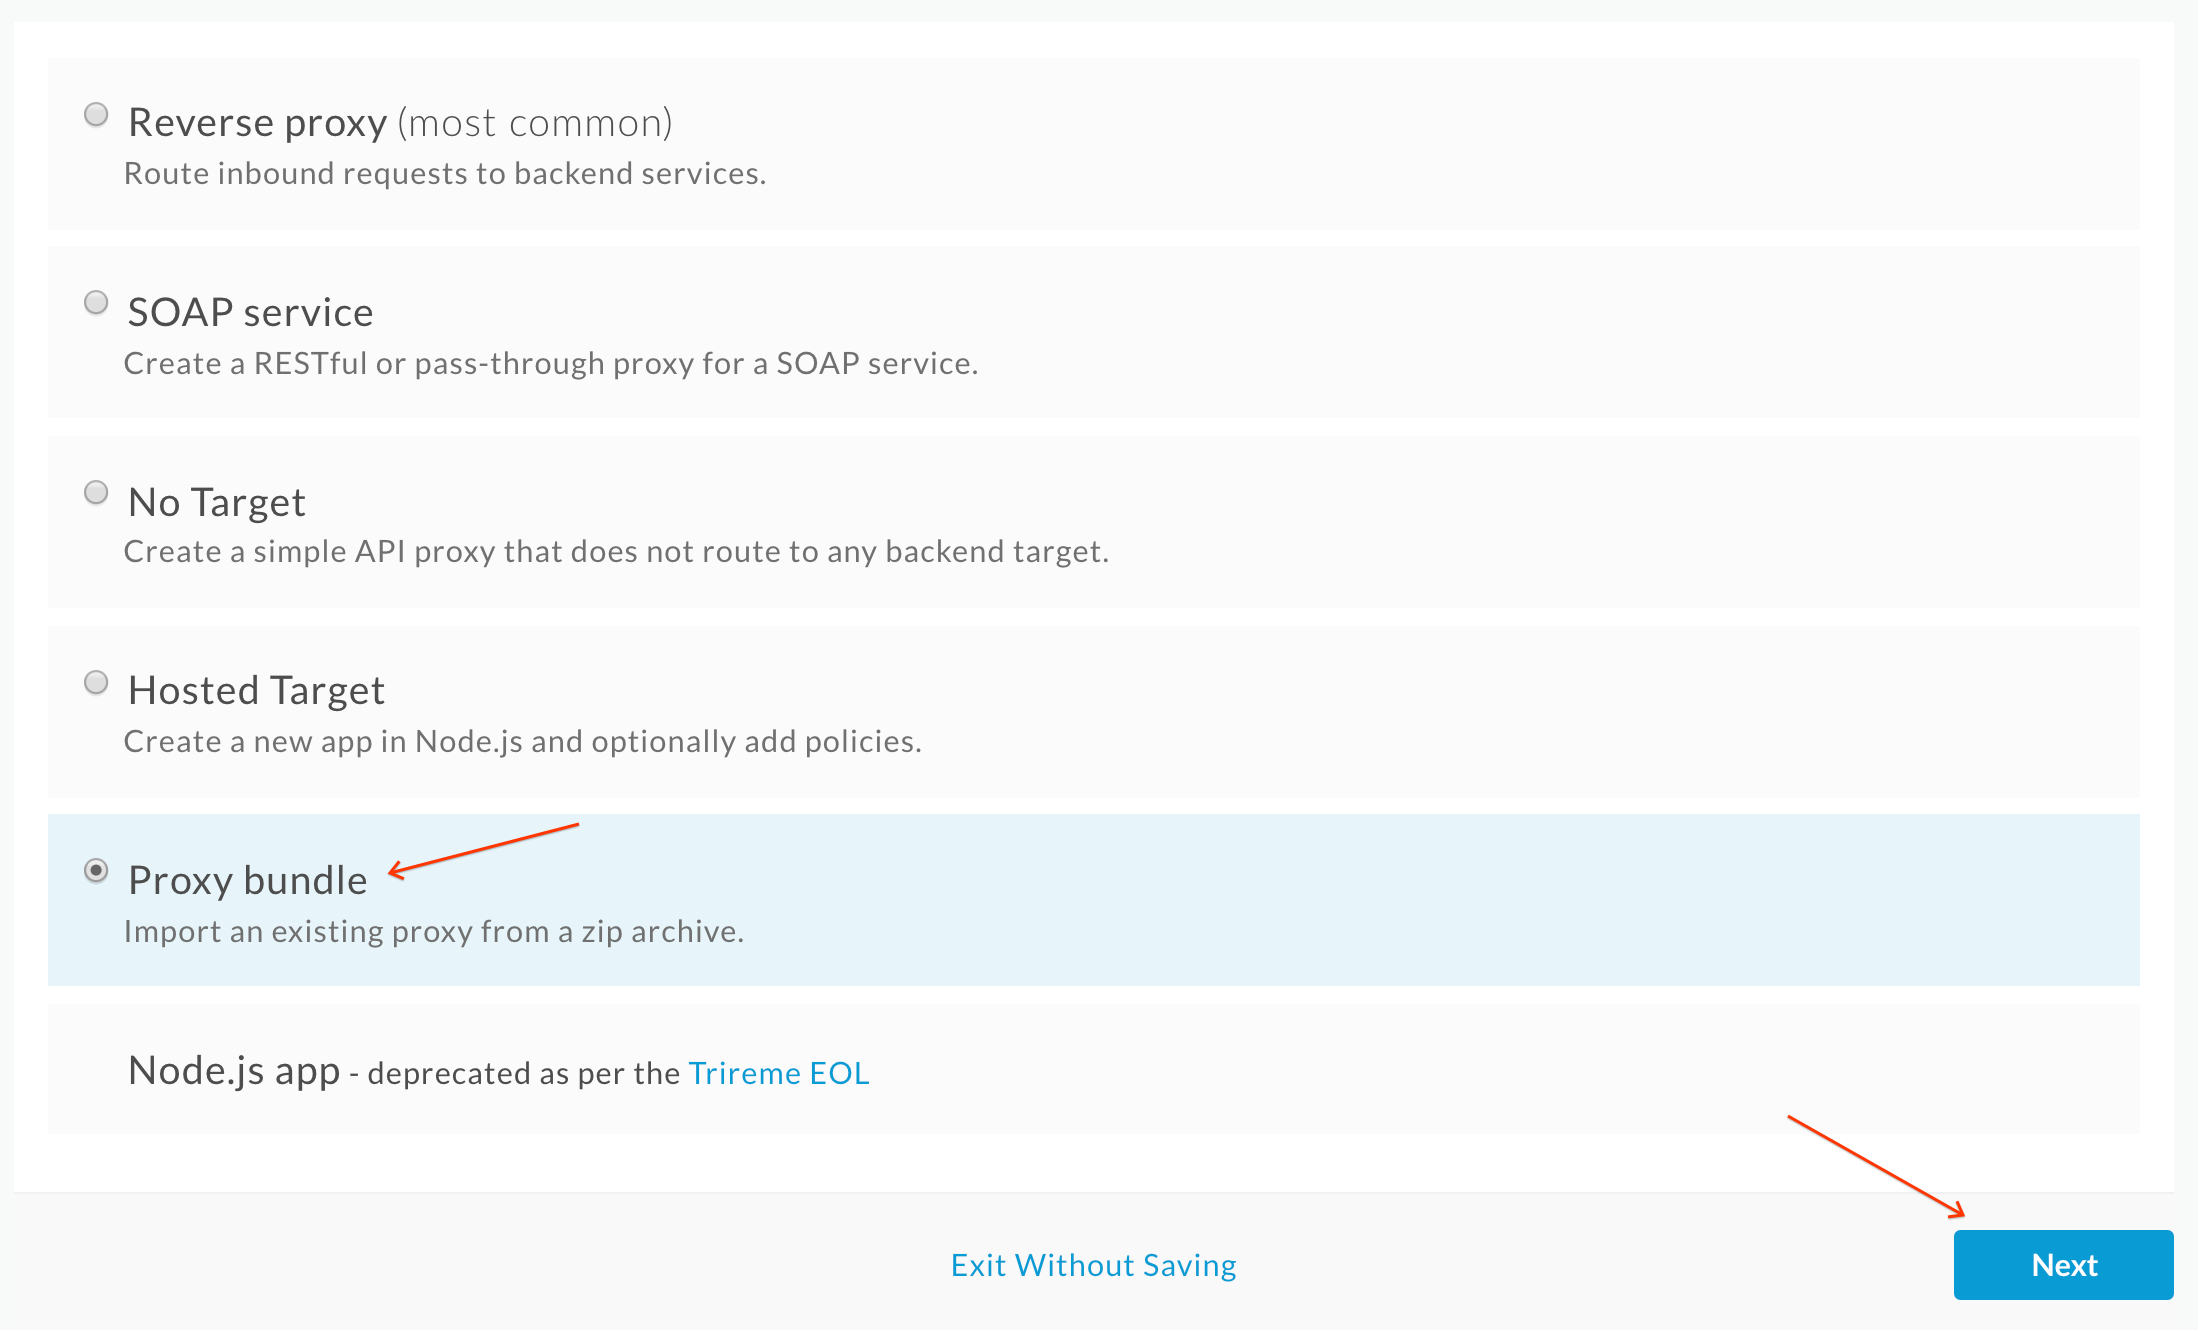
- In the proxy creation wizard, select the Proxy bundle option and click Next:
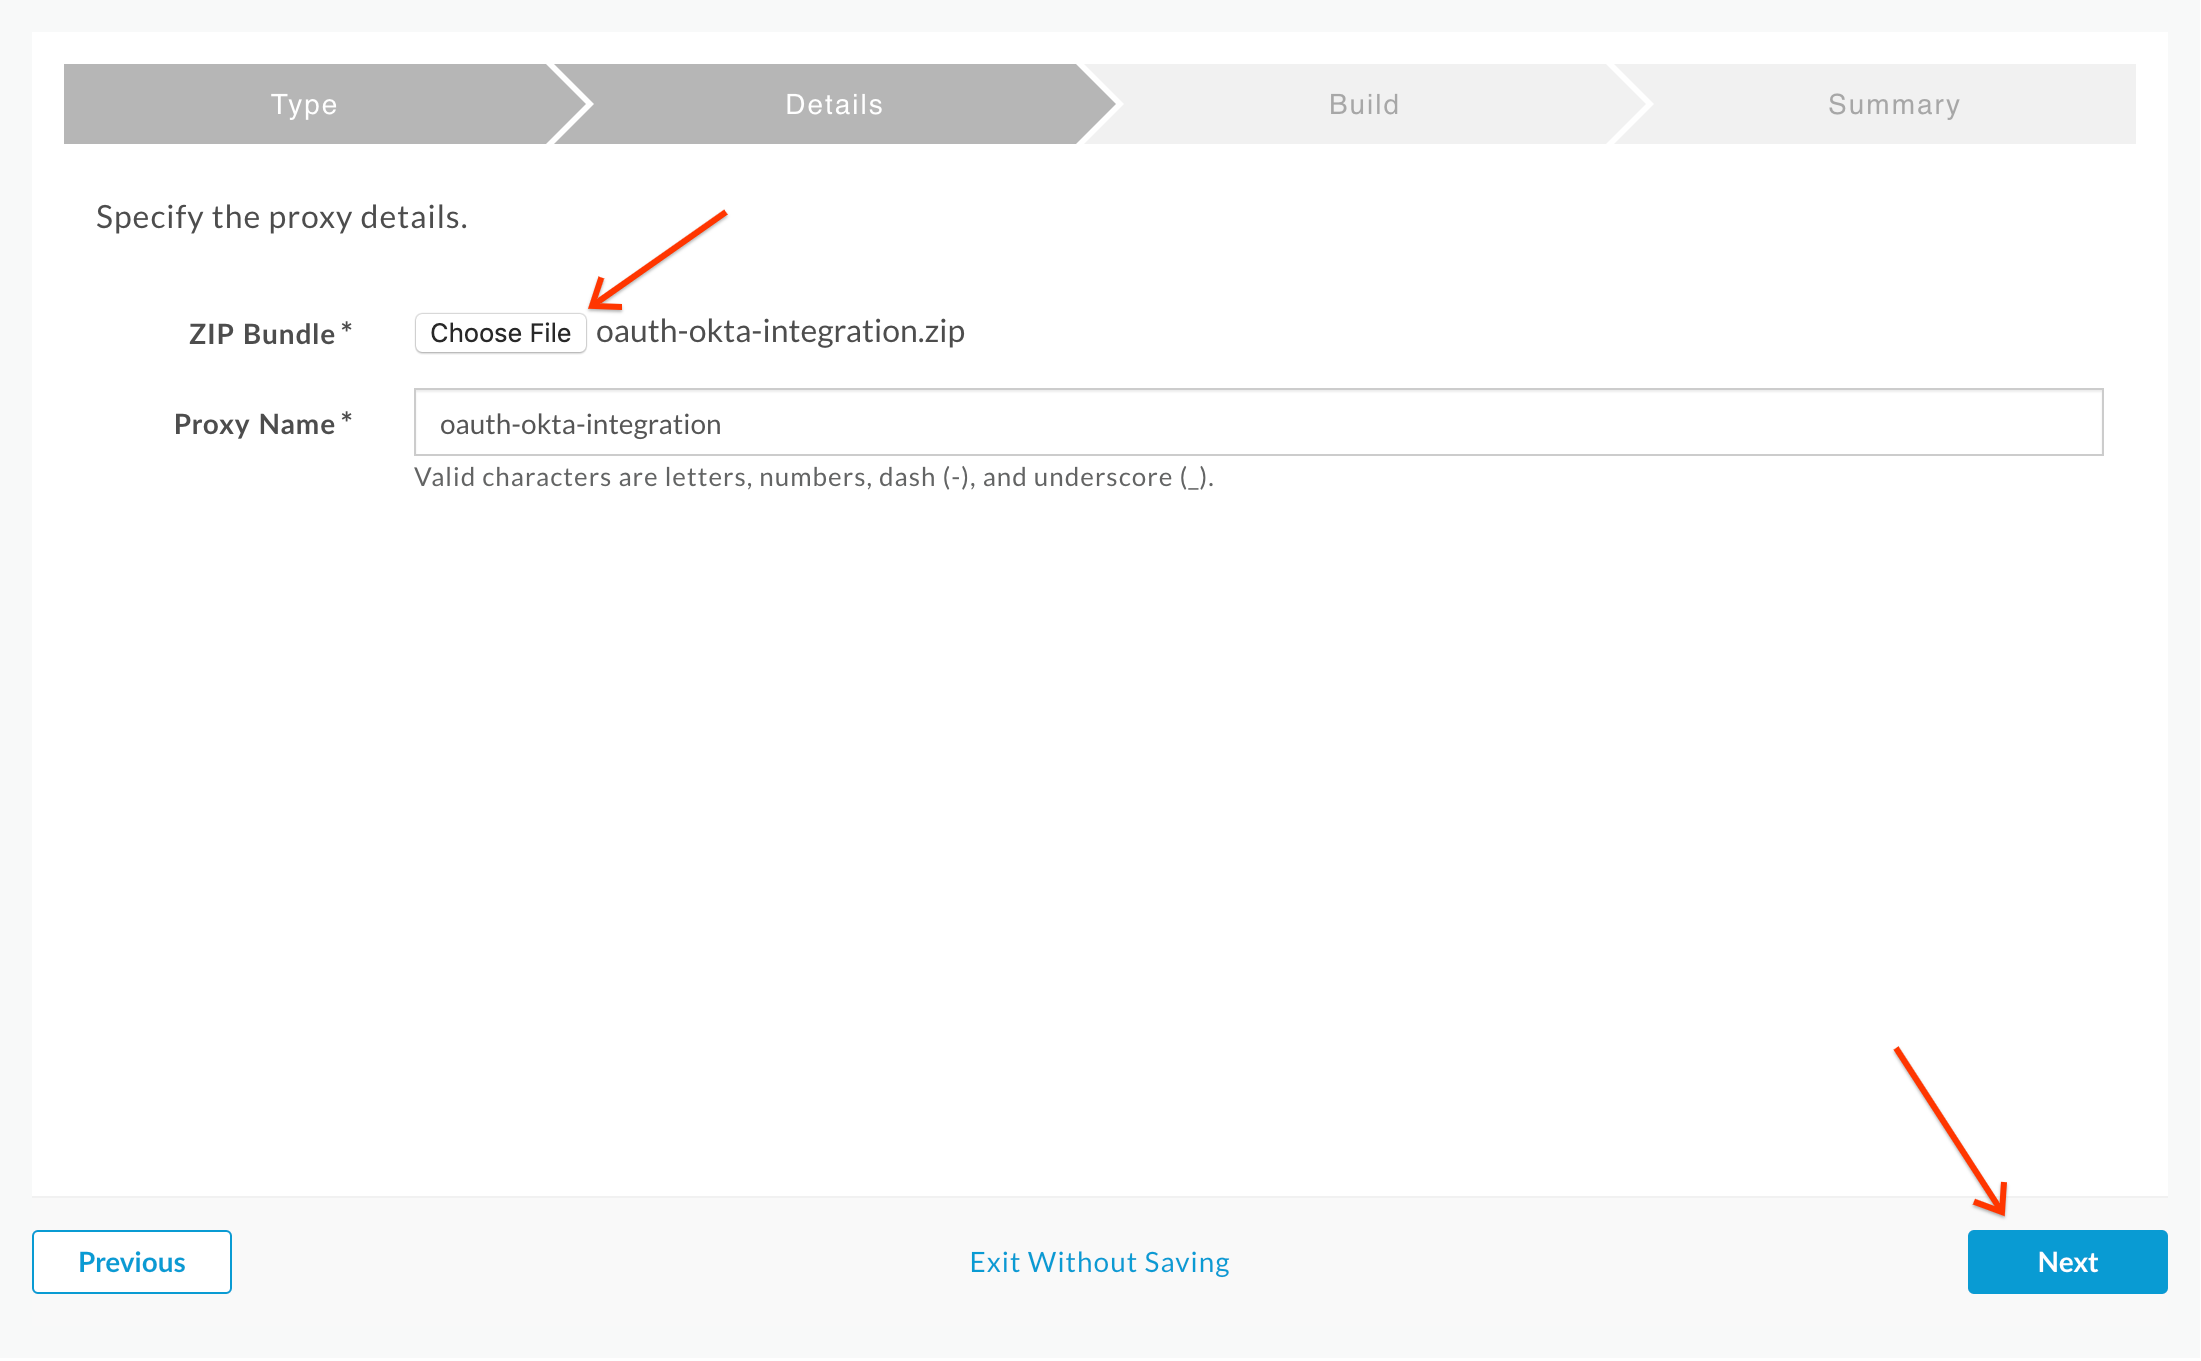
- On the next screen, click Choose File and upload the previously downloaded proxy bundle zip. Then click Next:
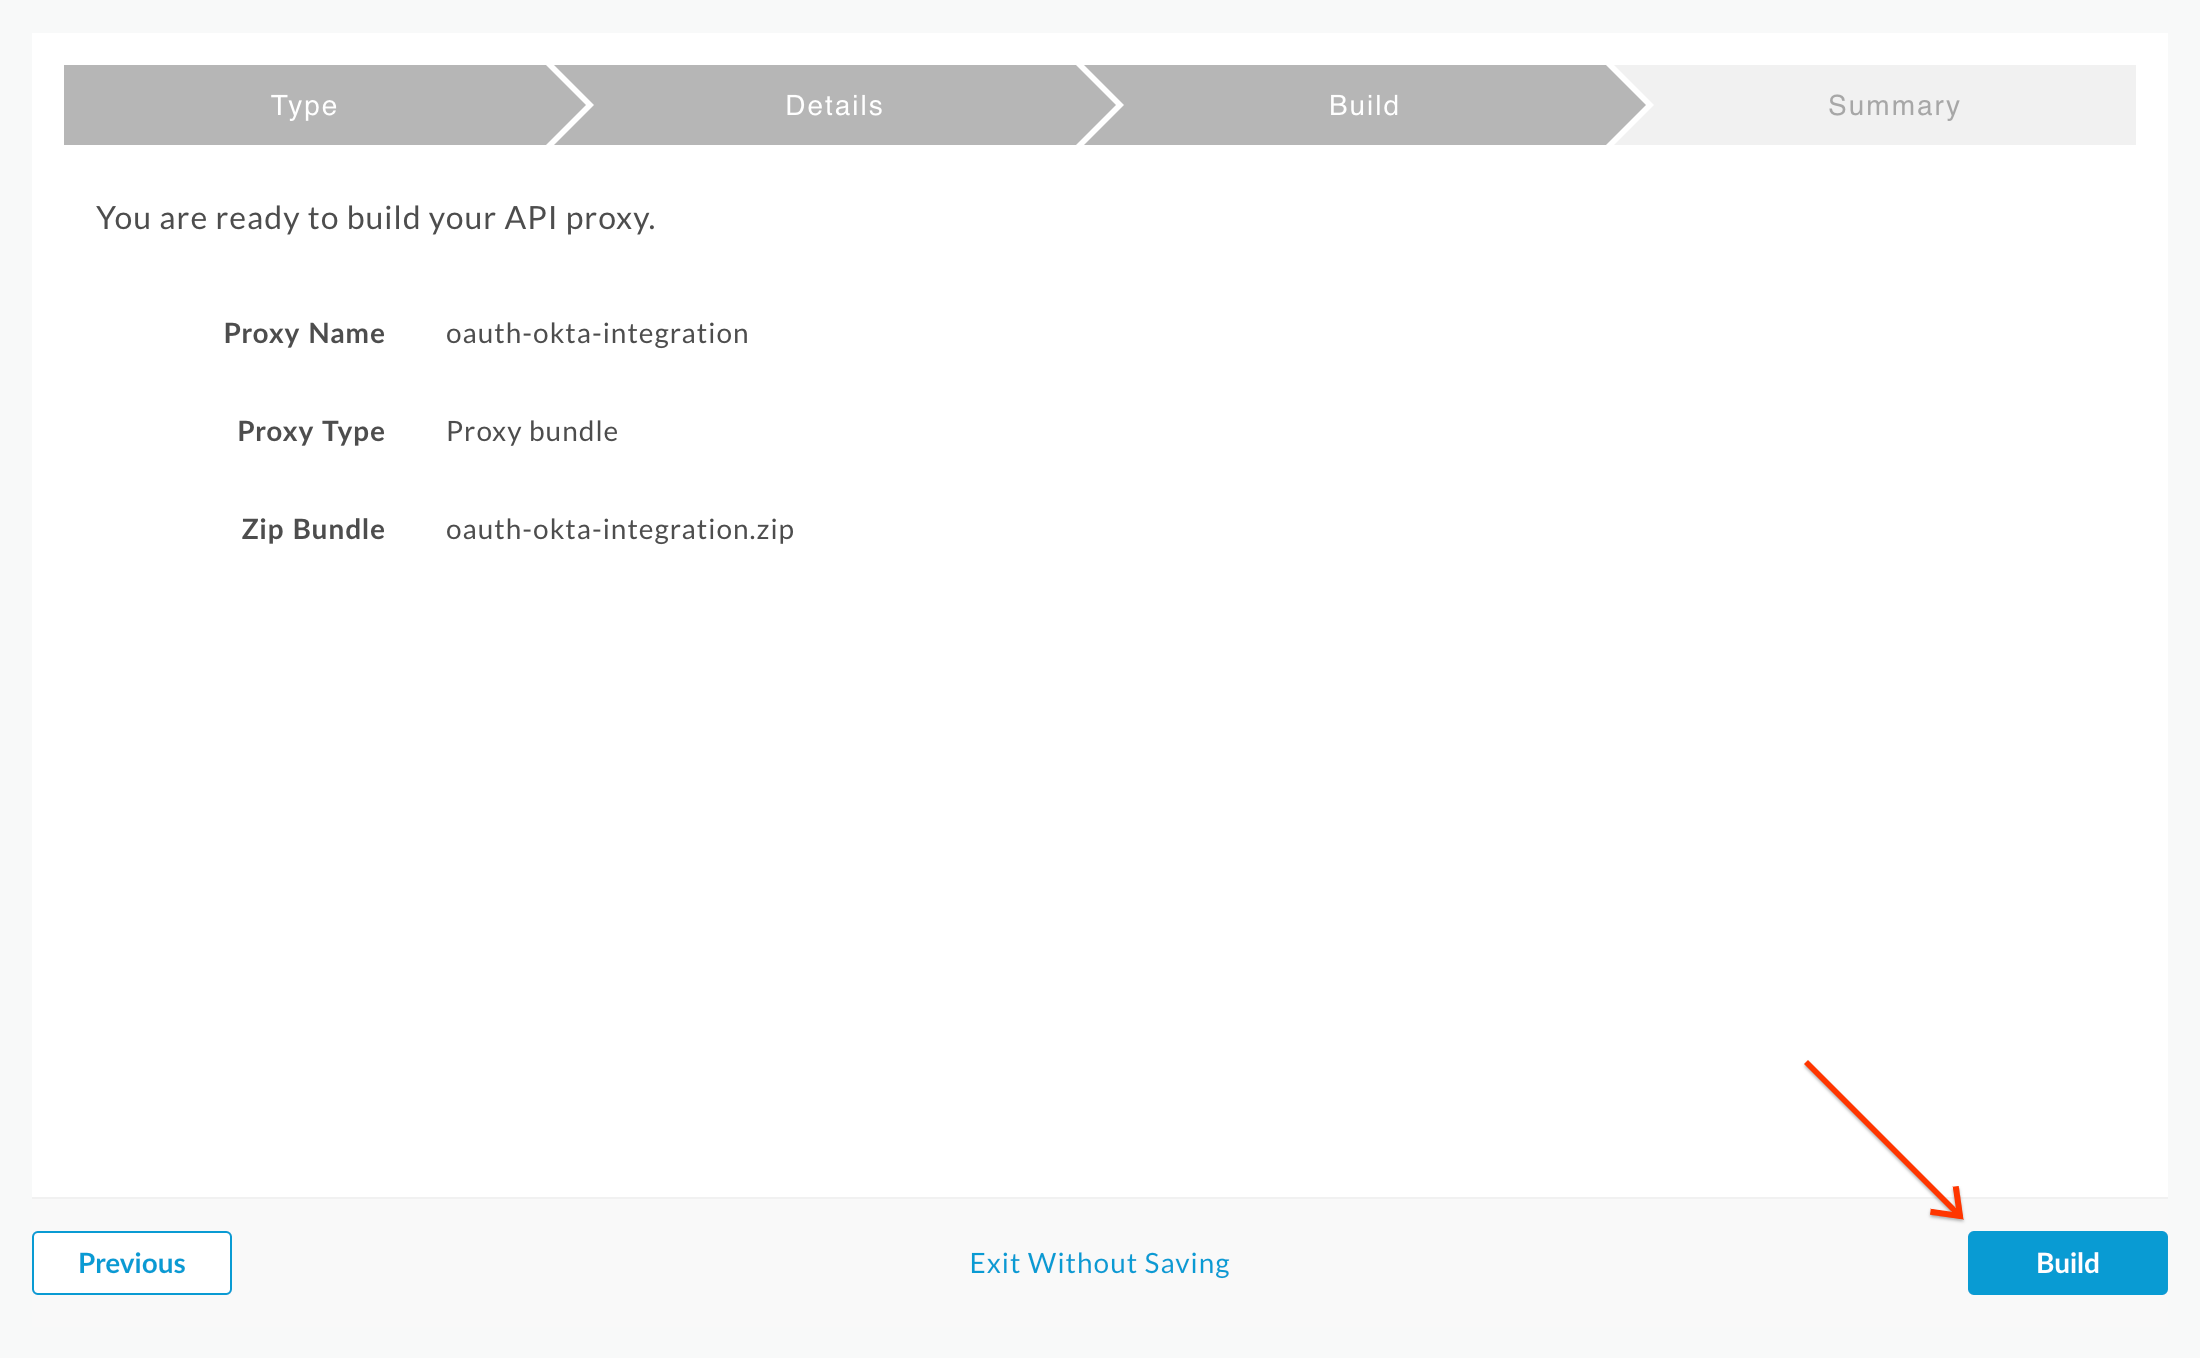
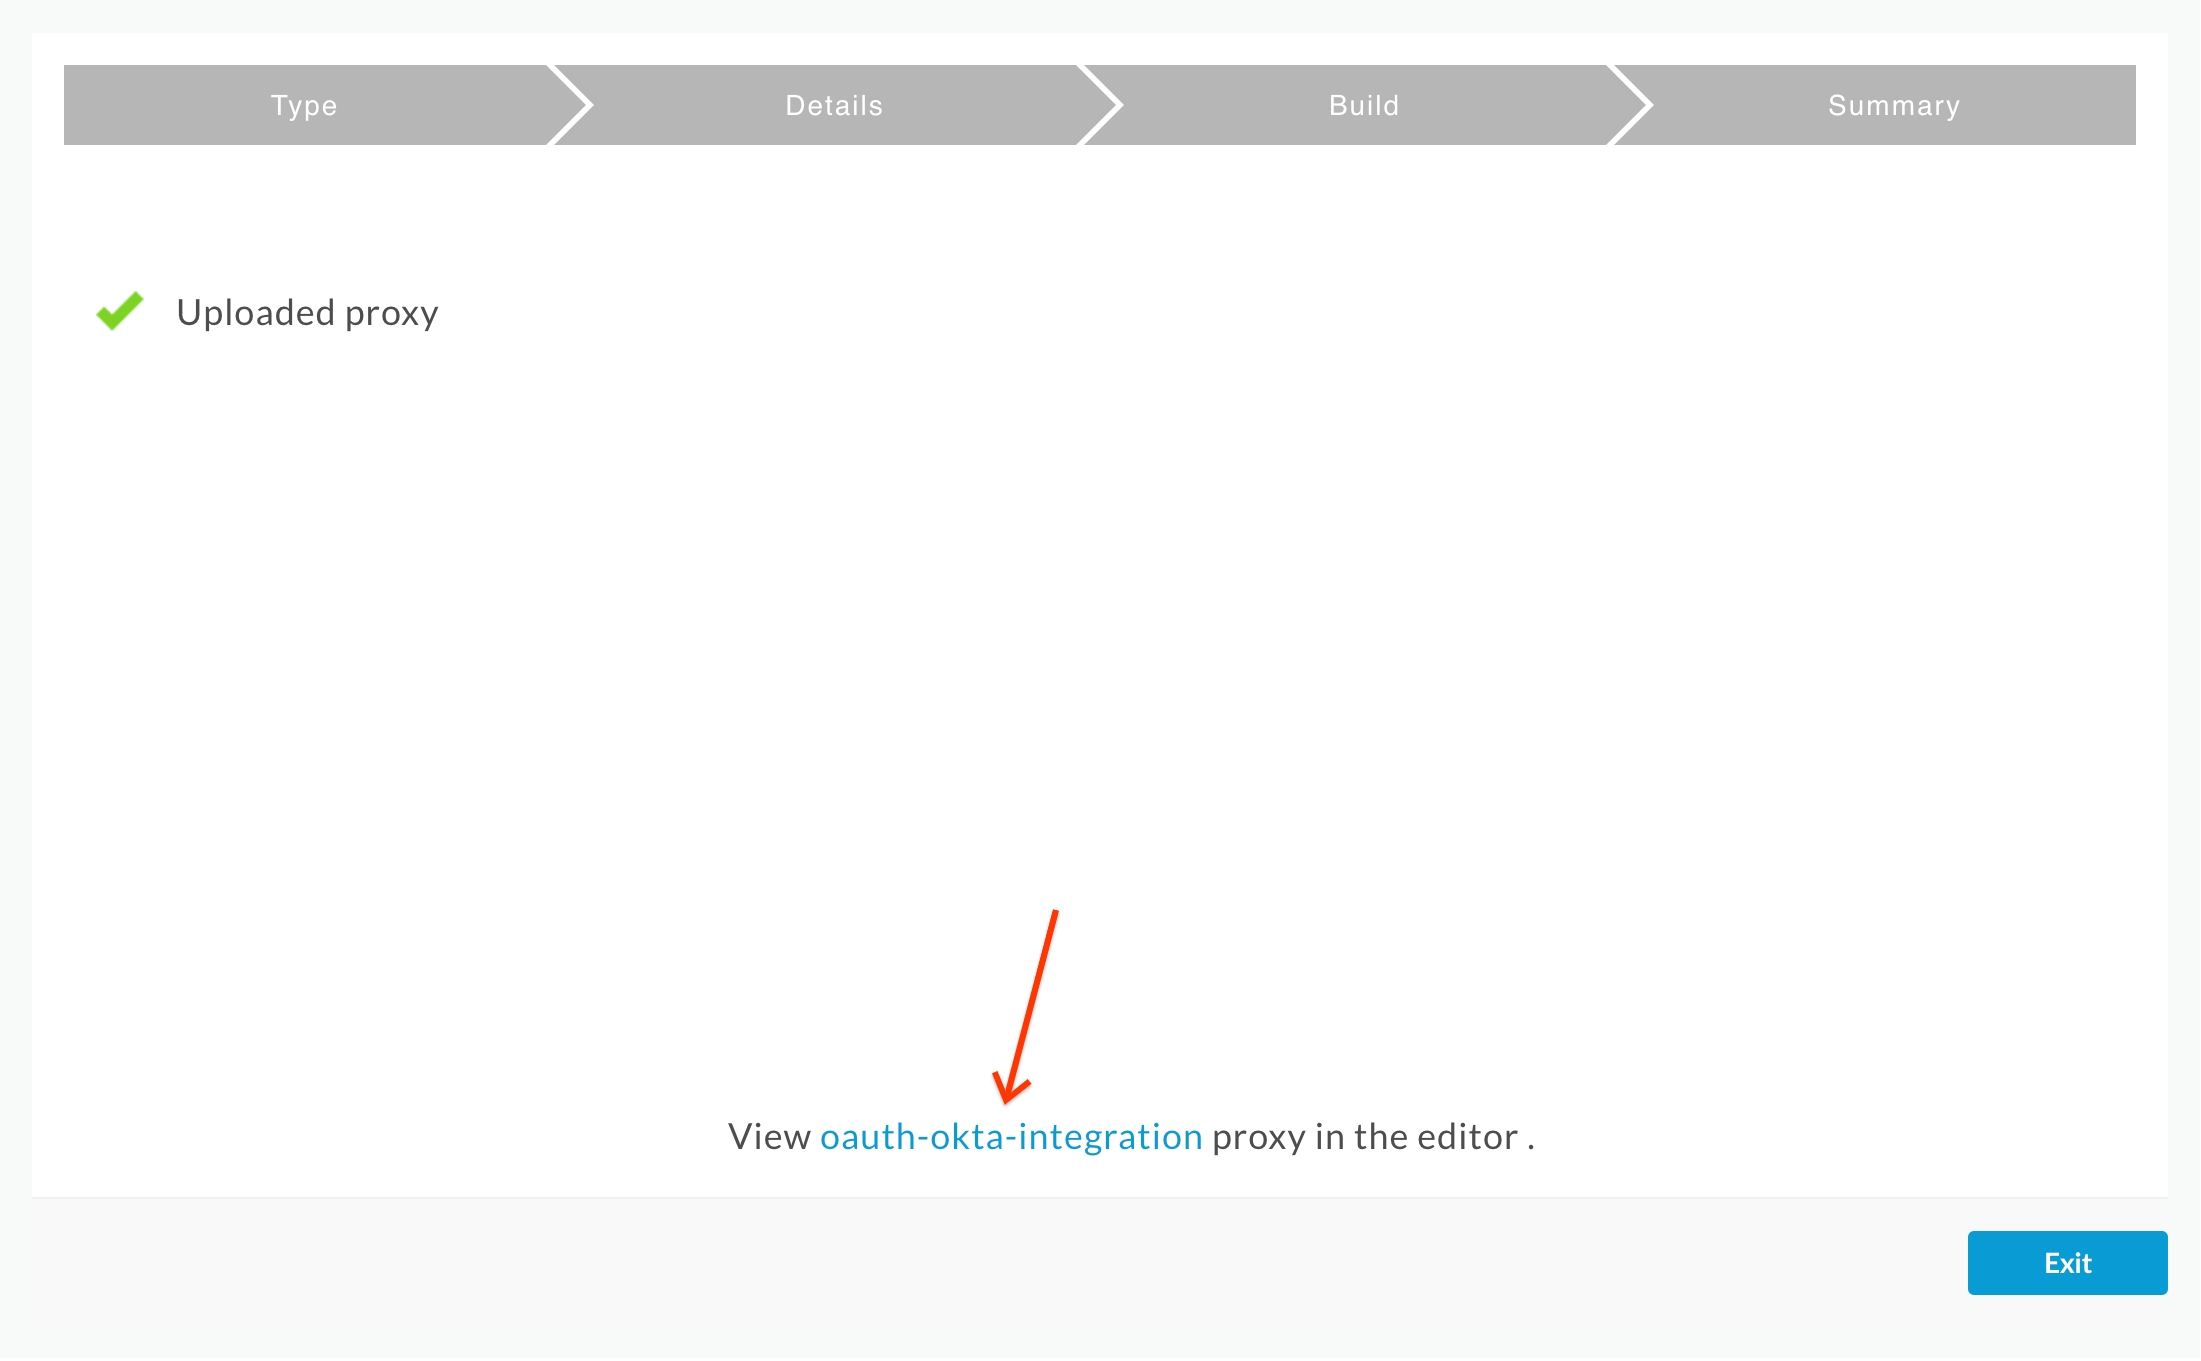
- On the next screen, click Build:
- Confirm that the proxy was uploaded successfully and click on the oauth-okta-integration link:
- On the Proxy Overview page, click the Deployment drop down, and select the test environment. Click Deploy in the confirmation pop-up.

Test
Now that we have configured the end user credentials in Okta, and the API Proxy in Apigee Edge, let us proceed to test the OAuth ROPC flow end to end.
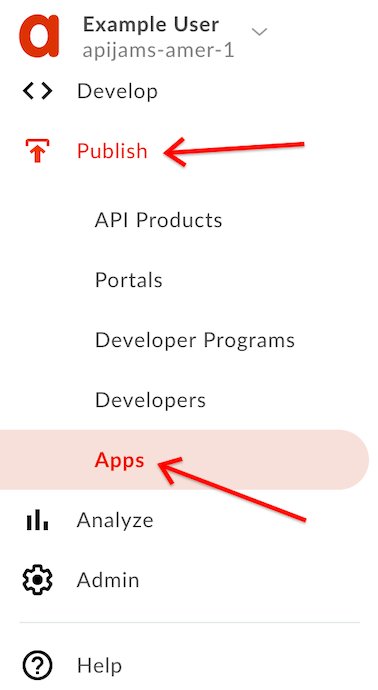
- If necessary, retrieve the app credentials for the Hipster Products App you created in the previous labs. Click on Publish → Apps from the side navigation menu:
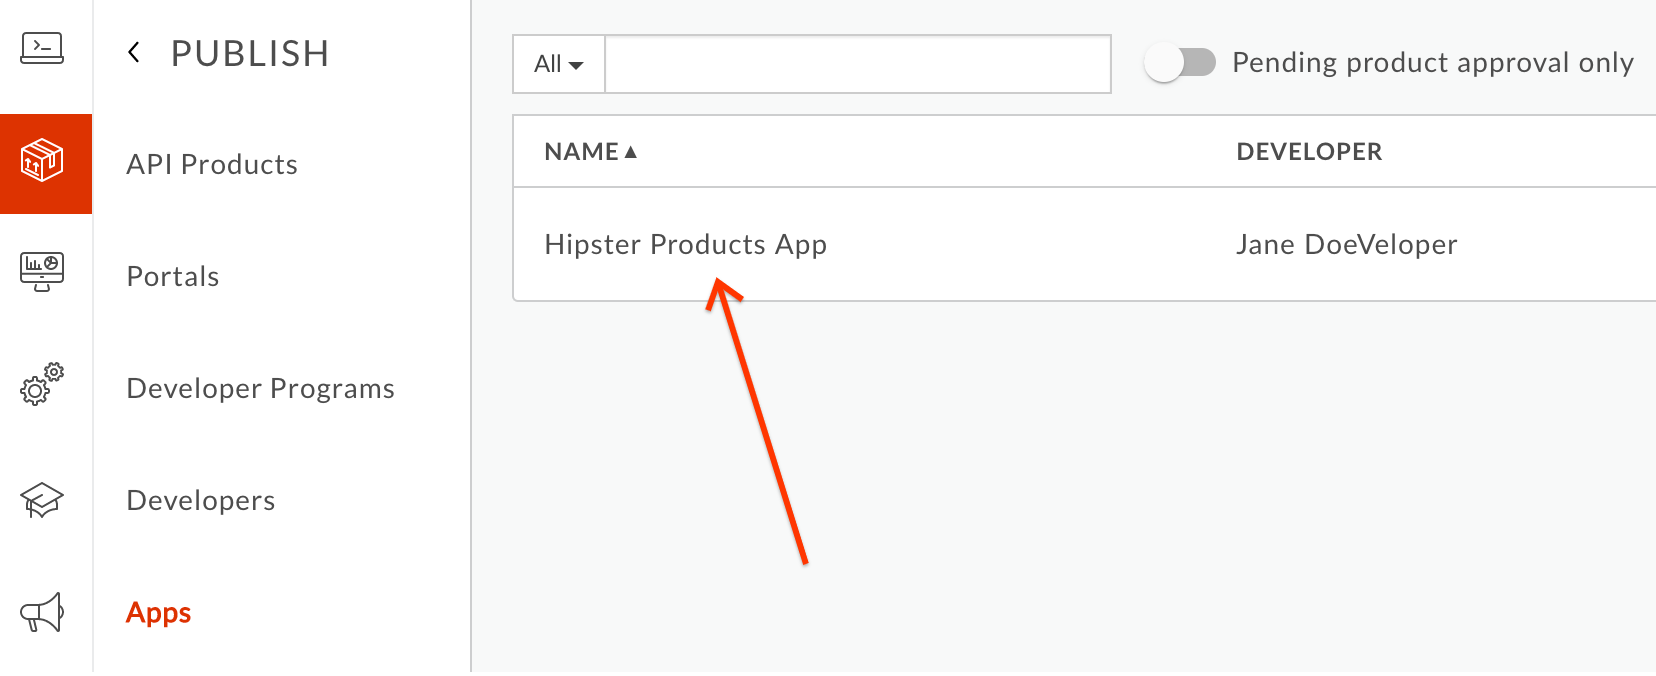
- Select the Hipster Products App:
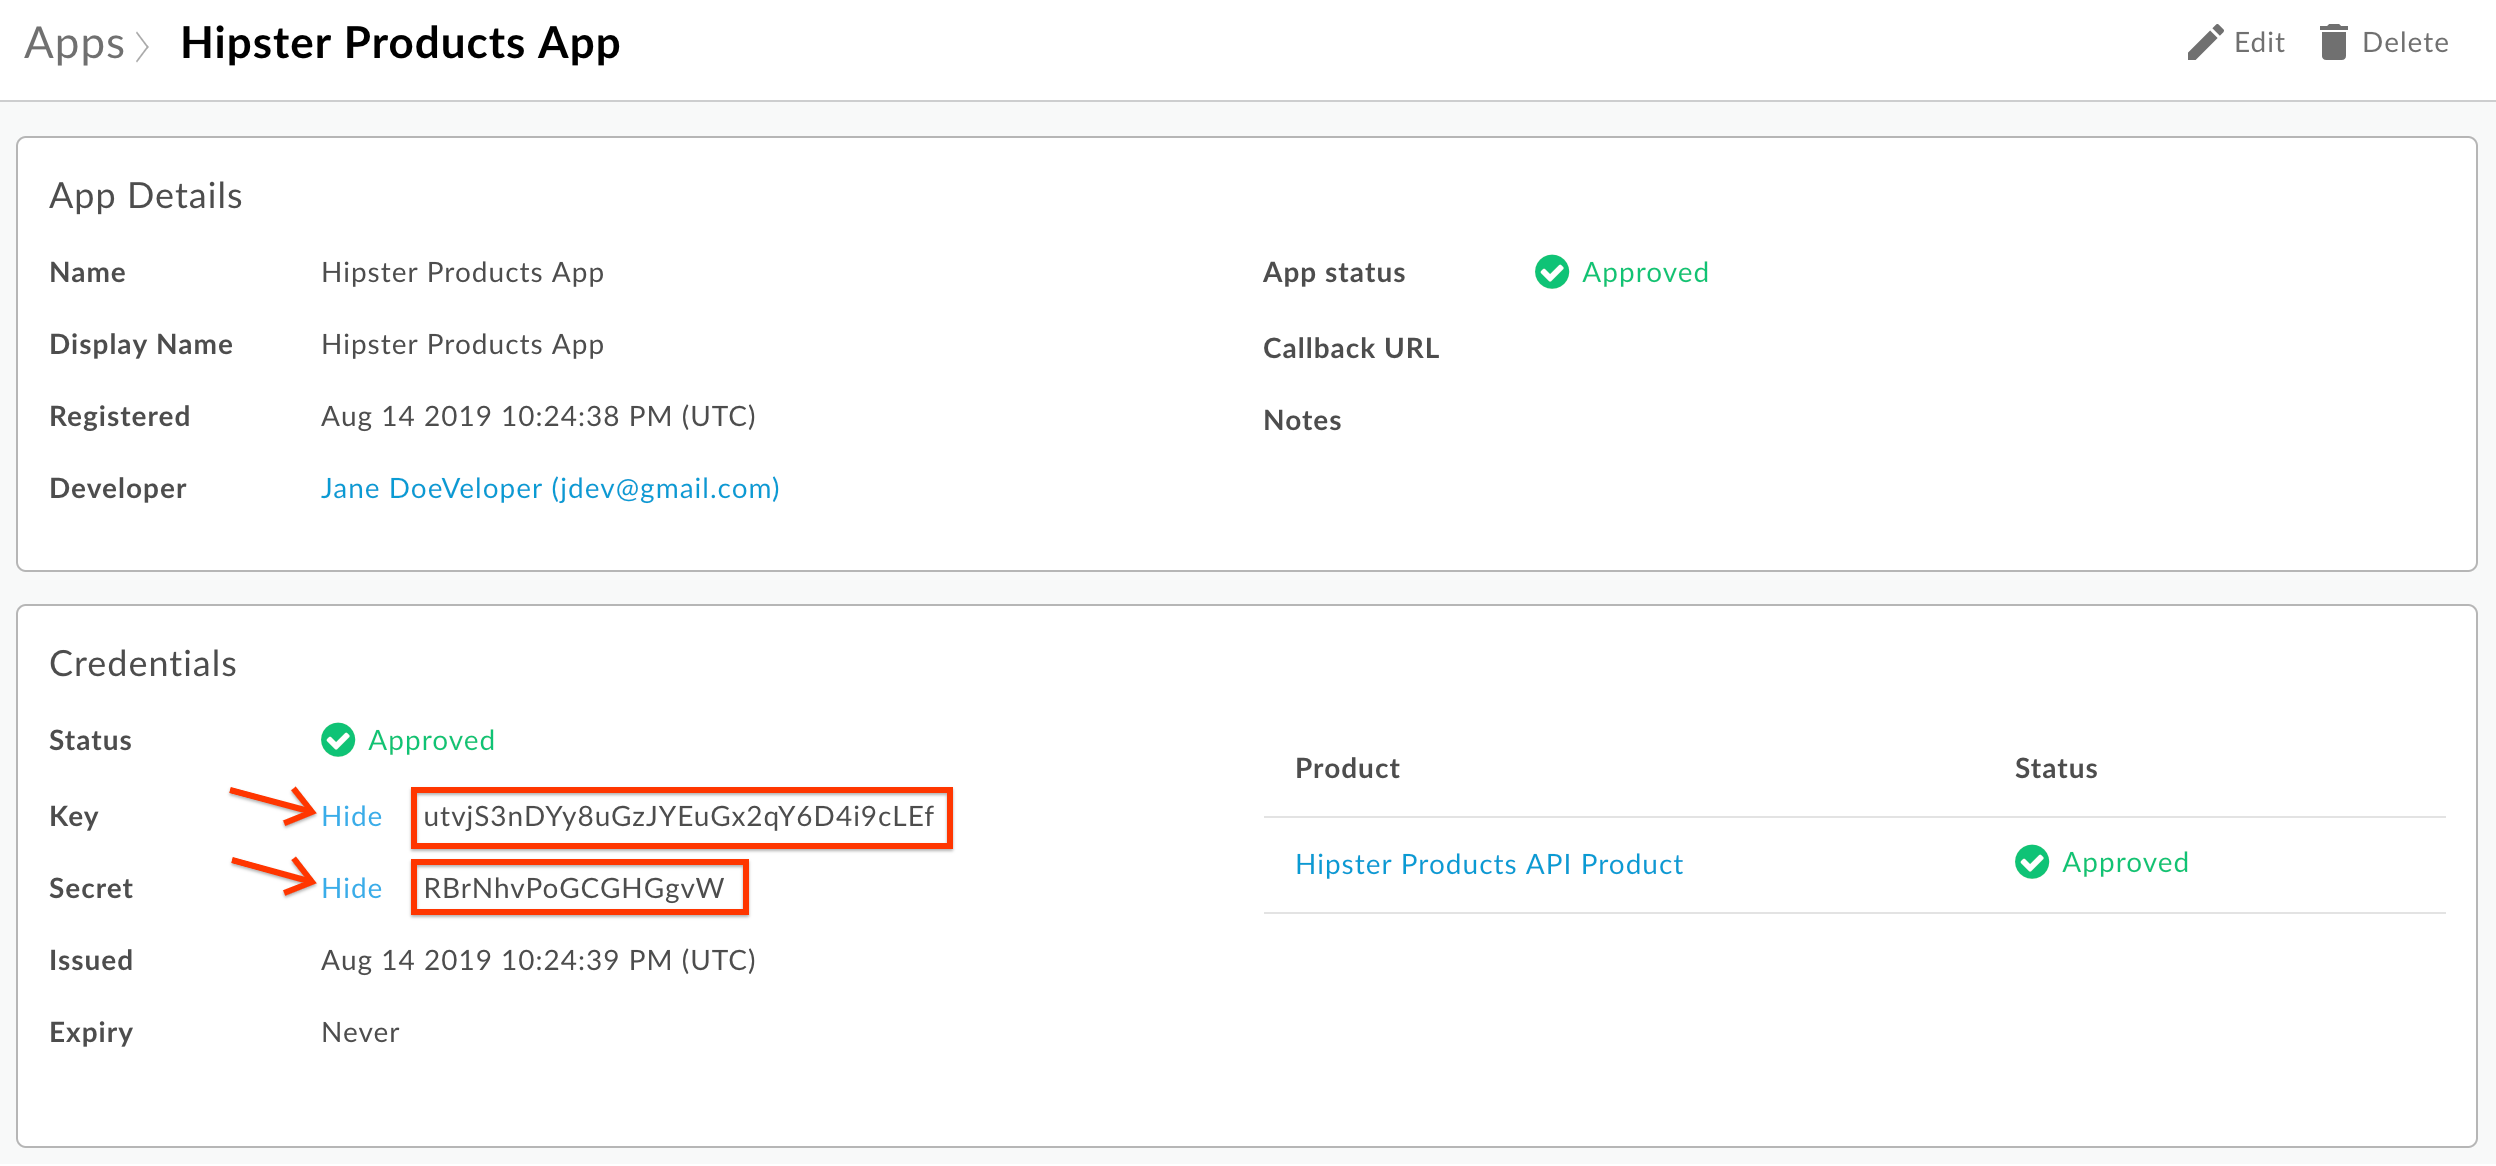
- Click the “Show/Hide” buttons next to the Key and Secret fields. Make a note of the Key and Secret values. These are the client credentials you will need to obtain an OAuth access token:
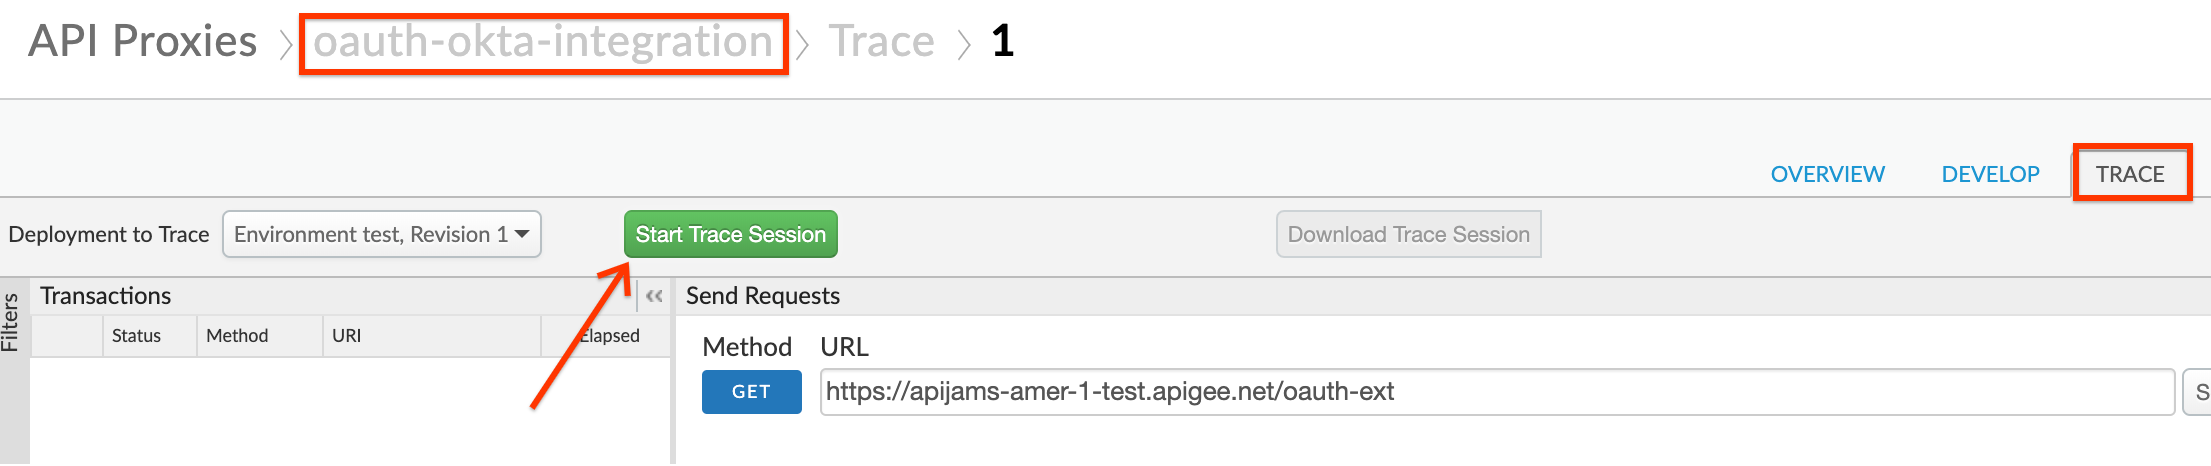
- (Optional) Navigate to the Trace tab on the oauth-okta-integration proxy and start a trace session:
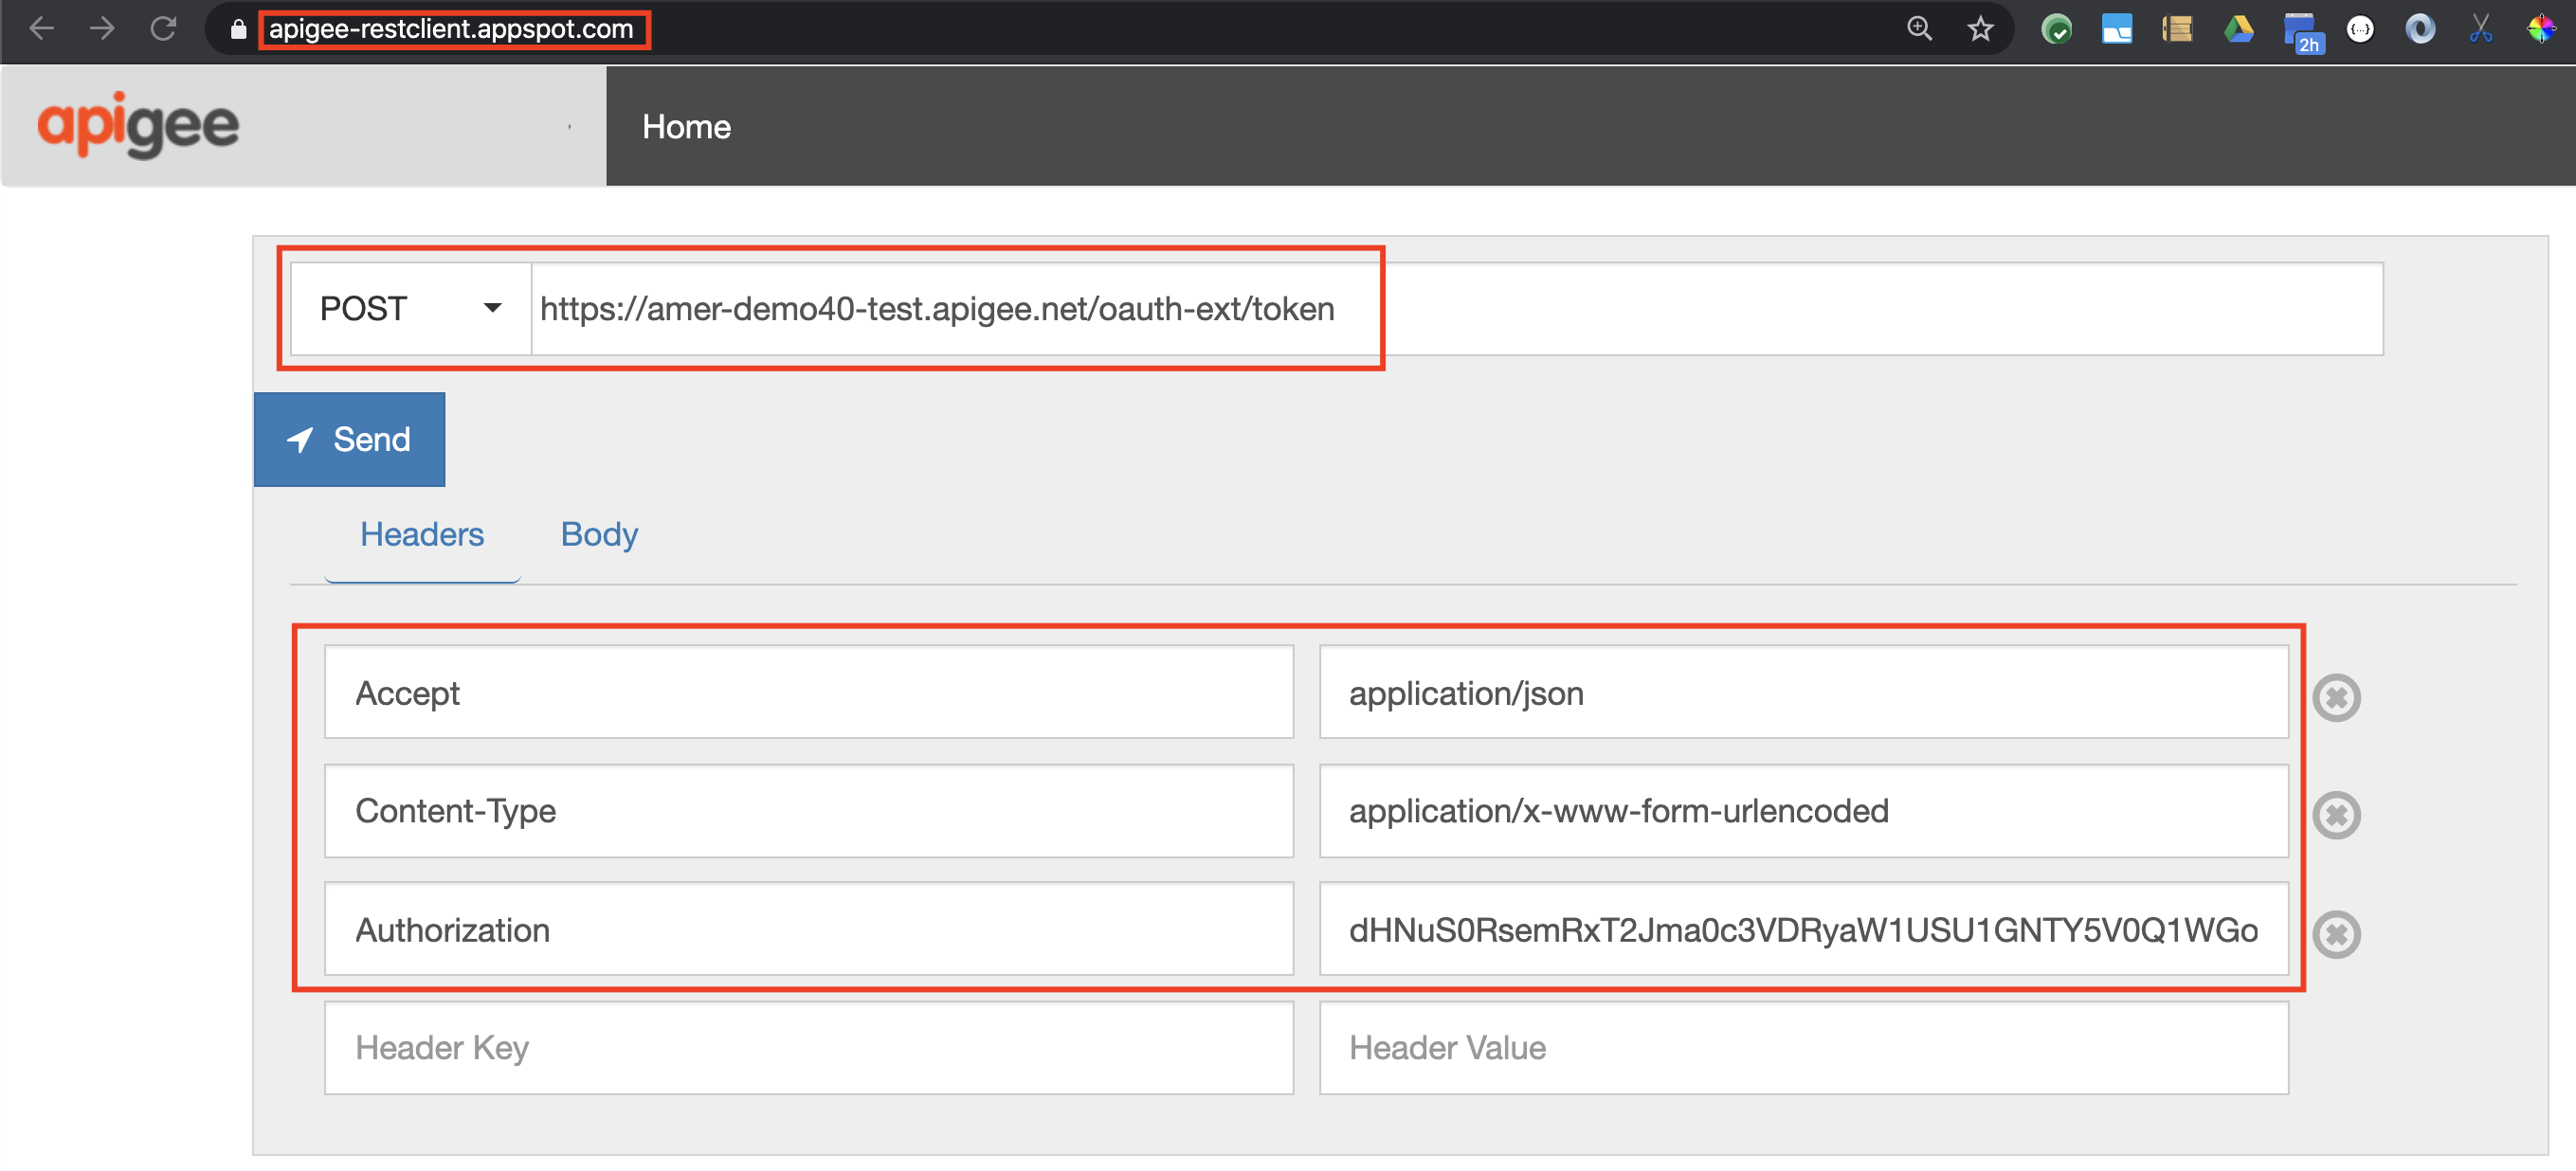
- Send the following token generation request to the access token endpoint, using a terminal or a REST client:
POST /oauth-ext/token HTTP/1.1
Host: -.apigee.net
Content-Type: application/x-www-form-urlencoded
Accept: application/json
Authorization:
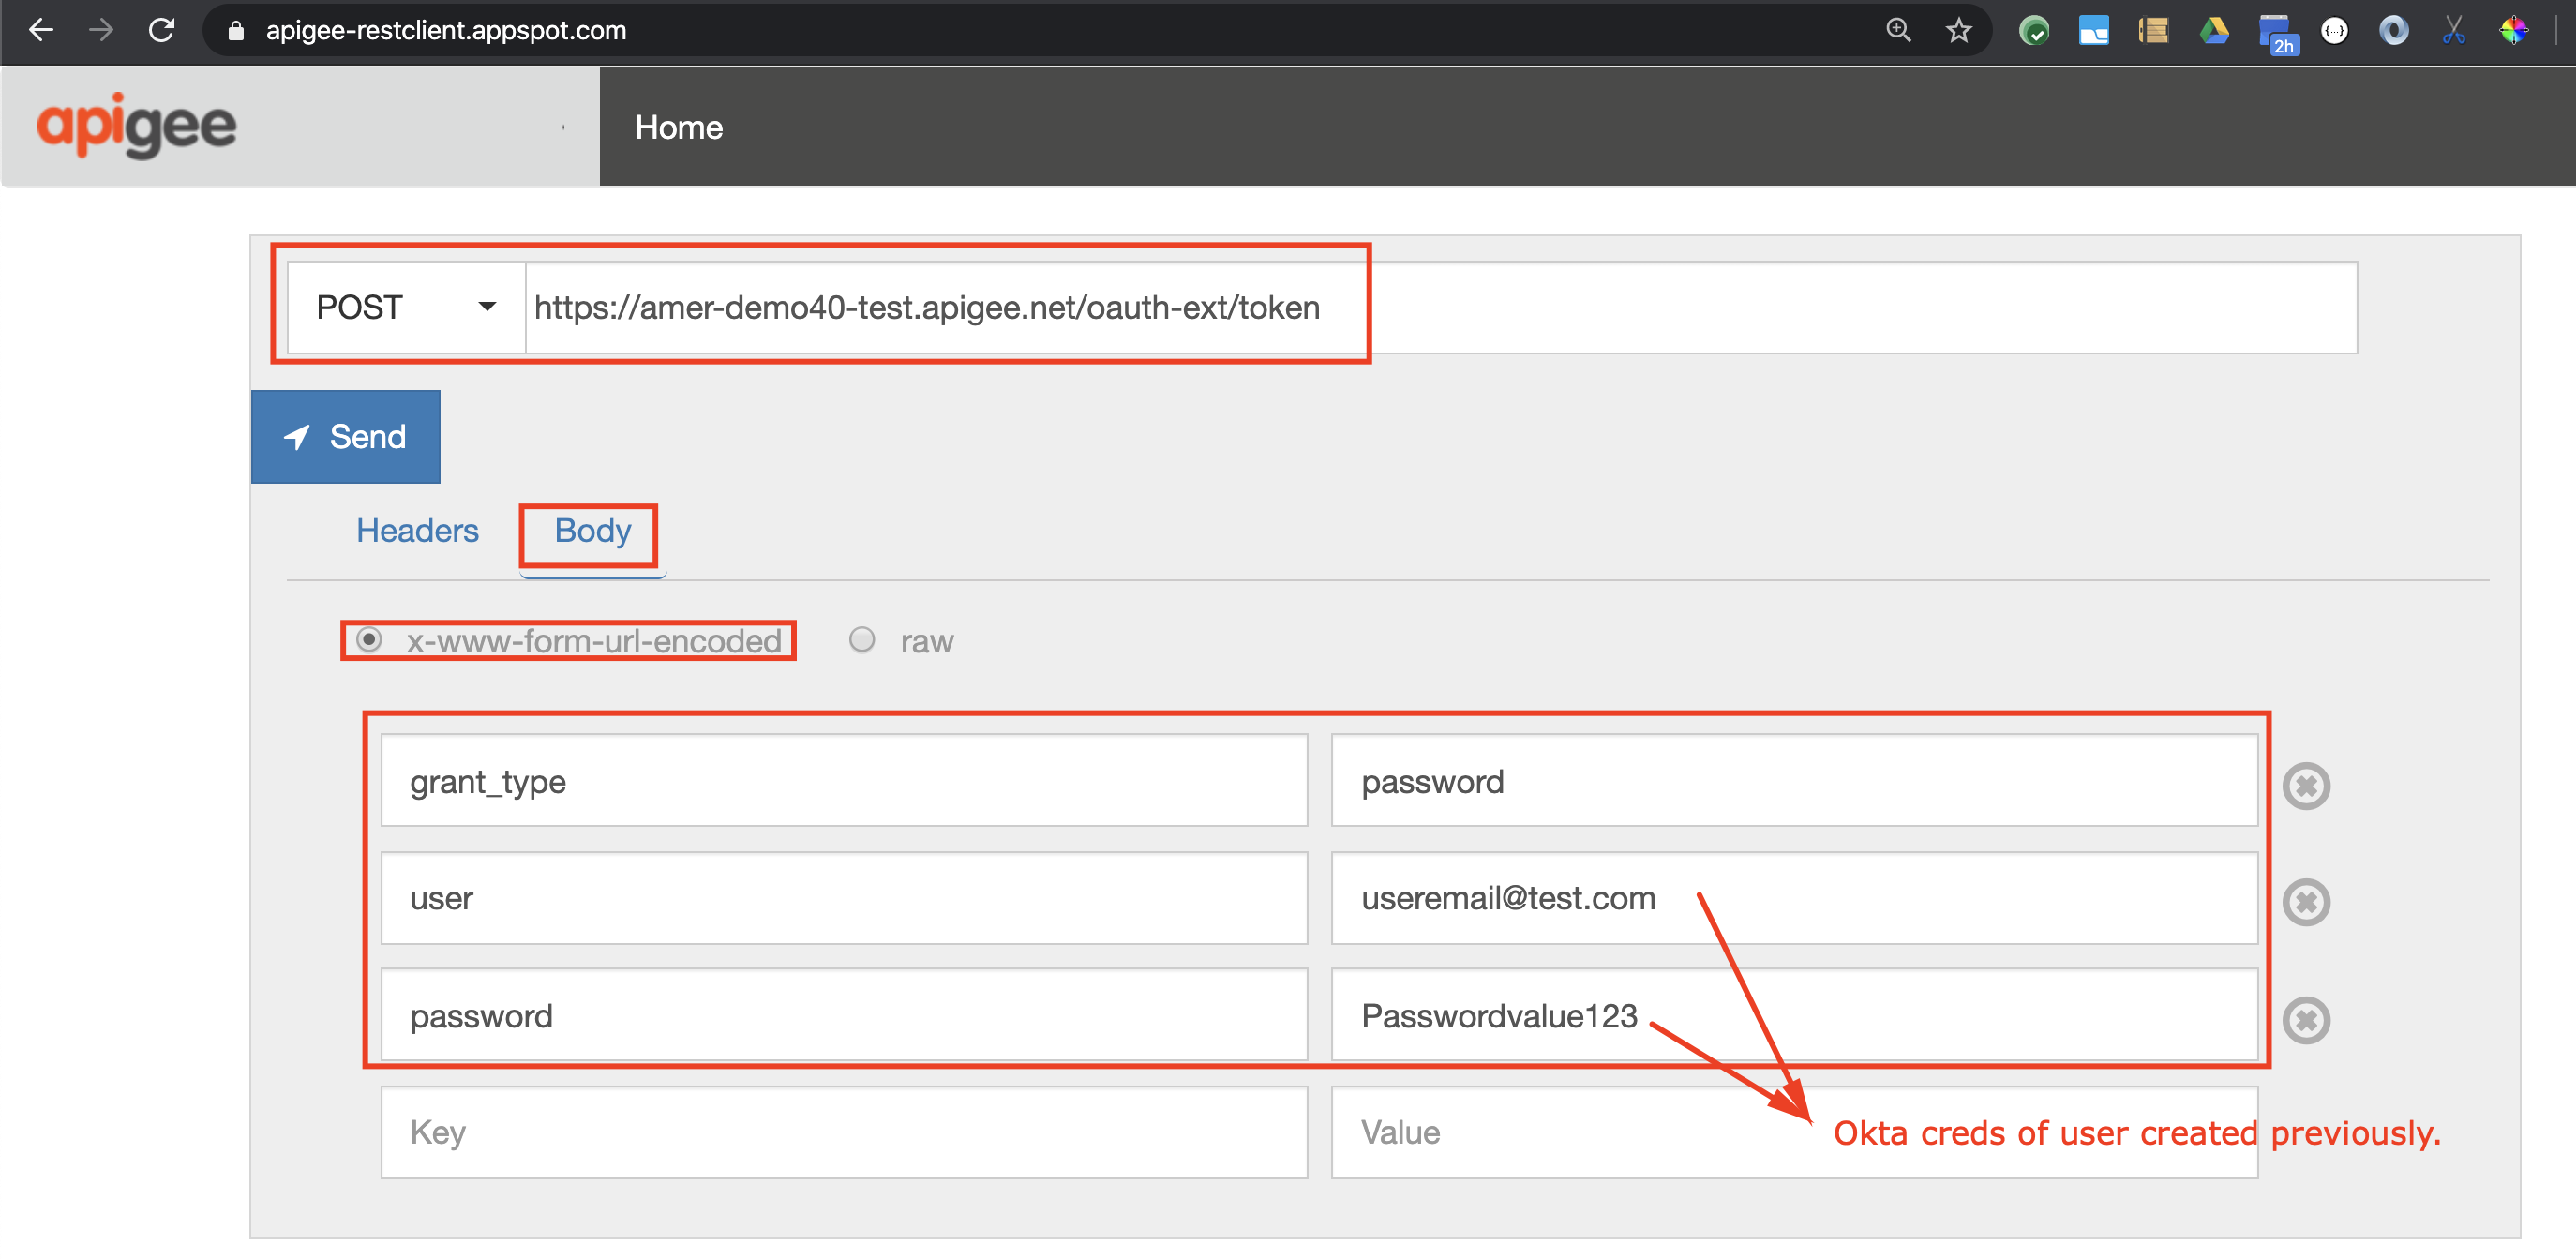
grant_type=password&user=&password=
-
Replace with your actual Apigee org name, and with the deployment environment for your proxy (eg. test)
-
To obtain a base64 encoded value of ‘Key:Secret’, you can utilize an open tool like G Suite Toolbox:
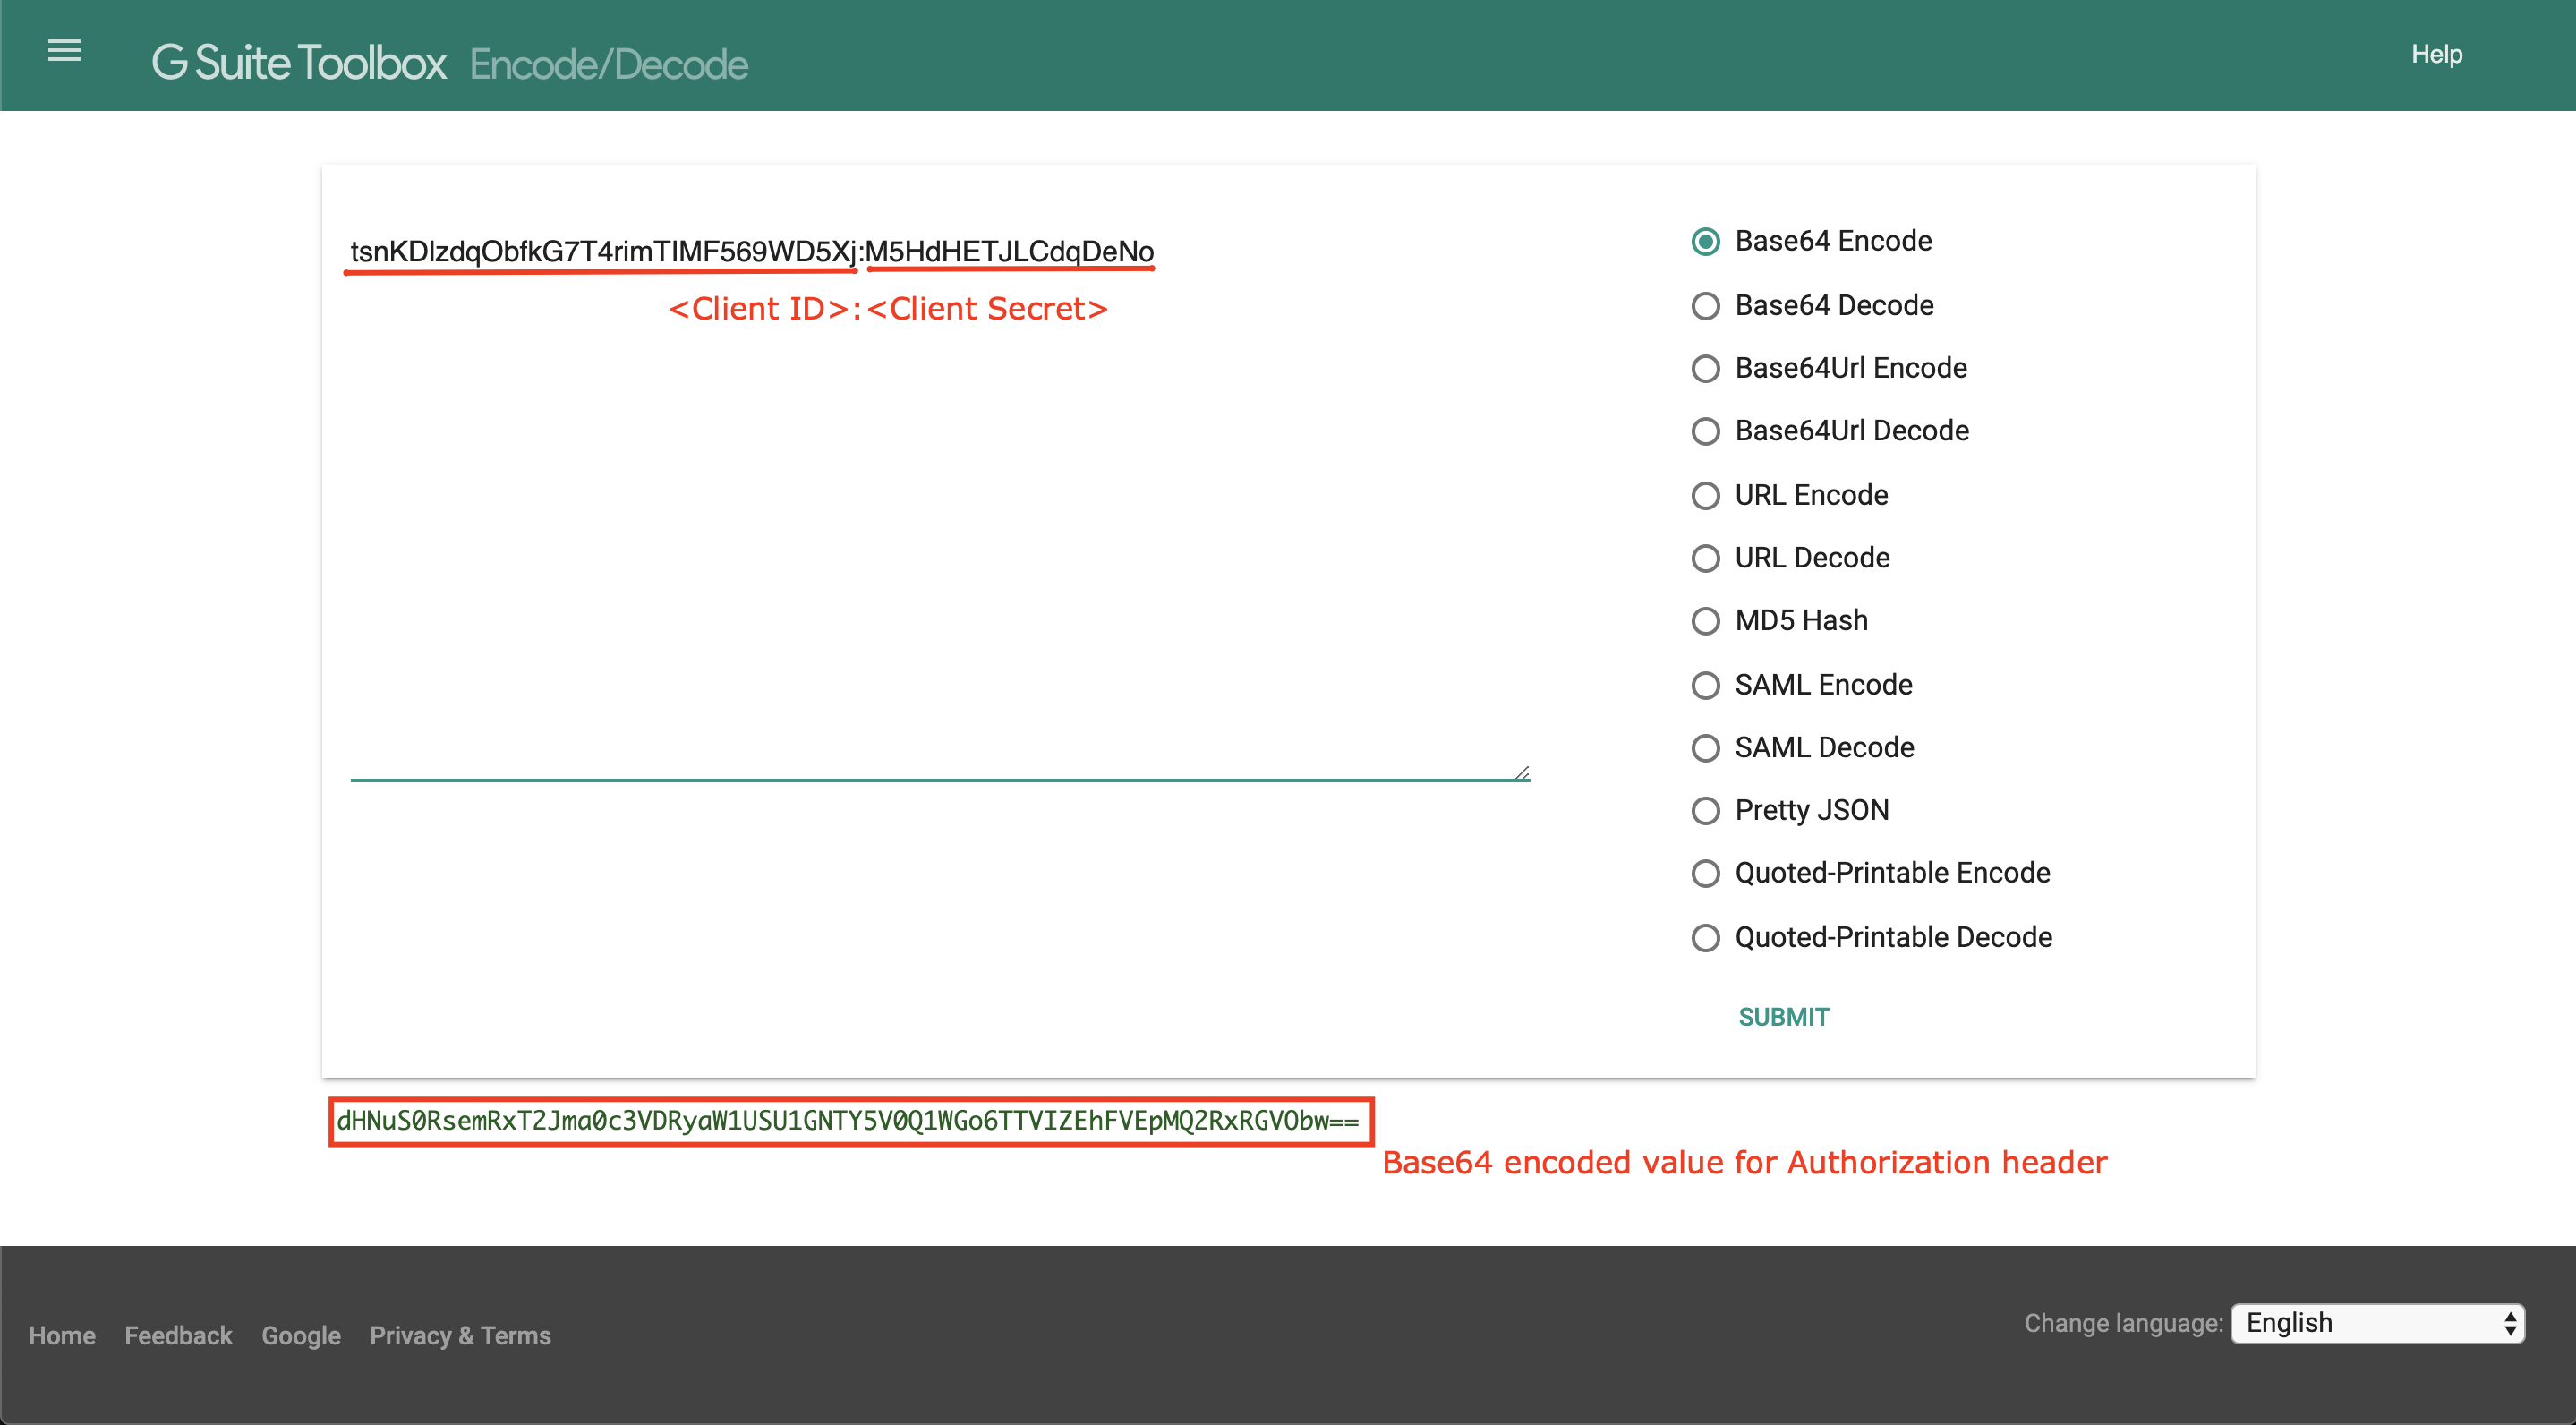
- Replace and with the values you used to add the app end user to Okta
Example curl command (replace with values as described above):
curl -X POST -H "Accept:application/json" \
-H "Content-Type:application/x-www-form-urlencoded" \
-H "Authorization:" \
-d 'grant_type=password&user=&password=' \
"https://-.apigee.net/oauth-ext/token"
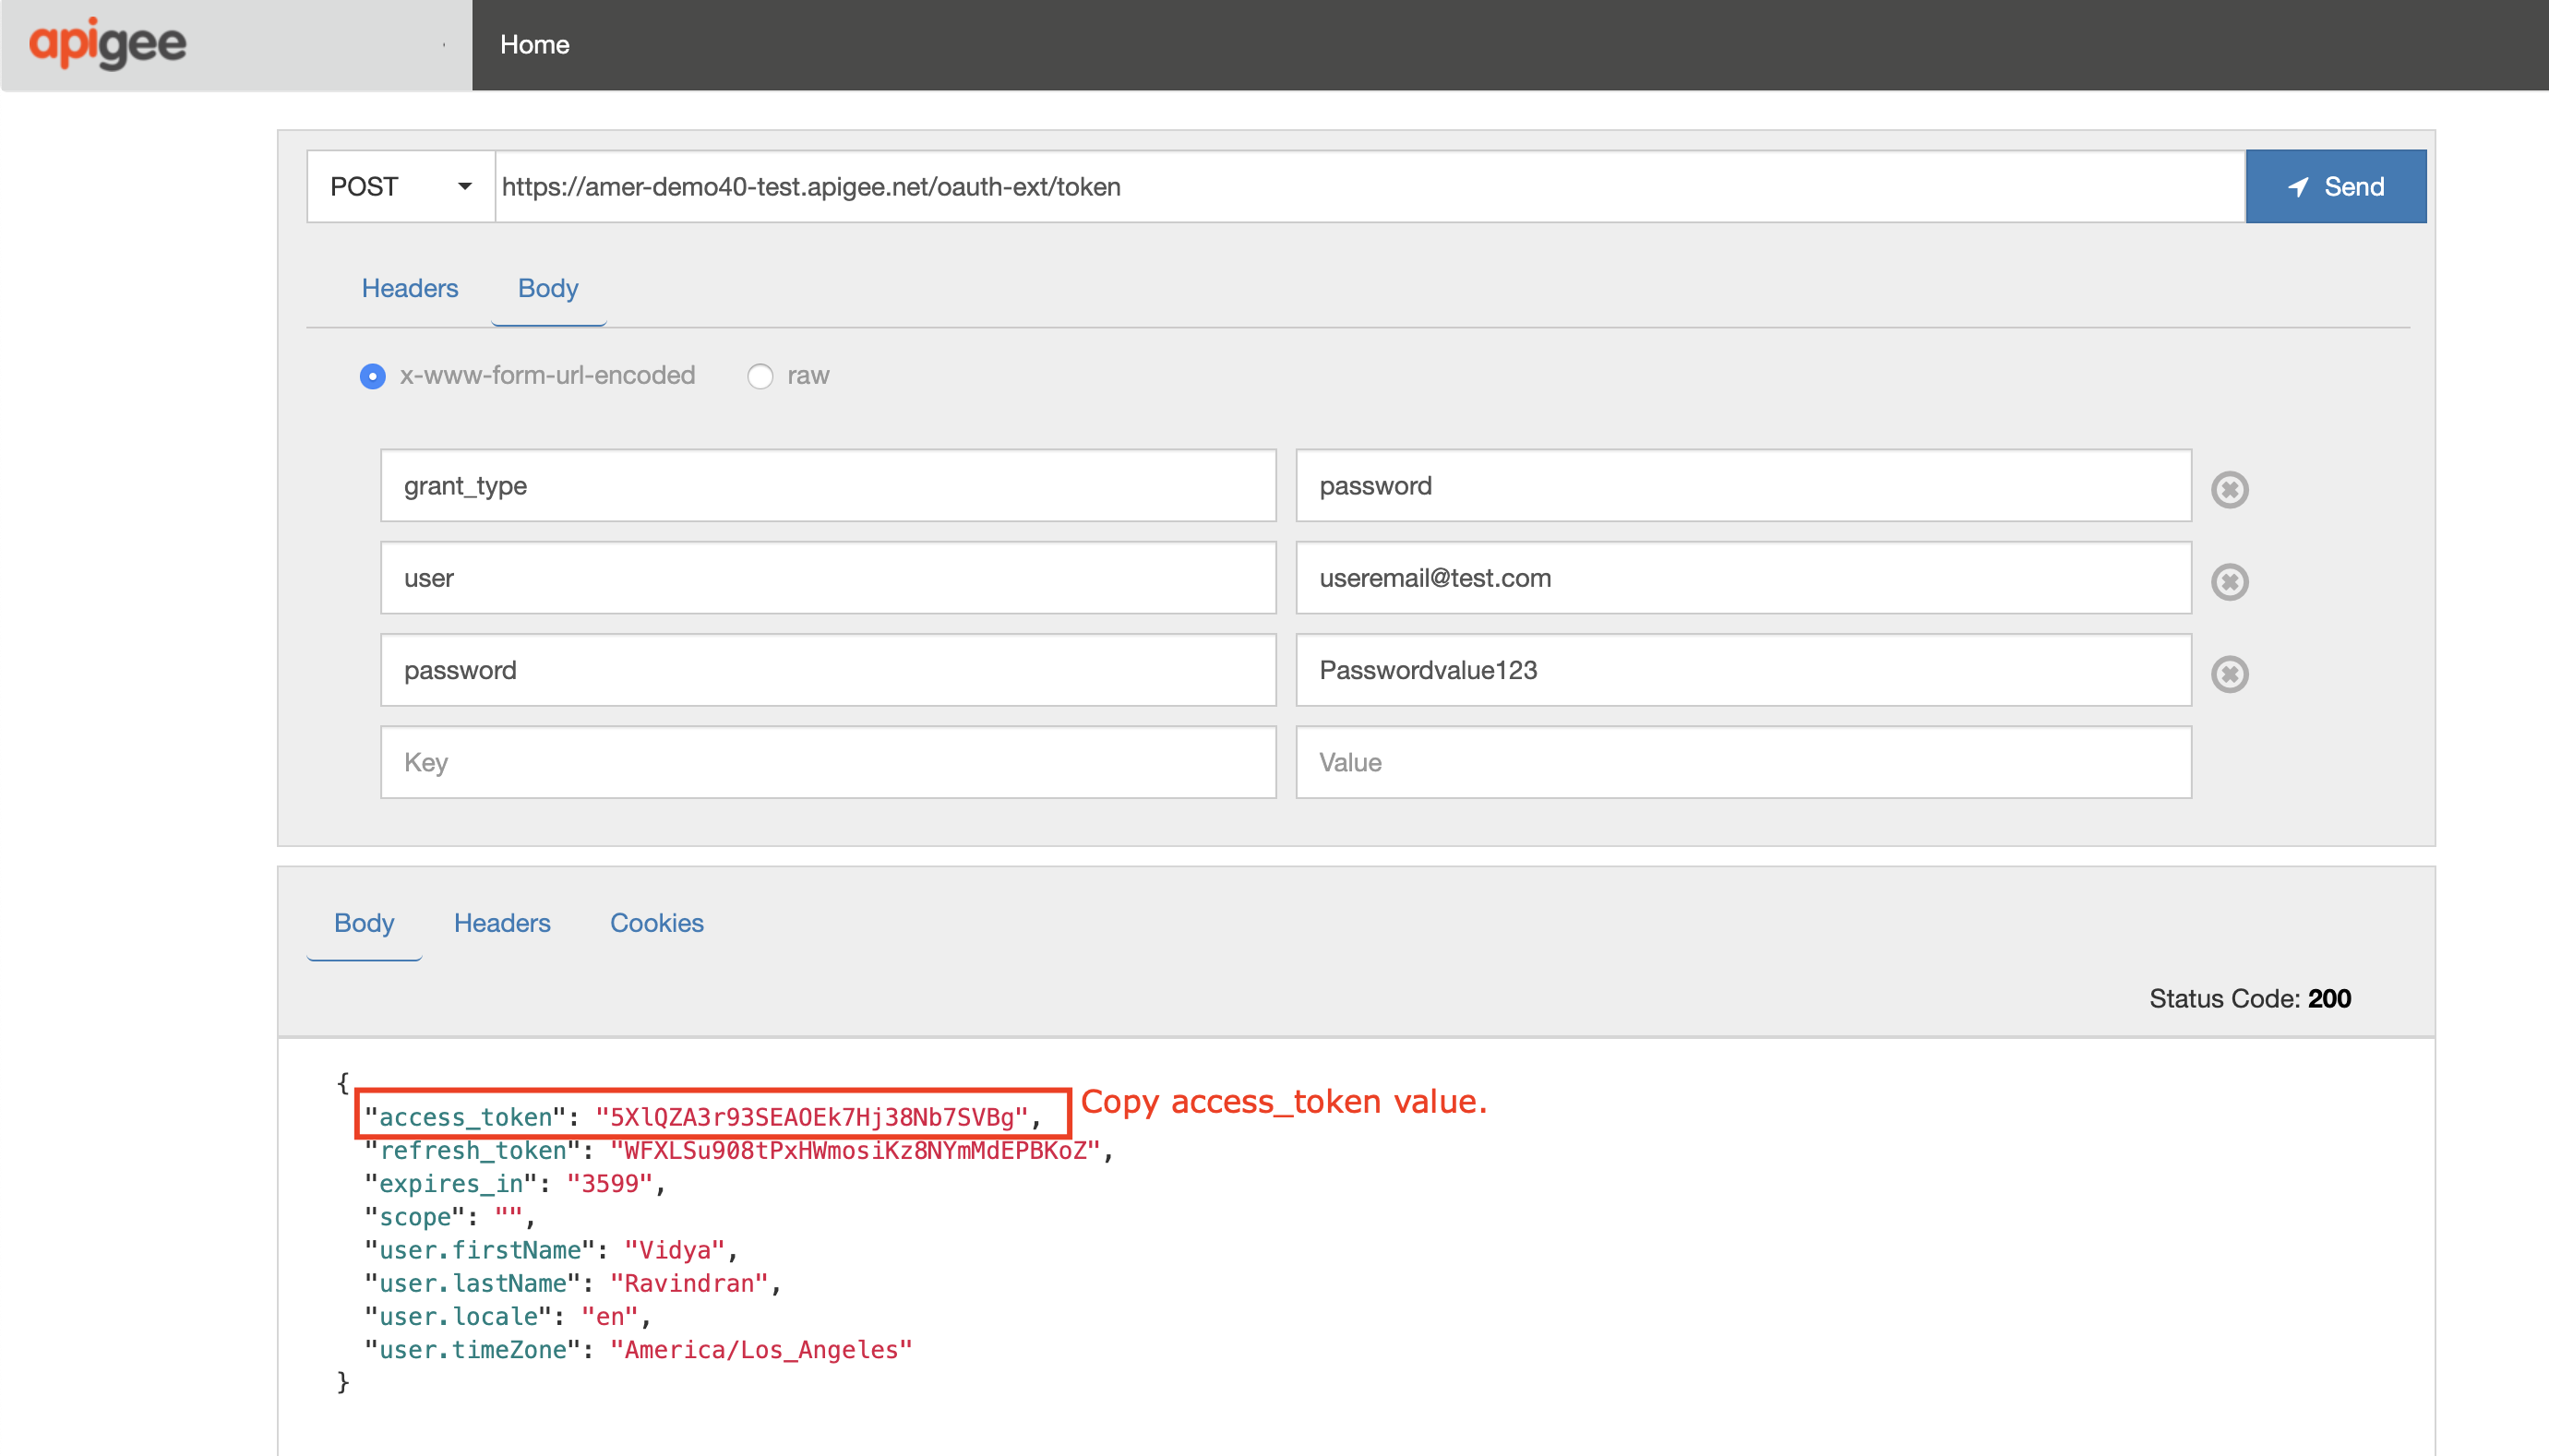
You should now have an OAuth access token returned in the body of the HTTP response. Copy the value of access_token (not including the surrounding quotes) as you will need it for the next step.
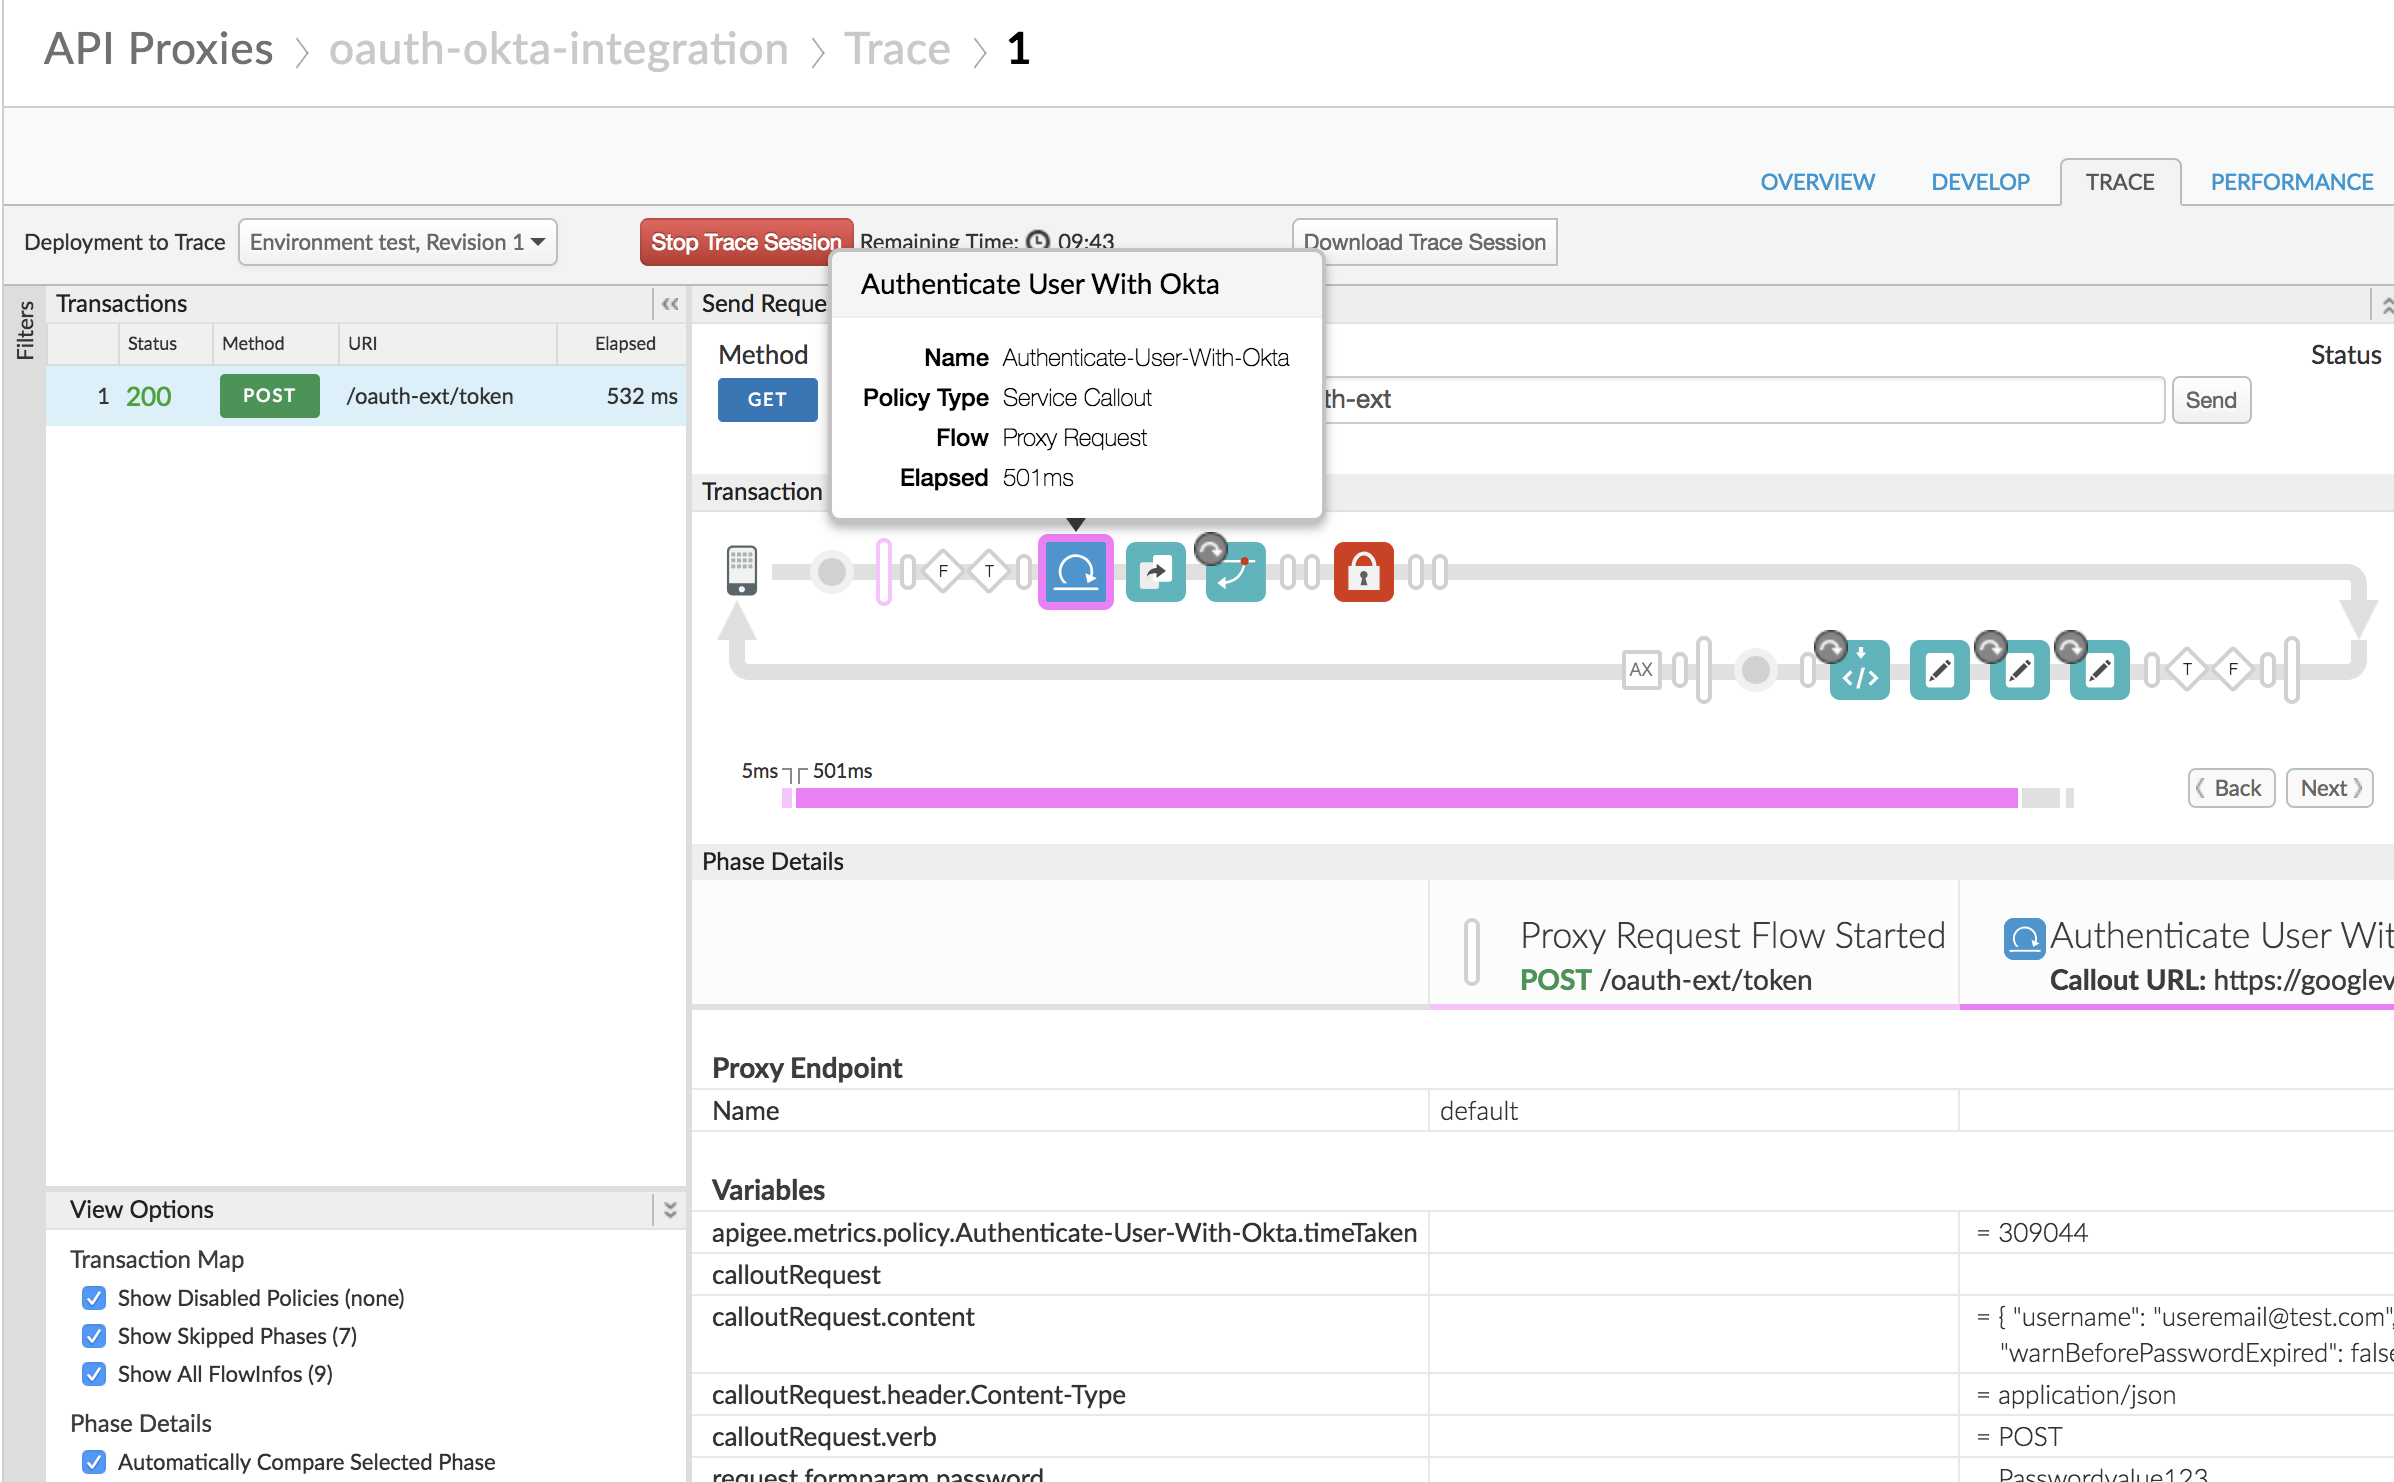
Also, note in the trace session that the Service Callout policy in the oauth-okta-integration proxy is called to validate the end user identity in Okta. Upon successful authentication, the proxy then uses the OAuthV2 policy to generate the access token:
-
Now, let us test the {yourinitials}_Hipster-Products-API proxy which we protected with the OAuthV2 policy back in Module-2a lab 2.
-
(Optional) Navigate to the Trace screen of the {yourinitials}_Hipster-Products-API proxy, and start a trace session:

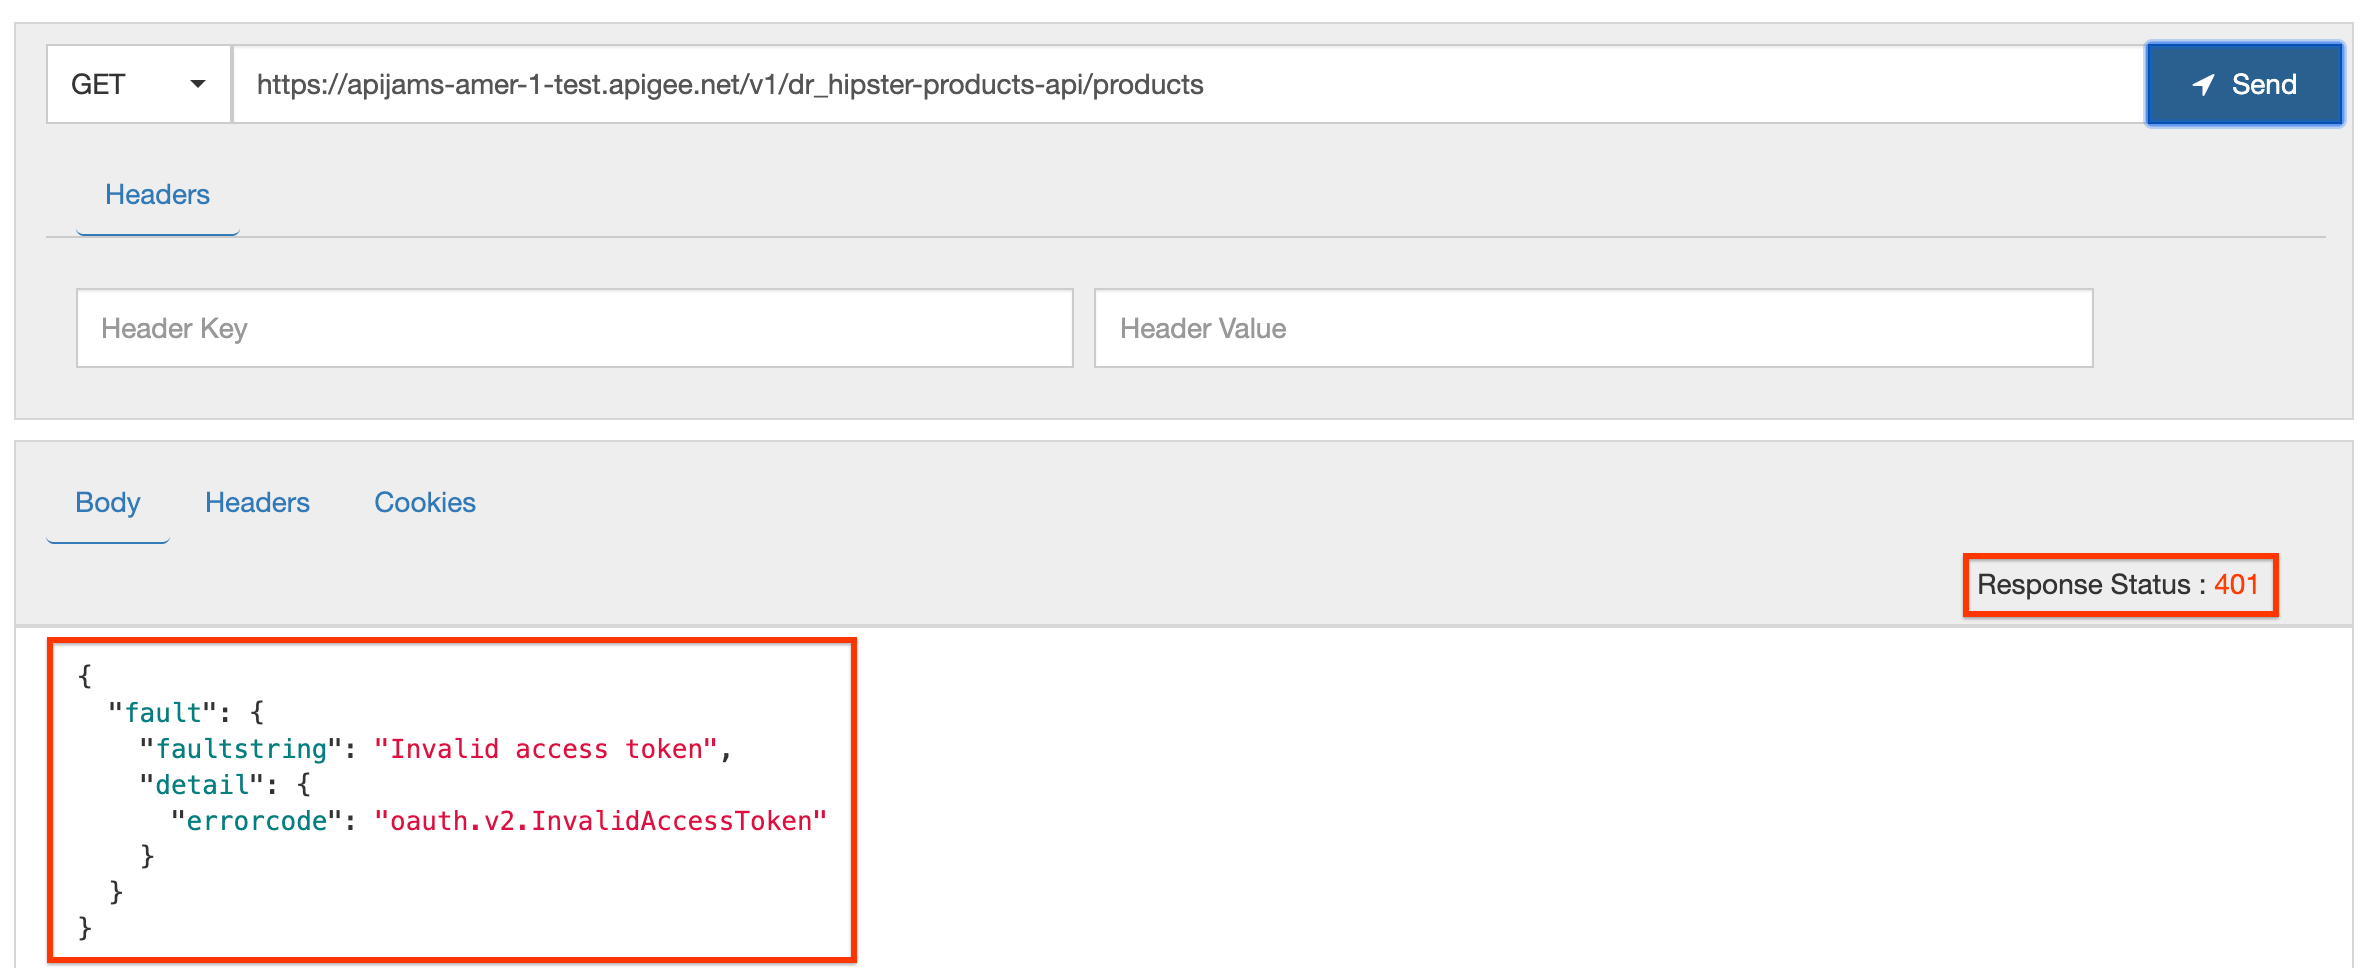
- Send in a GET request to the
/productsendpoint without an Authorization header:
GET /v1/_hipster-products-api/products HTTP/1.1
Host: -.apigee.net
-
Replace with the initials you used when creating the proxy
-
Replace with your actual Apigee org name, and with the deployment environment for your proxy (eg. test)
Notice a 401 unauthorized error response is returned because the access token was not sent in the request:
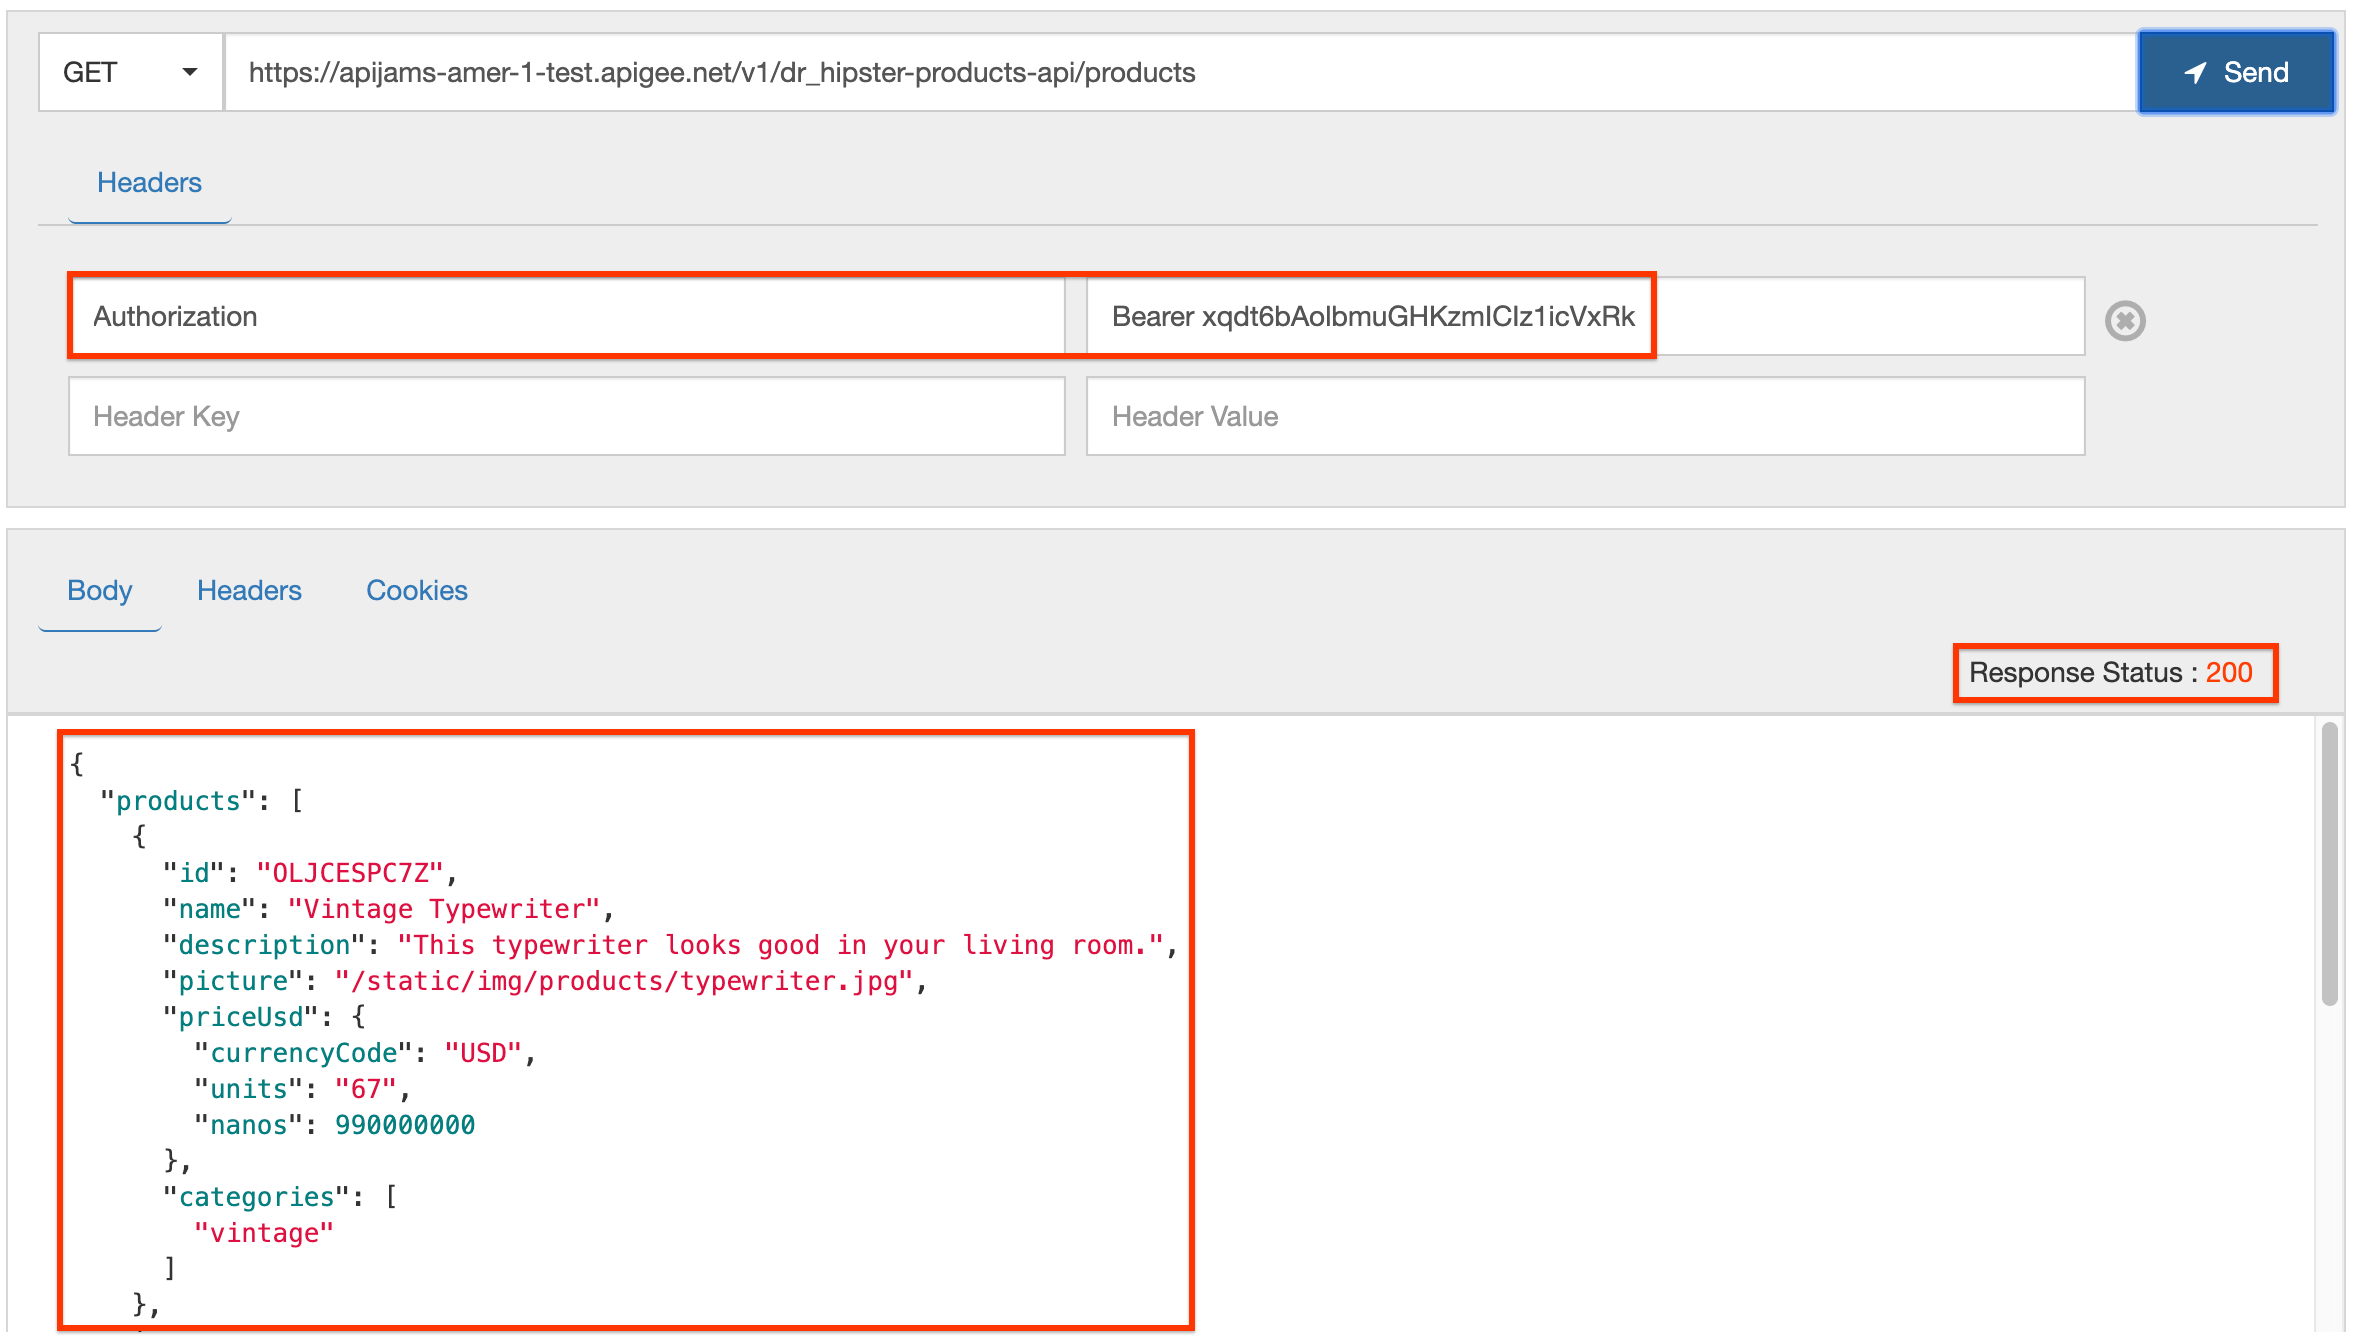
- Now send the same request, this time adding the access token in the Authorization header:
GET /v1/_hipster-products-api/products HTTP/1.1
Host: -.apigee.net
Authorization: Bearer
- Add a header named Authorization, and in the value field enter Bearer followed by the
access_tokenvalue you copied from the request to the oauth-okta-integration endpoint
Once the access token is validated, a successful API response is returned:
Lab Video
If you like to learn by watching, here is a short video on the topic: Apigee/Okta Integration: Resource Owner / Password Grant Flow in Action
Earn Extra points
- Try out the Okta integration proxy using a delegated token generation flow where Okta mints the OAuth access token instead of Apigee, as documented here:
- Also see the advanced example for Open ID Connect with Okta, as documented here.
Summary
In this lab, you created an OAuth 2.0 access token endpoint to generate and refresh tokens using the resource owner password credentials (ROPC) grant type, validating end user credentials against an external identity provider (Okta). You also secured your API such that a valid token must be presented to authorize requests to your API.